Showing posts with label oracle fusion applications. Show all posts

Updating Customer Site Profile Classes using SOAP Web Services in Oracle Fusion Applications

First off, there are two ways to upload/update Customer Site Profiles in Oracle Fusion Applications:
  1. Using File-Based Data Import (FBDI)
  2. Using Web Services such as SOAP and REST. 
However, I would recommend using Web Services instead of FBDI because it's more straight-forward and simpler than FBDI. More details can be found in a separate article: When to Use FBDI or WebServices in Oracle Fusion Applications.

This article will talk about how to upload/update Customer Site Profile Classes in Oracle Fusion Applications using SOAP web services and in the future, I will also discuss how to do this using FBDI.

Before we begin, let's first discuss what a Customer Profile Class is. Customer profile Class is a master data setup object that holds attributes that are important to the interaction between the organization and customers in terms of their selling relationship. It holds details such as the Customer's creditworthiness, credit tolerance, credit limit, its default payment terms, statement configurations, and its assigned collector.  A Customer Profile class is also used drive how the system will match receipts together with their invoices and defines how invoices are grouped together. For more in-depth information, check out a separate article: Defining a Customer Profile Class in Oracle Fusion Applications.

Below are some prerequisites before you can actually upload/update Customer Site Profiles using SOAP Web Services:
  1. Download a copy of ReadyAPI, a software that will drive the updates to Customer Site Profiles
  2. Prepare an "Extraction Report" that will generate the spreadsheet with the required Customer Data.
Since the first prerequisite is pretty straight forward, we'll move on to discuss the second prerequisite: Preparing the "Extraction Report". The script will be run from Business Intelligence Publisher (BIP), a reporting tool that we'll utilize to generate the actual data that will be fed to the Web Service.

To create the extraction report, you would have to create the following in order:
  1. A custom Data Model that contains the SQL Script
  2. A custom Report with CSV as the Output
  3. A custom "dummy" Excel Template
Check out this article for an idea on how to create a custom Data Model (Customize the Data Models of seeded Oracle Fusion Applications reports). In the future, i'll create a step-by-step guide on how to create a custom data model, report and dummy excel template.

The SQL Script to be used in the Data Model is as follows:


 1
 2
 3
 4
 5
 6
 7
 8
 9
10
11
12
13
14
15
16
17
18
19
20
21
22
23
24
25
26
27
28
29
30
31
32
33
34
35
36
37
38
39
40
41
42
43
44
45
46
47
48
49
50
51
52
53
54
55
56
57
58
59
60
61
62
63
64
65
66
67
68
69
70
71
72
73
74
select  ACCT.ACCOUNT_NUMBER
 , hps.party_site_number
 , ACCT.CUST_ACCOUNT_ID
 --, 'DEFAULT' SET_CODE
 , STID.SET_CODE
 , custprof.CLEARING_DAYS
 , custprof.CREDIT_BALANCE_STATEMENTS
 , custprof.CREDIT_CHECKING
 , custprof.CREDIT_HOLD
 , custprof.PROFILE_CLASS_ID
 , decode(custprof.DISCOUNT_TERMS, 'N', NULL, custprof.DISCOUNT_GRACE_DAYS) DISCOUNT_GRACE_DAYS
 , custprof.DISCOUNT_TERMS
 , 'Y' DUNNING_LETTERS
 , custprof.EFFECTIVE_START_DATE
 , custprof.EFFECTIVE_END_DATE
 , custprof.LAST_CREDIT_REVIEW_DATE
 , custprof.NEXT_CREDIT_REVIEW_DATE
 , custprof.OVERRIDE_TERMS
 , HP.PARTY_ID
 , custprof.PERCENT_COLLECTABLE
 , custprof.SEND_STATEMENTS
 , custprof.TOLERANCE
 , coll.NAME CollectorName
 , custprof.EXCHANGE_RATE_TYPE
 , RTM.name  PaymentTerms
 , custprof.AUTOCASH_HIERARCHY_ID
 , null ApplicationExceptionRuleSet
 , aar.Name AutoMatchRuleSet
 , custprof.AUTOCASH_HIERARCHY_ID_FOR_ADR
 , cyc.NAME StatementCycle
 , grp.name GroupingRule
 , custprof.CREDIT_CLASSIFICATION
 , custprof.ACCOUNT_STATUS
 , custprof.RISK_CODE
 , custprof.CREDIT_RATING
 , custprof.CONS_BILL_LEVEL
 , custprof.CONS_INV_TYPE
 , custprof.LOCKBOX_MATCHING_OPTION
 , replace(custprof.PREF_CONTACT_METHOD, 'EMAIL', 'E-Mail') PREF_CONTACT_METHOD
 , replace(custprof.TXN_DELIVERY_METHOD, 'EMAIL', 'E-Mail') TXN_DELIVERY_METHOD
 , custprof.PRINTING_OPTION_CODE
 , custprof.MATCH_BY_AUTOUPDATE_FLAG
 , custprof.AUTO_REC_INCL_DISPUTED_FLAG
 , custprof.CONS_INV_FLAG
 , NULL CREDIT_REVIEW_CYCLE
 , custprof.CREDIT_ANALYST_ID
 , custprof.CREDIT_LIMIT
 , custprof.CREDIT_CURRENCY_CODE
 , replace(custprof.STMT_DELIVERY_METHOD, 'EMAIL', 'E-Mail') STMT_DELIVERY_METHOD
 , custprof.ORDER_AMOUNT_LIMIT
from  HZ_PARTIES      hp
JOIN  HZ_PARTY_SITES     hps   on HPS.PARTY_ID     = HP.PARTY_ID
JOIN  HZ_CUST_ACCOUNTS   ACCT  on ACCT.PARTY_ID     = HP.PARTY_ID
JOIN  HZ_CUST_ACCT_SITES_ALL  ACTS  ON (ACTS.CUST_ACCOUNT_ID    = ACCT.CUST_ACCOUNT_ID
           AND  HPS.party_site_id     = ACTS.party_site_id)
JOIN  HZ_CUSTOMER_PROFILES_F   custprof ON (hp.party_id             = custprof.party_id
           AND  ACCT.CUST_ACCOUNT_ID    = custprof.CUST_ACCOUNT_ID)
join  HZ_CUST_SITE_USES_ALL  usg   ON (usg.SITE_USE_ID          = custprof.SITE_USE_ID
           and usg.CUST_ACCT_SITE_ID    = ACTS.CUST_ACCT_SITE_ID)
JOIN  HZ_CUST_PROFILE_CLASSES  class  ON (custprof.PROFILE_CLASS_ID = class.PROFILE_CLASS_ID)
JOIN  FND_SETID_SETS    STId  ON (STID.SET_ID       = ACTS.SET_ID)
join  AR_COLLECTORS    coll  on (coll.collector_id     = custprof.COLLECTOR_ID)
join  AR_STATEMENT_CYCLES   cyc   on (cyc.statement_cycle_id   = custprof.STATEMENT_CYCLE_ID)
join  RA_GROUPING_RULES   grp   on (custprof.GROUPING_RULE_ID = grp.GROUPING_RULE_ID)
JOIN  RA_TERMS      RTM   ON  (custprof.STANDARD_TERMS = rtm.TERM_ID)
left JOIN AR_AUTOMATCH_RULES  aar   on (custprof.AUTOMATCH_RULE_ID = aar.AUTOMATCH_RULE_ID)
where custprof.status      = 'A'
and  class.status       = 'A'
AND  ACTS.STATUS       = 'A'
and  hp.party_type       = 'ORGANIZATION'
AND  hp.status           = 'A'
and  custprof.site_use_id is not null
and  sysdate between custprof.EFFECTIVE_START_DATE and custprof.EFFECTIVE_END_DATE
and  class.NAME = 'DEFAULT'

This is the script I used to capture all the required information for the WebService Payload that will  update the Customer Site Profile Classes. Feel free to change it according to your Organization's requirements.

Next, open up ReadyAPI and create a new SOAP project and provide the Web Services Description/Definition Language (WSDL) for your Instance. Next, load the Spreadsheet generated from the Report and assign it as a Data Source for the XML Payload below:


 1
 2
 3
 4
 5
 6
 7
 8
 9
10
11
12
13
14
15
16
17
18
19
20
21
22
23
24
25
26
27
28
29
30
31
32
33
34
35
36
37
38
39
40
41
42
43
44
45
46
47
48
49
50
51
52
53
54
55
56
57
58
<soapenv:Envelope xmlns:soapenv="http://schemas.xmlsoap.org/soap/envelope/" xmlns:typ="http://xmlns.oracle.com/apps/financials/receivables/customers/customerProfileService/types/" xmlns:cus="http://xmlns.oracle.com/apps/financials/receivables/customers/customerProfileService/" xmlns:cus1="http://xmlns.oracle.com/apps/financials/receivables/customerSetup/customerProfiles/model/flex/CustomerProfileDff/" xmlns:cus2="http://xmlns.oracle.com/apps/financials/receivables/customerSetup/customerProfiles/model/flex/CustomerProfileGdf/">
   <soapenv:Header/>
   <soapenv:Body>
      <typ:updateCustomerProfileAsync>
         <typ:customerProfile>
            <cus:AccountNumber>${DataSource#AccountNumber}</cus:AccountNumber>
            <cus:SiteNumber>${DataSource#SiteNumber}</cus:SiteNumber>
            <cus:CustomerAccountId>${DataSource#CustomerAccountId}</cus:CustomerAccountId>
            <cus:ProfileClassName>${DataSource#ProfileClassName}</cus:ProfileClassName>
            <cus:ClearingDays/>
            <cus:CreditBalanceStatements>${DataSource#CreditBalanceStatements}</cus:CreditBalanceStatements>
            <cus:CreditChecking>${DataSource#CreditChecking}</cus:CreditChecking>
            <cus:CreditHold>${DataSource#CreditHold}</cus:CreditHold>
            <cus:CustomerAccountProfileId>${DataSource#CustomerAccountProfileId}</cus:CustomerAccountProfileId>
            <cus:DiscountGraceDays/>
            <cus:DiscountTerms>${DataSource#DiscountTerms}</cus:DiscountTerms>
            <cus:DunningLetters>${DataSource#DunningLetters}</cus:DunningLetters>
            <cus:EffectiveEndDate>${DataSource#EffectiveEndDate}</cus:EffectiveEndDate>
            <cus:EffectiveStartDate>${DataSource#EffectiveStartDate}</cus:EffectiveStartDate>
            <cus:LastCreditReviewDate/>
            <cus:NextCreditReviewDate/>
            <cus:OverrideTerms>${DataSource#OverrideTerms}</cus:OverrideTerms>
            <cus:PartyId>${DataSource#PartyId}</cus:PartyId>
            <cus:PercentCollectable/>
            <cus:SendStatements>${DataSource#SendStatements}</cus:SendStatements>
            <cus:Tolerance>${DataSource#Tolerance}</cus:Tolerance>
            <cus:CollectorName>${DataSource#CollectorName}</cus:CollectorName>
            <cus:ConversionRateType/>
            <cus:PaymentTerms>${DataSource#PaymentTerms}</cus:PaymentTerms>
            <cus:AutoCashRuleSet/>
            <cus:ApplicationExceptionRuleSet/>
            <cus:AutoMatchRuleSet/>
            <cus:ReminderRuleSet/>
            <cus:StatementCycle>${DataSource#StatementCycle}</cus:StatementCycle>
            <cus:GroupingRule>${DataSource#GroupingRule}</cus:GroupingRule>
            <cus:CreditClassificationValue/>
            <cus:AccountStatusValue/>
            <cus:RiskCodeValue/>
            <cus:CreditRatingValue/>
            <cus:BillLevel/>
            <cus:BillType/>
            <cus:MatchReceiptsBy/>
            <cus:PreferredContactMethod>${DataSource#PreferredContactMethod}</cus:PreferredContactMethod>
            <cus:PreferredDeliveryMethod>${DataSource#PreferredDeliveryMethod}</cus:PreferredDeliveryMethod>
            <cus:GenerateBill/>
            <cus:MatchByAutoupdate/>
            <cus:AutoReceiptsIncludeDisputedItems>${DataSource#AutoReceiptsIncludeDisputedItems}</cus:AutoReceiptsIncludeDisputedItems>
            <cus:ConsolidatedInvoice>${DataSource#ConsolidatedInvoice}</cus:ConsolidatedInvoice>
            <cus:CreditReviewCycleName/>
            <cus:CreditAnalystName/>
            <cus:CreditLimit/>
            <cus:CreditCurrencyCode/>
            <cus:StatementDeliveryMethod>${DataSource#StatementDeliveryMethod}</cus:StatementDeliveryMethod>
            <cus:OrderAmountLimit/>
         </typ:customerProfile>
      </typ:updateCustomerProfileAsync>
   </soapenv:Body>
</soapenv:Envelope>

Provide the Username and Password of the Application User you intend to use to update the Classes. Test out a few customers first one-by-one before doing a full bulk load to ensure you get the correct output.

For more full-detailed Tutorials and Tips, check out #TheOracleProdigy at https://lifeofanoracleprodigy.blogspot.com/
Follow The Oracle Prodigy on Facebook (https://www.facebook.com/theOracleProdigy/) and Twitter (https://twitter.com/D_OracleProdigy)

Overview of Receivables Invoicing Rules in Oracle Fusion Applications

Invoicing Rules are used to determine when to recognize your receivable for invoices that span more than one accounting period. You can only assign one invoicing rule to an invoice. Receivables provides the following invoicing rules:

Bill In Advance: Use this rule to recognize your receivable immediately.
Bill In Arrears: Use this rule if you want to record the receivable at the end of the revenue recognition schedule.

To use Invoicing Rules create an Invoice with the field populated:


After creating your Invoice and assigning an Invoicing Rule, Run Recognize Revenue Program from the Scheduled Processes page. This will create Invoices dated in a future date depending on the Invoicing Rule you have specified.

Also, ensure that the Invoicing Rule setup in Import Information section of "Manage Transaction Sources" task is correctly configured.


For more full-detailed Tutorials and Tips, check out #TheOracleProdigy at https://lifeofanoracleprodigy.blogspot.com/
Follow my other Social Media sites:
Like my Page The Oracle Prodigy on Facebook (https://www.facebook.com/theOracleProdigy/)
Subcribe to my YouTube Channel (https://www.youtube.com/c/OracleNerd)

Overview of Managing Statement Cycles in Oracle Fusion Applications

Statement Cycles are configurations that control the frequency of the sending of Customer Statements in Oracle Fusion Applications.

To navigate to the Manage Statement Cycles screen:
  1. Navigate to the Functional Setup Manager
  2. Select the Financials setup
  3. Select the Receivables functional area
  4. Select the Managing Statement Cycles Task (if it is not shown, select the "All Tasks" selection from the drop-down menu).

Oracle Fusion Applications also allows the modification of existing Cycles and the creation of Custom Statement Cycles


For more full-detailed Tutorials and Tips, check out #TheOracleProdigy at https://lifeofanoracleprodigy.blogspot.com/
Follow The Oracle Prodigy on Facebook (https://www.facebook.com/theOracleProdigy/) and Twitter (https://twitter.com/D_OracleProdigy)

Overview of Managing Receivables Activities in Oracle Fusion Applications

Managing Receivables Activities screen allows your organization to generate accounting for transactions that are not customer invoices, customer credit memos, customer payments, etc. Receivable activities can be used to generate accounting for a refund, a customer discount, an adjustment. This can also be configured from the Rapid implementation Spreadsheet.

To navigate to the Managing Receivables Activities screen:
  1. Navigate to the Functional Setup Manager
  2. Select the Financials setup
  3. Select the Receivables functional area
  4. Select the Managing Receivables Activities Task (if it is not shown, select the "All Tasks" selection from the drop-down menu).


From here, you can see the activities that can be set with default accounts:


For more full-detailed Tutorials and Tips, check out #TheOracleProdigy at https://lifeofanoracleprodigy.blogspot.com/
Follow The Oracle Prodigy on Facebook (https://www.facebook.com/theOracleProdigy/) and Twitter (https://twitter.com/D_OracleProdigy)

Overview of Managing Receivable System Options in Oracle Fusion Applications

The Receivable System Options controls a number of setup and configurations for the Receivables application. Some of these options are:
  1. Default Accounting
  2. Statement Delivery Email Configurations
  3. Transaction Delivery Email Configurations
  4. Customer Grouping Rules
  5. AutoInvoice Configurations
  6. Enabling of Late Charges (detailed article available: Overview of Processing Late Charges for Receivables in Oracle Fusion Applications)
Some of the options in the Receivable System Options are populated by the Rapid Implementation Spreadsheet.

Manage Receivable System Options can be accessed from the Functional Setup Manager using the following navigation:

  1. Go to Setup & Maintenance
  2. select "Financials" as the Setup
  3. choose Receivables as the Functional Area
  4. on the Receivables Tasks, select "Manage Receivable System Options"


The Manage Receivable System Options screen has two tabs: Billing & Revenue / Cash Processing


DSO - Days Sales Outstanding
-> Critical for Collections Module
-> shows how long it takes a customer to pay

AutoInvoice Log File Message Level -> Shows the level of detail the AutoInvoice Log shows (0 - 5??)

Bill Receivable
-> Like a Promissory note
-> not used in the US but used in Europe

For more full-detailed Tutorials and Tips, check out #TheOracleProdigy at https://lifeofanoracleprodigy.blogspot.com/
Follow The Oracle Prodigy on Facebook (https://www.facebook.com/theOracleProdigy/) and Twitter (https://twitter.com/D_OracleProdigy)

Overview of Credit Management in Oracle Fusion Applications

What is Credit Management?

Credit Management provides a comprehensive system for developing and implementing policies that will help evaluate and maintain credit worthiness of customers. It allows Credit Analysts to look at credit-related data that's dictated by various attributes attached to a customer record either at the global account or the account site level. Credit analyst or credit managers can make better informed decisions based on policies tailored to your business needs and market conditions.

Is Credit Management part of Receivables?

Yes, its part of the Receivables Cloud Application as it mainly deals with customers and evaluates their ability to pay on time and their credit scores. Credit Management gets much of its data from the transactions created in Receivables such as aging transactions, overdue payments, etc.

Most of Credit Management's default attributes come from a customer's profile class, such as the customer's assigned credit analyst, credit review cycle, credit currency, order amount limit, credit limit, etc. 

How is Credit Management Used?

A credit analyst or credit manager would want to make sure the organization minimizes the risk of Financial loss by not giving customers a credit limit too big. If the customers are delinquent payers, that means credit analysts or credit managers want to be careful on the type of credit that they provide for those particular customers. Based on multiple data generated from Receivable transactions and uploaded external information (called data points), credit analysts can put Credit Limits on customers.

Which users are responsible for Credit Management?

The Credit Analyst
  • Regularly monitors the credit-worthiness of customers and the customer accounts
  • Assists in the resolution of credit-related issues
  • Reassigns credit folders to other credit analysts if needed
The Credit Manager
  • The credit manager can perform everything an analyst can do, plus more.
  • Perform tasks as part of the "Managed Credit Review" advanced privilege.
  • Has access the case folders of customers and customer accounts and assigned to his or her staff.
  • Has the final approval for a Case Folder decision. 
What are Data Points and How are Credit Limits evaluated?

Data Points are pieces of credit information pertaining to a customer. Data points are categorized depending on what type of data is being used. Sources of Data Points are different for New and Existing customers.

For Existing Customers, Receivables transactions such as Invoices and Receipts automatically generate data points depending on their ability and frequency to pay. It can be the number of past due invoices, bank account average balance, percentage of invoices paid promptly, the total amount of due invoices, etc. If the existing customers have a history of delinquency, they will most likely have a lower credit limit.

For new customers, their Credit Limits would be determined from data points gathered from external sources such as bank and trade references. This data will drive what type of credit limit you place initially for a new customer.

Types of Data Point Categories

Credit Management in Oracle Fusion Applications provides a set of predefined data points in the following categories:

Data Point
Description
Aging
Data related to a customer's open balances
Bank References
Information about a Customer's bank accounts
Billing and Payments
A Customer's transaction and payment history
Business Information and Credit
Data Related to a customer's credit history, both within its own enterprise and with external credit agencies and monitoring services
Collateral
Information about a Customer's collateral as it relates to establishing or requesting credit
Financial Data
Data related to the health of a customer's business, such as profits, losses and cash flow
Guarantors
Information about third parties willing to guarantee customer credit
References
Information about third parties that provide references for the customer
Trade References
Information about third parties in the same trade that provide statements of creditworthiness for the customer
Venture Funding
Information about investment funding for the customer
Additional
additional data points available for user-defined categories and values

Each data point isn't the same. Other Data Points can be more important than others. these are called Data Point Weights.

What are Data Point Weights?

Data point weights indicate the importance of a data point. The higher the weight, the more important the data point is. These data points are then placed into a Credit Case Folder to be reviewed by a Credit Analyst or Credit Manager to form the basis for determining a customer's credit worthiness.

What are Credit Case Folders?

A Credit Case folder is a repository containing data points to be used to conduct a credit review of a customer or customer account. It is like a physical folder where you put documents (data points) about a customer that's relevant for decision-making when it comes to the credit analysis process.

What are Credit Reviews?

Credit Reviews is the task that involves a Credit Analyst opening up a Credit Case folder and reviews the data points provided for a Customer. For example, before a person can loans a car or a home, his or her credit-worthiness is being evaluated based on their work history, salary, their assets, etc.

From the data points provided, a Credit Analyst can then make informed decisions about a Customer's Creditworthiness and either close a Credit folder or assign it to another analyst for review. 

There are three ways Credit reviews are initiated:


Credit Check Failure
Occurs when a Customer fails a credit authorization request.
Periodic Review
Occurs when a Customer is included in a scheduled run of the periodic credit review process
Ad-hoc Manual Review
occurs when a credit analyst manually initiates a credit review for a new customer or for an ad-hoc review of an existing customer


These reviews use scoring models to analyze data points and rate a customer's credit-worthiness accordingly.

What is a Scoring Model?

A scoring model is a model or guideline on how to rate your customers based on a combination of data points (including categories and weights) to determine the credit score of a customer. The scoring model is assigned to the case folder and will automatically compute the credit score of a customer to help a credit analyst analyze data and make decisions. An organization can create multiple scoring models depending on the needs of their business.

To know more about Scoring Models and how it calculates Credit Scores, check out the article: Defining a Scoring Model Calculation for Credit Management in Oracle Fusion Applications

For more full-detailed Tutorials and Tips, check out #TheOracleProdigy at https://lifeofanoracleprodigy.blogspot.com/
Follow The Oracle Prodigy on Facebook (https://www.facebook.com/theOracleProdigy/) and Twitter (https://twitter.com/D_OracleProdigy)

Customer Statements in Oracle Fusion Applications

What's the difference between a statement and a balance forward bill?


A statement is an information document that provides a customer with a complete record of transaction, receipt, and adjustment activity over a specified time period.

A balance forward bill is a single bill presented for payment that consolidates the open debit items of a customer over a specified time period. You use this instead of sending a separate invoice for each transaction.

Steps in Sending Customer Statements
  1. Make the that the the "Send Statements" checkbox is ticked at the Receivables Customer Profile Class. more on this at another article Defining a Customer Profile Class in Oracle Fusion Applications
  2. Go to Customer Site & Define if the customer site will be used for statements
  3. Submit the Customer Statement Program
Customer Statements Delivery Method
  1. Print
  2. Email
This can be set at either Customer Profile Level, Account Level or at the Customer Site level.

Customer Statement Defaults

Customer statements defaults such as Email From, Reply To, Name, Email Subject, among others, can be setup via Manage Receivable System Options.


Customer Statement Cycles


Statement Cycles are configurations that control the frequency of the sending of Customer Statements. More details on this can be found on another article: Overview of Managing Statement Cycles in Oracle Fusion Applications

For more full-detailed Tutorials and Tips, check out #TheOracleProdigy at https://lifeofanoracleprodigy.blogspot.com/
Follow The Oracle Prodigy on Facebook (https://www.facebook.com/theOracleProdigy/) and Twitter (https://twitter.com/D_OracleProdigy)

Customize the Data Models of seeded Oracle Fusion Applications reports

This article further expands on another article I wrote: "Customize the layouts of seeded Oracle Fusion Applications reports". The previous article talks about modifying only the visual aspects of the report, but not the underlying data.

There might be some cases wherein an organization would like to use the Seeded Report functions of Oracle Fusion, but may be required to add more details (such as a Descriptive FlexField, or another column in the Table).

In my experience, I've been tasked to add the name of the Legal Entity of seeded reports from Receivables (such as Invoices, Statements and Credit Memos), Procurement (such as Purchase Orders and Requisitions), Collections (such as Dunning Letters) and Payments (such as a Separate Remittance Advice).

The best and recommended way to customize seeded reports is to use BI Publisher's "Customize" function. But before you can actually modify the report, you have to first know the following:
  1. Identify under what group / pillar the report belongs to (Ex. Financials, HCM, Procurement)
  2. Identify the report's functionality (Ex. Invoice Report, Payroll, Purchase Order)
  3. Identify if the report is being called from the application screen via a function button, a menu, etc (more on this later).
  4. Familiarity with the expected report output and its data.
  5. Have the sufficient roles assigned such as BI Author and BI Administrator
For this example, we will modify the seeded Receivables Invoice report's underlying SQL.

To begin customizing a seeded Oracle Fusion Report, you may execute the following steps:
  1. Login to Oracle Fusion Applications using your Username and Password
  2. Click on the browser's address bar and change the URL to below to go to the BI Publisher Enterprise console


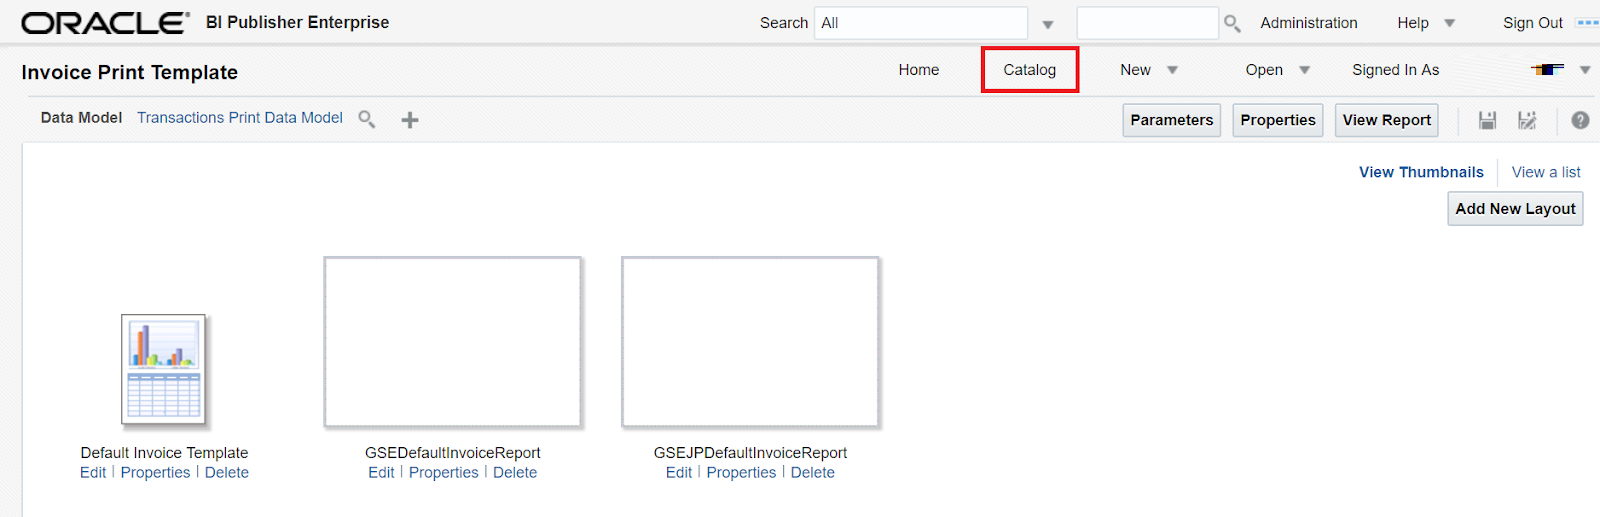
  3. Once inside BI Publisher Enterprise console, go to "Catalog" to access the Reports Catalog

  4. On the Folders pane, Expand "Shared Folders", then select the application that contains the Report to be modified (ex. "Financials"), then open the folder of the report's functionality (ex. "Receivables")

  5. Once inside the folder, choose the correct report and click on "More", then choose "Customize". Note that you may have to go deeper into the sub-folders to see the correct report. In this case, one has to navigate to the following folders: Receivables > Bill Presentment and look for the "Invoice Print Template" report:

  6. The Customize function will effectively copy the said report and folder structure under the "Custom" folder. However, note that this step only copies the report and its seeded layouts to the Custom folder, but still uses the seeded Data Model. Go back to the Reports Catalog by clicking on the "Catalog" link on the BI Publisher Enterprise's Global Area:


  7. On the Folders pane, Expand "Shared Folders" and further down to the "Custom" Folder. Again, select the application that contains the Report to be modified (ex. "Financials"), then open the folder of the report's functionality (ex. "Receivables"). You will now see the copy of the Report ("Invoice Print Template") that is ready to be customized.

  8. This Custom folder will also contain the customized data model. To proceed, click on the "+" Icon and add a new Folder called "Data Model". Please note that this folder name and structure is recommended by Oracle and using a different approach might result into data loss during upgrades or patches.

  9. Go back to the folder where the seeded report is placed (Shared Folders > Financials > Receivables > Bill Presentment) and go further down a sub-folder also named "Data Models". This will contain the seeded Data Models of each corresponding Report.

  10. Select the Data Model of the seeded report and click on "More" > "Copy". Then go into the Custom Data Model Folder (Shared Folders > Custom > Financials > Receivables > Bill Presentment > Data Model) and click on the "Paste" Icon.


  11. Go back on folder higher (Shared Folders > Custom > Financials > Receivables > Bill Presentment) and select the Report and click on "Edit":


  12. On the report page. Hover over the Data Model link and you will see that it points to the seeded Data Model (/Financials/Receivables/Bill Presentment/Data Models/Transactions Print Data Model). To point this to the custom Data Model, click on the search Icon and navigate to the custom Data Model.


  13. Once selected, hover once more on the Data Model link and you will see that it now points to the custom Data Model (/Custom/Financials/Receivables/Bill Presentment/Data Models/Transactions Print Data Model). Note that Oracle does not recommended to change the custom Data Model's name as it will impact how the seeded report is being run.

  14. Proceed to click on the Data Model link and you will be directed to the Data Model console. Here, you can modify, add or remove data sets, add parameters, Triggers, List of Values (LOVs) and Bursting Options.


For more information on modifying Data Models, you may check out the Oracle Documentation on BI Reports Customization. For more information on the usage of seeded tables in Oracle Fusion, check out the technical documentation on Oracle Tables and Views.

Follow The Oracle Prodigy on Facebook (https://www.facebook.com/theOracleProdigy/) and Twitter (https://twitter.com/D_OracleProdigy)

Overview of Enterprise Structures in Oracle Fusion Applications

This article provides an overview of Enterprise Structures in Oracle Fusion Applications, mainly focused on the relationship of the Enterprise, Legal Entity and Business Unit. It also provides some examples gathered from real-life scenarios the author has encountered.

Enterprise Structure

Business' enterprise structure may differ on the basis of industry, geography or statutory requirements. The main driver of an enterprise structure would be any legal requirements and reporting it has to adhere to. Planning how the enterprise structure would be is highly critical. Below is a quick graphical example of an Enterprise named "Vision Corporation":


"Vision Corporation" operates in multiple countries such as United States, France, United Kingdom and Japan. By law, they are required to report their financial earnings in different accounting methods/conventions. Therefore, a good strategy would be to create legal entities by country:

Enterprise
Legal Entity
Accounting Convention
Vision Corporation
Vision US
US Generally Accepted Accounting Principles (GAAP)
Vision France
International Accounting Standards (IAS)
Vision UK
International Financial Reporting Standards (IFRS)
Vision Japan

Each of these Legal Entities have Business Units (BU) under it that carry out day-to-day operations. Focusing into Vision US, it has 2 Business Units, namely: "US1" and "US2". However, Vision US also has a third Business Unit called "Corporate BU" that is shared with all Legal Entities.

This "Shared Services" Business unit can carry out processes for all Legal Entities (such as Procurement and Payments). This Shared Service strategy has a lot advantages such as discounts on purchasing and payments and for overall simplification of process.

Why can't the Shared Service BU be represented as a Legal Entity?

The reason for this is because the Shared Service BU doesn't incur transactions of its own and only provides a service to other Legal Entities and thus, is ineligible to be called a Legal Entity.

Legal Entities

By definition, a Legal Entity is an organization that

  1. Incurs financial transactions such as invoices, receipts, payments, etc.
  2. Makes purchases and owns the assets (both physical and financial) of the Enterprise
  3. Is lawfully registered and recognized as a company or a related entity
  4. Pays tax to the government

Each Legal Entity has a separate legal identifier and therefore conducts different aspects of a business. The transactions being carried out by Legal Entities are then accounted to a Business Unit for reporting detail purposes.

Transactions of a Legal Entity are then recorded to a Ledger for statutory reporting (more on this later.)

Business Units

Below are the functions of a Business Units:
  1. Security
  2. Set ID assignment
  3. Reporting
  4. Transaction Processing
Each transaction of a Legal Entity should be accounted to a Business Unit. Setting up Business Units need to be planned carefully. Some considerations would be the required Financial Reports, the detail of these reports and the departmental hierarchies of the organization.

Below are some strategies and suggestions on setting up Business Units:
  1. Setting up BUs per Industry or Line of Business (LOB) 
This would apply to a large enterprise with multiple Legal Entities and have a well-defined organizational structure. An example would be a large enterprise (Tosh Corporation) that owns multiple companies such as:

Industry
Legal Entity Name
Storage
Tosh Storage
Digital
Tosh Digital
Electronics
Tosh Electronics
Appliances
Tosh Appliances

Under the "Tosh Storage" Legal Entity, there are multiple Lines of Businesses and with this, we can setup the Business Units like below. In addition, the implementer can also setup other Business Units that provide services from within the Enterprise such as Procurement and Financial Services:

Legal Entity
Line of Business
Business Unit Name
Tosh Storage
Flash Memory
Flash
Solid State Drives
SSD
Hard Disk Drives
HDD
N/A (Shared)
-
Procurement
-
Financial Services
  1. Setting up a BU per Legal Entity
This would most probably apply to enterprises who operate only in one country. An example would be: a local Shipping enterprise "PhilShip Corp" has setup the Legal Entities and Business Unit with the names:

Enterprise
Legal Entity
Business Unit
PhilShip Corp
PhilShip Freight
Freight BU
PhilShip Passenger
Passenger BU
PhilShip Hauling
Hauling BU

Steps in Setting up a Business Unit:
  1. Creation of a Business Unit name
  2. Assignment of Business Unit functions
    • Identifies the business processes the Business Unit will be involved with (ex. Receivables, Payables, Assets, etc.) and assigns the BU to a Legal Entity and a Ledger
    • Need to have the IT_SECURITY_MANAGER or Application Implementation Consultant role assigned.
  1. Managing Service Provider Relationships 
    • Identifies if the BU be enabled to be service provider to transact in behalf of other Business Units
    • It can also be used to identify a Singular User under that Business Unit that will transact in behalf of other Business Units. An example would be: User "A" is a Receivables specialist for the whole organization and can transact invoices for all Business Units.
  1. Managing Business Unit Set Assignment 
For more full-detailed Tutorials and Tips, check out The Oracle Prodigy at https://lifeofanoracleprodigy.blogspot.com/
Follow The Oracle Prodigy on Facebook (https://www.facebook.com/theOracleProdigy/) and Twitter (https://twitter.com/D_OracleProdigy)

Recent Posts

SQL Fundamentals

Introduction to SQL and Syntax What is SQL? SQL stands for Structured Query Language. is a standard programming language for accessing datab...

Top Posts