Showing posts with label video. Show all posts

Manage Revenue Scheduling Rules in Oracle Fusion Applications

What is a Revenue scheduling rule?

A Revenue scheduling rule (also known as "Performance Satisfaction Plan") is a rule that tells receivables how to allocate our revenue into the future. It can be that a revenue scheduling rule that tells receivables not to recognize revenue now, we are going to recognize the revenue manually in the future by processing a revenue adjustment.

To view or create a Revenue Scheduling Rule, Navigate to Functional Setup Manager, Pick on the “Financials” offering, search for the Task “Manage Revenue Scheduling Rule” or "Manage Performance Satisfaction Plans":


Provide a name of the rule, and a Revenue Scheduling Type. There is a checkbox to indicate if the Revenue Scheduling Rule will be Deferred or Non-Deferred. You would need to associate, the Scheduling Rule with a Reference Data Set. Reference Data Sets allow you to share configurations across multiple business units or keep them specific.


What is a Revenue Scheduling Type?


Revenue Scheduling Type (also called Performance Satisfaction Plan Types) indicate how the Revenue will be split. You can use four different performance Satisfaction Plan Types on Revenue Scheduling Rules:


  1. Daily revenue rate, all periods - This means you are recognizing revenue on a daily basis. Use this type of Performance Satisfaction Plan if your organization has accounting rules with very strict revenue recognition requirements. This rule requires a start date and an end date. 
  2. Daily revenue rate, partial periods. Used if there's a revenue that needs to be recognized partially for a period, then you have to prorate. This type of rule also needs start date and end date. 
  3. Fixed schedule. This does not use days, instead it uses accounting periods. Now that accounting period can be a week, can be similar to a month, can be a quarter, depending on the Accounting calendar your organization uses. If you go with a fixed schedule, you would have to then provide percentages. For example if the period will be over three months, then you have to come in and specify how the revenue will be split, such as 30/30/40 or it can be 20/50/30. That's a mandatory attribute to populate how that revenue is going to be distributed across those periods, whatever the number of periods there are. 
  4. Variable schedule. The revenue is going to be prorated over a number of periods, but those periods are not going to be fixed. So these will also require a start date.
What is the difference between Deferred and Non-Deferred?

Deferred means that you will have to recognize the revenue manually through adjustments and Non-deferred means that the revenue recognition schedule will be created for the invoice. Note that for Non-deferred, you would have to run the Recognize Revenue Program to be automatically generated a revenue schedule for invoices.

Check out the video below for a step-by-step demonstration on Creating Revenue Scheduling Rules in Oracle Fusion Applications:


For more full-detailed Tutorials and Tips, check out #TheOracleProdigy at https://lifeofanoracleprodigy.blogspot.com/
Follow The Oracle Prodigy on Facebook (https://www.facebook.com/theOracleProdigy/) and Twitter (https://twitter.com/D_OracleProdigy)

Creating Banks, Bank Branches and Bank Accounts in Oracle Fusion Applications

This article gives a quick overview of the Bank Structure and demonstrates how to create custom Banks, Bank Branches and Bank Accounts in Oracle Fusion Applications. 

One of the main configurations for Cash Management is you have to define banks, branches, and the actual bank accounts. The Bank and the Branch information are stored in the Trading Community Model (TCM) tables where, whereas the account is stored in Cash Management tables.


To create custom Banks, Bank Branches and Bank Accounts in Oracle Fusion Applications, on the Springboard, click on the Navigator and go to the Functional Setup Manager (also known as "Setup and Maintenance" page):


Select the "Financials" offering, and select the "Cash Management and Banking" functional area and select the task "Manage Banks". Alternatively, you can click on the Task Panel and choose the "Search" function and enter "Manage Banks":


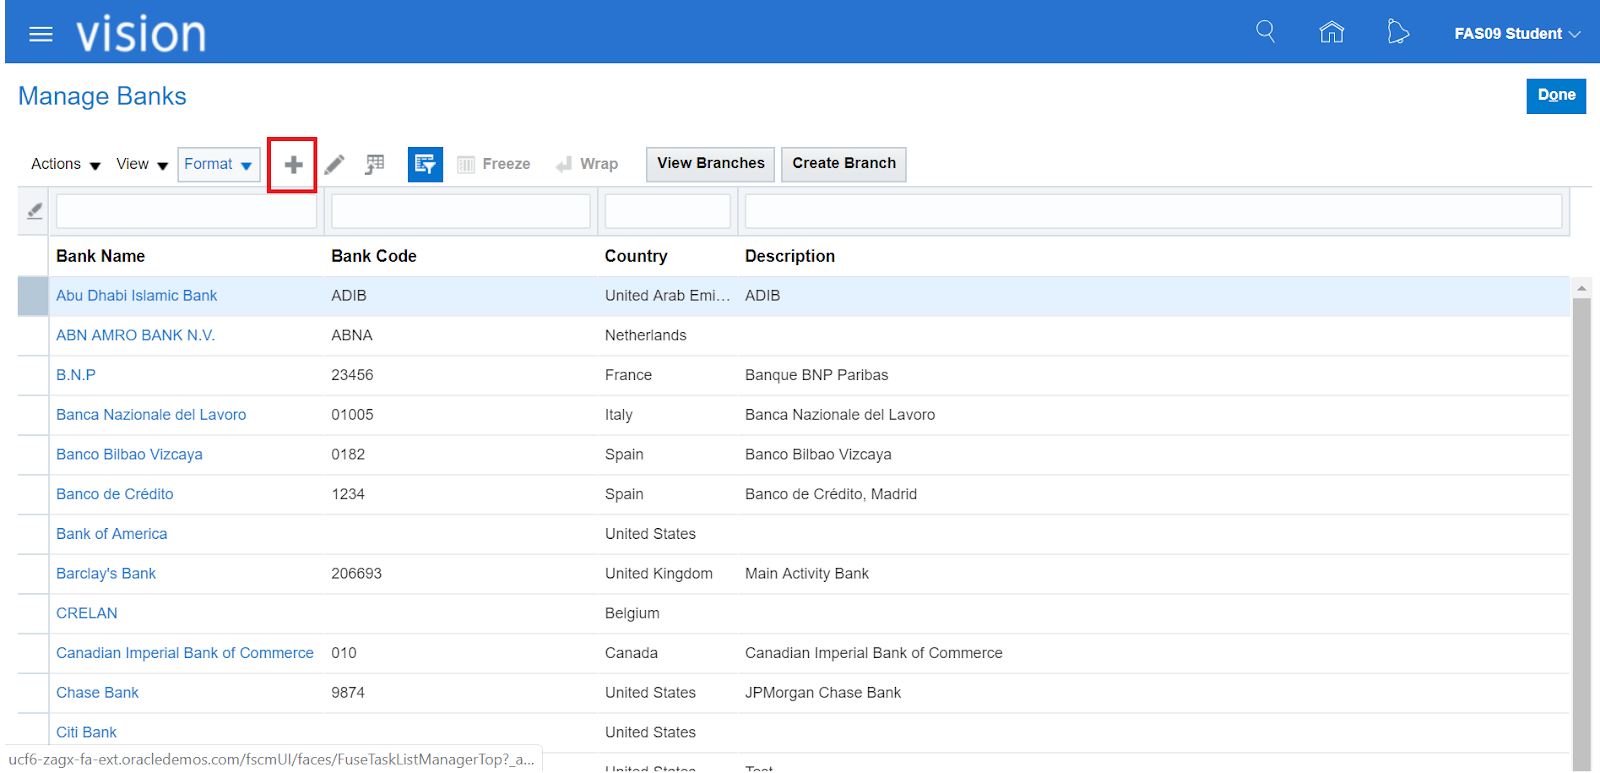
In the Manage Banks screen, click on the + Icon to add a new Bank and fill up the required fields:


In the "Create Banks" screen, fill up the required fields of the Bank such as the Country and Name. Other fields such as contacts and addresses are optional. Once done, click on the "Save and Close" button:


Back in the "Manage Banks" screen, select the newly created Bank and click on the "Create Branch" button to add a new Bank Branch:


In the "Create Bank Branch" screen, fill up the required field ("Branch Name"). Again, the other fields such as contacts and addresses are optional. Once done, proceed to Save and Close.


Back in the "Manage Banks" screen, select the newly-created Bank and click on the "View Branch" button to View the newly-created Bank Branch:


In the "Manage Bank Branches" screen, select the desired Bank Branch and click on the "Create Account" button:


In the "Create Bank Account" screen, specify which legal entities will have access to use this Bank Account and tick the corresponding check boxes if the Bank Account will be used for Payables, Receivables and Payroll functions. Also, take note of the tabs on this screen. These tabs will be very important for Cash Management. 
  • Under the General Tab, the GL Accounts section shows accounting information such as Accounts to be used for Cash, Cash Clearing and Reconciliation Differences. Under the Payment Documents section, this specifies what payment documents will be used by this bank account. These are going to be important for payables.
  • Under the Controls tab, there is a section dedicated to Reconciliation such as the Tolerance Rules, Auto Reconciliation Rule Set, Start Dates, etc. Also, under Bank Statement Processing, this is where Parsing Rule Sets and bank statement transaction creation rules are configured for the Bank Account. Further below, there are also some options for Payables for minimum and maximum payments, and then some forecasting options for Cash Management.
  • Under the security tab, That's an option where you could secure the bank account by directly assigning roles and/or users directly to the bank account.
  • Lastly, under the Business Unit Access Tab, you can specify which business units has access to the bank account. 


If the the "Business Unit Access" tab is not filled up, you will get the below error message:


Add the necessary Business Unit access and the correct Payment Document to be used by the Bank and Save:


Below is a quick Video demonstration of creating Banks, Bank Branches and Bank Accounts in Oracle Fusion Applications:


Follow my other Social Media Accounts!

Changing the Home Page Layout in Oracle Fusion Applications

Oracle Fusion Applications can provide three options for a home page layout: Newsfeed, Panel, and Banner. These are all set by the System Administrator.

News Feed Layout


Has the Analytics page section readily available.

Panel Layout


Banner Layout:


Has the Page Control dots to show the user's Infolets.

Changing the Home Page Layout

For you to change the Layouts or Appearance, the System Administrator would need to go into a "Sandbox" environment. Any changes applied to this Sandbox will only be visible to the user logged in and would need to be "Published" before all users in the system can see the changes. Do note that the Sandbox would only be available to the "System Administrator" Role. Below are the steps on how to change the Home Page Layout:


  1. Log in to a User that has a "System Administrator" Role.
  2. Go into a Sandbox by clicking on the Logged in User's name and click on "Manage Sandbox"
  3. You can either create a new Sandbox or activate an existing Sandbox.
  4. Click on the Navigator and select the "Appearance" menu
  5. Select the desired Layout and click "Apply". Wait for it to take effect.
  6. Click on the Home icon to navigate to the Welcome Springboard and see the applied home page layout.
  7. You may now publish the Sandbox and the desired layout will now be applied to the production environment.

Below is a video demonstration for further clarity:


Don't forget to leave a comment and subscribe to future tutorials! :)

Create a Supplier in Oracle Fusion Applications

To Create a Supplier, the User must first be granted the seeded role of "Supplier Manager". Navigate to the Security Console from the Navigator:


Click on the "User" tab and search for your desired user to grant the role to:


Click on "Edit" and proceed to click on the "Add Role" button:


Select "Supplier Manager" from the List of Values (LoV). If there is another role with a similar name, choose the Role with the Code of "ORA_" as the prefix. This signifies that it's the seeded Oracle role.


Once done, click on the "Add Role Membership" button and Save. You may need to logout and log back in after a few minutes for it to take effect to the desired user.

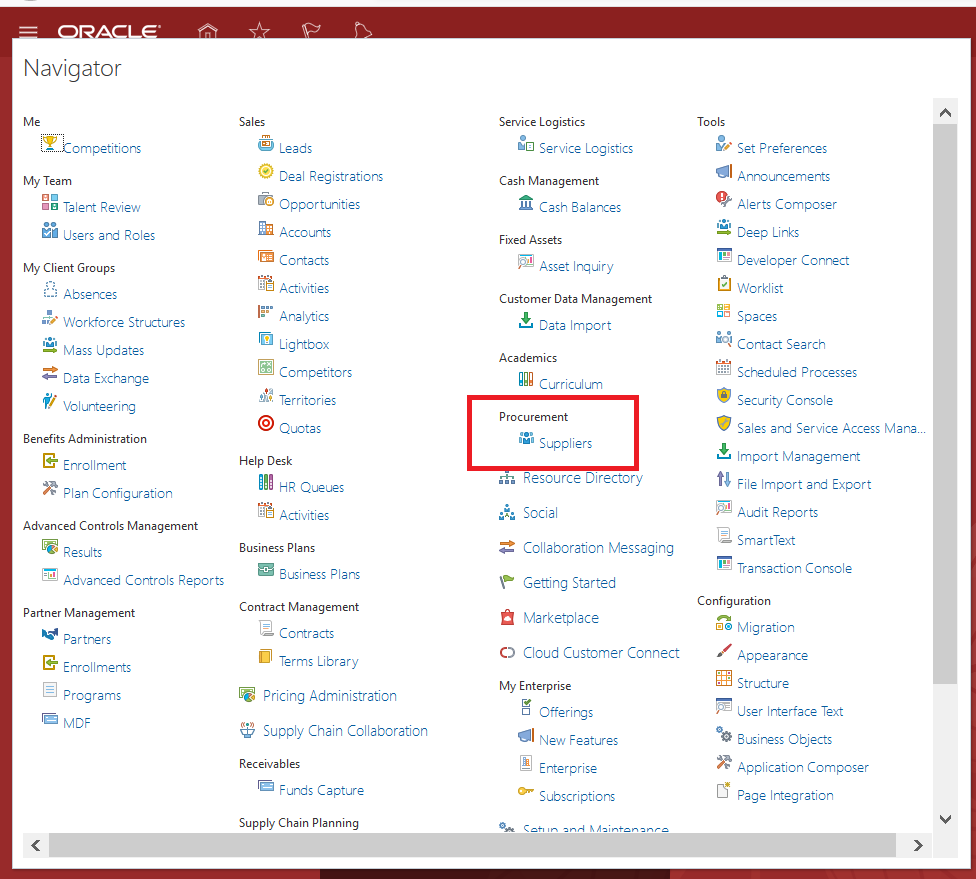
Click on the Navigator and select "Suppliers". Alternatively, you may click on the "Procurement" Menu on the Welcome Springboard and proceed to click on "Suppliers".


Click on the Task Pane and select "Create Supplier". Fill up the initial required details and click on "Create":


Once done, The initial details of the Supplier will be created. Please take note that you would still need to complete other important details before you can proceed to use the newly-created Supplier. You can view the details still pending for the Supplier by viewing the "Suppliers with Incomplete Setup" section in the Supplier screen:


A quick step-by-step Video demonstration can be found here:


Recent Posts

SQL Fundamentals

Introduction to SQL and Syntax What is SQL? SQL stands for Structured Query Language. is a standard programming language for accessing datab...

Top Posts