Showing posts with label bi publisher. Show all posts

Idea: Ability to Generate Dunning Letters in Draft without Sending it as an Email Attachment

I recently submitted an Idea to Oracle's Cloud Customer Connect regarding the ability to Generate Dunning Letters in Draft without sending it as an Email Attachment. Below are the details:

In most cases, most Organizations would want to customize their Dunning Letters Templates to reflect their Organization branding and modify the words used. During the development process, developers would want to test out the look of the customized Dunning Letter Templates and thus, would need to run The "Send Dunning Letter" scheduled process in "Draft Mode". The Dunning Letter Program has two parameters that is responsible for running Dunning Letters in Draft:
  1. Draft Mode - indicates if the Dunning Letters are run in Final or Draft Mode (Required. Allowed values are Yes and No).
  1. Email Address - Indicates the specified email address would receive the generated Draft Dunning Letters (optional).
The problem with this program is that when Dunning Letters is run in "Draft Mode" without an email address, Dunning Letters would generated and sent out to actual Customer Site Contacts. This defeats the purpose of having a "Draft Mode".
The expectation of running the report in Draft Mode would be:
  1. If the email address parameter was supplied, the process would send all Dunning Letters to the specified email address.
  1. If the email address parameter was NOT supplied, the generated dunning letters can be downloaded them from the application.

The "Draft Mode" of Generate Dunning Letters is not the expected feature of a "Draft" Report. As documented in Doc ID 2257139.1 (What Does Draft Mode Accomplish For Report Send Dunning Letters), Dunning Letters would still be generated and sent out to Customer Site Contacts even if it was set to "Draft Mode" if the Email Address parameter was left blank. This takes away the real "Draft Mode" function of Dunning Letters, since "Draft Mode" implies that it's used to verify if the template generated is correct.

This Idea comes from a actual scenario that has happened recently during the development process. During the development of a customized Dunning report from the Test environment, Dunning Letters were sent out to over 400 Business contacts because the email address parameter was left blank.

Check out and vote for this Idea Here: Ability to Generate Dunning Letters in Draft without Sending it as an Email Attachment.

For more full-detailed Tutorials and Tips, check out #TheOracleProdigy at https://lifeofanoracleprodigy.blogspot.com/
Follow The Oracle Prodigy on Facebook (https://www.facebook.com/theOracleProdigy/) and Twitter (https://twitter.com/D_OracleProdigy)

"Could not find main class" error when previewing BI Publisher for Word

I recently encountered an issue regarding the BI Publisher Desktop MS Word Plugin. I had the issue  "Could not find main class" when previewing a Word Template like below:


I was able to resolve this issue by doing the steps below.
  1. Click on the BI Publisher Plugin Tab and click on Options:

  1. In the Option Window, select the "Preview" tab and check if the Java Home field is blank. This is most likely the cause of your issue.  
  1. Click on Browse and locate the appropriate Java directory from your Machine.

  1. Once you've selected the correct directory of your Java version, you may now load XML files and preview the template properly.


For more full-detailed Tutorials and Tips, check out #TheOracleProdigy at https://lifeofanoracleprodigy.blogspot.com/
Follow The Oracle Prodigy on Facebook (https://www.facebook.com/theOracleProdigy/) and Twitter (https://twitter.com/D_OracleProdigy)

Reporting for Revenue Management Cloud

Oracle Fusion provides two predefined reporting tools for Revenue Management Cloud: Business Intelligence Publisher and Oracle Transactional Business Intelligence.

A Business Intelligence Publisher (BIP) is a reporting tool that you run by navigating to the Scheduled Processes page. These are usually business-specific reports are are either sent to external business contacts. 

Oracle Transactional Business Intelligence (OTBI) is a reporting and analysis tool used to create Analyses and Dashboards. These are usually used by internal teams rather than an actual report submitted externally such as auditors, governments etc. OTBI can also be used to create custom Infolets, which are miniature versions of dashboards. For more information on OTBI, check out a separate article: Overview of Oracle Transactional Business Intelligence in Oracle Fusion Applications.

Oracle Fusion provides two predefined reporting objects for Revenue Management Cloud:
  1. Revenue Contract Account Activities Report (BI Publisher)
  2. Standalone Selling Price Dashboard (OTBI Report)
Also, Oracle Fusion provides two predefined reporting Subject Areas than can be used by OTBI:
  1. Revenue Management - Customer Contracts Real Time
  2. Revenue Management - Standalone Selling Price Real Time

Below discusses the objects and subject areas in detail:

Revenue Contract Account Activities Report gives us account balances by performance obligation to support the audit process and perform detail analysis. This report shows information about revenue contract, performance obligation, customer name, source document references, period information, and most importantly account classes. 

Account classes are accounts that you're going to see in connection with activity for a customer contract. They correspond to contract liability, contract asset balances, contract revenue, etc. 

This is a BI Publisher report that is available to you out-of-the-box and you can run the report for a given ledger, and one or multiple periods, and you can also narrow down the results of the report by account class. It is defaulted to an Excel output. but it can also be data, or in CSV as well.

Standalone Selling Price Dashboard allows your organization to analyze standalone selling prices for a single period or a range of periods.

To Navigate to the Standalone Selling Price Dashboard, Click on the Navigator > More > under Tools, find Reports and Analytics. From Reports and Analytics > click on All Folders > Click on Shared Folders,> Financials > Revenue Management > Standalone Selling Price. Inside of this folder, find standalone selling price report.

Revenue Management - Customer Contracts Real Time. Provides real-time information on accounting contracts. Details for contracts, performance obligations, and promised details include related revenue prices for an effective period, satisfaction, billing, revenue distribution and accounting.

Revenue Management - Standalone Selling Price Real Time. Provides real-time information on Standalone Selling Prices and tolerance ranges for an item group, item or memo line by pricing dimension, item classification and effective period.

For more full-detailed Tutorials and Tips, check out #TheOracleProdigy at https://lifeofanoracleprodigy.blogspot.com/
Follow The Oracle Prodigy on Facebook (https://www.facebook.com/theOracleProdigy/) and Twitter (https://twitter.com/D_OracleProdigy)

Overview of Oracle Business Intelligence Publisher in Oracle Fusion Applications

What is Oracle Business Intelligence Publisher?

Oracle BI Publisher is a very powerful enterprise reporting solution that can be used to extract data from virtually any underlying technology such as relational databases, data warehouses, Essbase cubes, RSS feeds, Excel Spreadsheets, etc. BI Publisher essentially allows you to access data from multiple sources and send out that data in multiple formats to multiple recipients.

What functions can Oracle BI Publisher provide?

Besides generating business user reports such as Purchase Orders, Invoices, and Credit Memos, BI Publisher can carry out operational bank tasks such as send electronic funds transfer, bank statements and payments, or automatically fill in a government report such as tax forms.

Which applications offer Oracle BI Publisher?

BI Publisher is available both as a standalone application (BIP) and as a part of Oracle Business Intelligence Enterprise Edition (OBIEE).

The Standalone BIP doesn't need to be integrated into your Fusion environment. You can simply use it on its own. And inside of that, you can manage all the scheduling, all the security, all of the administrative details that you need to manage to deliver these reports.

As part of OBIEE, then all your BI Publisher reports are going to be in the same repository as all of the other BI objects. And the functionality is basically the same as the standalone application. But within Fusion and within OBIEE, you can navigate to the Enterprise Edition if you need to manage all your reports.

What types of Data can BI Publisher use?

BI Publisher supports a multitude of data formats (SQL, Spreadsheet, XML, etc.) from different data sources (Oracle Database, SQL Server, Spreadsheets, Essbase, Microsoft Analysis Services, web services).

How can BI Publisher generate reports? 

Firstly, a BI Publisher Report consists of a Data Model, a Data File and a Layout. The data model contains the “script” that will extract the actual data, contained in the Data File, and the Layout will then display the actual data before delivery.

The procedure for getting data from those data sources is to create a data model that will extract all your data into an XML file.  For example, we can write a SQL query in BI Publisher and that SQL query will extract data from our relational database or databases and that data will be written to an XML file. The layout template would then display that XML data in formats the business user would need such as PDF, text, HTML, Spreadsheets, CSVs, etc. The possibilities for your output formats are very wide and diverse.

Also, you can also deliver it in a number of ways: by email, straight to a printer, straight to a fax machine, right into a repository, right directly to a database, or you can send it through e-commerce.

How can you run BI Publisher reports?

Financial Reporting Center (FRC)
  • If you are going to be running BI Publisher reports from FRC, you would need to initially run the report from an area called Scheduled Processes.
Enterprise Scheduler System (ESS) or Scheduled Processes Area

  • Most seeded BI Publisher reports can be run from the Scheduled Processes area and would be available to Business Users depending on their Roles.
  • With the help of Scheduled Processes, BI Publisher reports can be executed immediately, or to run on a scheduled time, such as off business hours if you're running a massive report (such as all of the tax information for the whole company to the tax authorities)
  • You can keep a track about the log of those jobs from the ESS and access the output of the jobs that have been submitted.
  • Users access this interface from Navigator > Tools > Scheduled Processes.
  • Most financial users will have access to this interface so that they can run the standard reports for general ledger and other subledger applications.
From inside an Applications Work Area
  • Some seeded BI Publisher reports can already be executed from a Work Area, such as Receivables Transactions (Invoices, Credit Memos, Debit Memos), Purchase Orders, etc.
Directly from BI Publisher
  • Although not recommended, BI Publisher has the capability to run the report on the fly. However, note that you would need the appropriate BI roles to do this, such as BI Author, BI consumer, etc.
What are Data Models and Layouts?

A data model is a set of instructions for BI Publisher to retrieve the data and structure that data so that it can then be married to a layout. It is an object that will extract the data from a data source. Data model can incorporate prompts, list of values and parameters to filter out the data further. A Data Model can be created directly from the BI Publisher screen using the Data Model editor. 

A report layout basically allows you to display the data in a format the user understands. Note that a report can have multiple layouts using one Data Model. Complex Layouts can be created using a very powerful template builder that is add-in for Microsoft Word and Excel. Also, there are other tools that you can use, like JDeveloper, to build the layout, or you can simply write the XSL if you wish. There is a built-in Layout editor in BI publisher but I personally don’t recommend on using it as it is slow, unresponsive and limited in its use.

The data model and the layout does not have a one-to-one relationship, they are simply brought together at runtime, and they are independent of each other. You can have one data model, many layouts, or one layout, many data models. For example, a Data Model that extracts Tax Data can have two or more layouts, one for the government tax authorities and another for internal use.

What is Translation?

Translation means that BI Publisher supports multiple layouts of multiple translations. Your layouts might look the same, but in fact, the language in the layout could be different. This is indicated during the uploading of layout templates.

Customizing Seeded BI Publisher Reports

However, most times, an organization may have other reporting requirements that are not being met by the ones Oracle provides out of the box, such as company branding, Wording, Colors, etc. You find that some of our predefined reports are close, but not quite what you need, then what you can do is you can customize those reports. Oracle provides a way for users to customize reports and protect it from being overwritten during patching. Check out a separate article about customizing the layouts of seeded Oracle Fusion Applications reports.

Below are some more articles that show Customization of Seeded report layouts in Oracle Fusion Applications:
For more full-detailed Tutorials and Tips, check out #TheOracleProdigy at https://lifeofanoracleprodigy.blogspot.com/

Follow The Oracle Prodigy on Facebook (https://www.facebook.com/theOracleProdigy/) and Twitter (https://twitter.com/D_OracleProdigy)

Customize the Data Models of seeded Oracle Fusion Applications reports

This article further expands on another article I wrote: "Customize the layouts of seeded Oracle Fusion Applications reports". The previous article talks about modifying only the visual aspects of the report, but not the underlying data.

There might be some cases wherein an organization would like to use the Seeded Report functions of Oracle Fusion, but may be required to add more details (such as a Descriptive FlexField, or another column in the Table).

In my experience, I've been tasked to add the name of the Legal Entity of seeded reports from Receivables (such as Invoices, Statements and Credit Memos), Procurement (such as Purchase Orders and Requisitions), Collections (such as Dunning Letters) and Payments (such as a Separate Remittance Advice).

The best and recommended way to customize seeded reports is to use BI Publisher's "Customize" function. But before you can actually modify the report, you have to first know the following:
  1. Identify under what group / pillar the report belongs to (Ex. Financials, HCM, Procurement)
  2. Identify the report's functionality (Ex. Invoice Report, Payroll, Purchase Order)
  3. Identify if the report is being called from the application screen via a function button, a menu, etc (more on this later).
  4. Familiarity with the expected report output and its data.
  5. Have the sufficient roles assigned such as BI Author and BI Administrator
For this example, we will modify the seeded Receivables Invoice report's underlying SQL.

To begin customizing a seeded Oracle Fusion Report, you may execute the following steps:
  1. Login to Oracle Fusion Applications using your Username and Password
  2. Click on the browser's address bar and change the URL to below to go to the BI Publisher Enterprise console


  3. Once inside BI Publisher Enterprise console, go to "Catalog" to access the Reports Catalog

  4. On the Folders pane, Expand "Shared Folders", then select the application that contains the Report to be modified (ex. "Financials"), then open the folder of the report's functionality (ex. "Receivables")

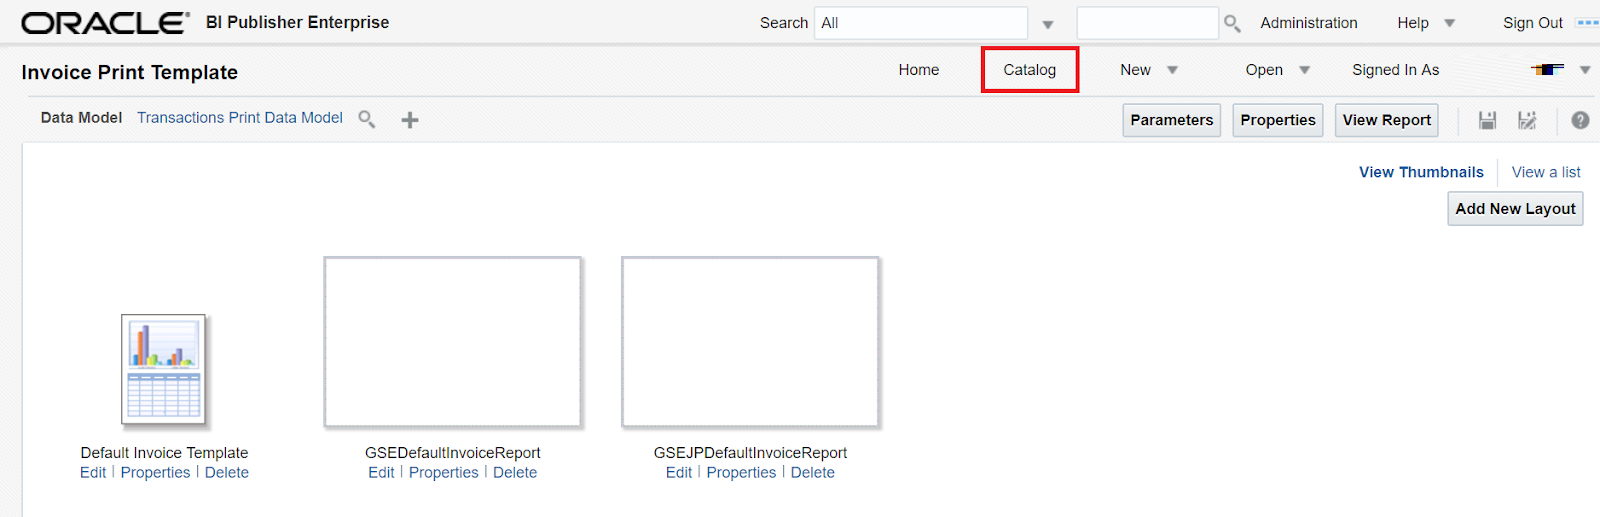
  5. Once inside the folder, choose the correct report and click on "More", then choose "Customize". Note that you may have to go deeper into the sub-folders to see the correct report. In this case, one has to navigate to the following folders: Receivables > Bill Presentment and look for the "Invoice Print Template" report:

  6. The Customize function will effectively copy the said report and folder structure under the "Custom" folder. However, note that this step only copies the report and its seeded layouts to the Custom folder, but still uses the seeded Data Model. Go back to the Reports Catalog by clicking on the "Catalog" link on the BI Publisher Enterprise's Global Area:


  7. On the Folders pane, Expand "Shared Folders" and further down to the "Custom" Folder. Again, select the application that contains the Report to be modified (ex. "Financials"), then open the folder of the report's functionality (ex. "Receivables"). You will now see the copy of the Report ("Invoice Print Template") that is ready to be customized.

  8. This Custom folder will also contain the customized data model. To proceed, click on the "+" Icon and add a new Folder called "Data Model". Please note that this folder name and structure is recommended by Oracle and using a different approach might result into data loss during upgrades or patches.

  9. Go back to the folder where the seeded report is placed (Shared Folders > Financials > Receivables > Bill Presentment) and go further down a sub-folder also named "Data Models". This will contain the seeded Data Models of each corresponding Report.

  10. Select the Data Model of the seeded report and click on "More" > "Copy". Then go into the Custom Data Model Folder (Shared Folders > Custom > Financials > Receivables > Bill Presentment > Data Model) and click on the "Paste" Icon.


  11. Go back on folder higher (Shared Folders > Custom > Financials > Receivables > Bill Presentment) and select the Report and click on "Edit":


  12. On the report page. Hover over the Data Model link and you will see that it points to the seeded Data Model (/Financials/Receivables/Bill Presentment/Data Models/Transactions Print Data Model). To point this to the custom Data Model, click on the search Icon and navigate to the custom Data Model.


  13. Once selected, hover once more on the Data Model link and you will see that it now points to the custom Data Model (/Custom/Financials/Receivables/Bill Presentment/Data Models/Transactions Print Data Model). Note that Oracle does not recommended to change the custom Data Model's name as it will impact how the seeded report is being run.

  14. Proceed to click on the Data Model link and you will be directed to the Data Model console. Here, you can modify, add or remove data sets, add parameters, Triggers, List of Values (LOVs) and Bursting Options.


For more information on modifying Data Models, you may check out the Oracle Documentation on BI Reports Customization. For more information on the usage of seeded tables in Oracle Fusion, check out the technical documentation on Oracle Tables and Views.

Follow The Oracle Prodigy on Facebook (https://www.facebook.com/theOracleProdigy/) and Twitter (https://twitter.com/D_OracleProdigy)

Get the XML Extract of Payments or Separate Remittance Advise from Oracle Fusion Applications

When an organization is issuing Payments to Suppliers and sending Remittance Advise, 
there would be instances where issues would arise (Incorrect Amounts, Invalid Supplier Details, etc.) and there is a need to review the XML data fusion is sending out.
However, getting the XML Extract of Payments or Remittance Advises in Fusion can be quite difficult as compared to other Fusion Reports.
In comparison, getting XML data for AR Invoices/Credit Memos are particularly easy, as the option to download its XML is already included when running its ESS job ("Print Receivables Transactions").
On the other hand, Payments or Remittance Advises don't have this capability.
Luckily, there are two workarounds Oracle has identified and I have personally tested both.

Listed below are the workarounds, including their advantages and disadvantages:

  1. Use BI Publisher's ad-hoc querying capabilities. 
    • The advantage of this option is there is no need for the actual process to be re-run, particularly useful if the issue has occurred in Production.
    • The downside of this option is sufficient BI Administrator Privileges is needed to create the ad-hoc Data Model that will retrieve the XML.
  2. Modify the Report's Output Format to XML and re-run the process.
    • Unfortunately, I don't actually see an advantage with regards to this option.
    • Because actual process needs to be re-run, this option would be risky if done in the Production Environment, as the application might re-send the data to suppliers or the Bank, creating confusion.
For this post, we will focus on the Option # 1. The steps to do this are as follows:
  1. Login to Oracle Fusion Applications using a Username that has the sufficient Custom BI Role (inherited BI Admin or BI Author role)
  2. Go to BI Publisher by appending "xmlpserver" on the browser's URL: (i.e. https://xxxx.xx.xxx.oraclecloud.com/xmlpserver)
  3. Create a New Data Model 
  1. Create a New SQL Data Set:


  1. Use the Below Query with the appropriate Payment_File_Number 


select document 
from  iby_trxn_documents 
where  payment_instruction_id = &Payment_File_Number
and  doctype = 100
  1. Run this Data Set and Click on "Export".
  1. Open this output in either Notepad or Notepad++ and re-save it as an XML file.
The resulting XML file would be the actual XML data used by the Payment File and Remittance Advise.

Using Simplified IF-ELSE condition in BI Publisher

In Oracle BI Publisher allows the use of Conditional Statements in RTF Templates. It uses similar logical conditions in PL/SQL such as IF-THEN, CHOOSE-WHEN, etc. More details and examples can be found from Fusion Middleware Report Designer's Guide for Oracle Business Intelligence Publisher.

However, the documentation provided only shows a scenario wherein you have just one condition. Example is below:

<?if:VENDOR_NAME='COMPANY A'?>This is the Vendor A<?end if?>

However, the code becomes a bit too troublesome and long if you need to have an ELSE condition:

<?if:VENDOR_NAME='COMPANY A'?>This is Vendor A<?end if?>
<?if:VENDOR_NAME!='COMPANY A'?>This is NOT Vendor A<?end if?>

To simplify this, you may use the XSLT function IFELSE that addresses this requirement:


<?xdoxslt:ifelse(VENDOR_NAME='COMPANY A',This is Vendor A,This is NOT Vendor A)?>

It works similar to the DECODE function in PL/SQL.
If the given condition is Satisfied, it will return the first parameter, if not, then it will return the second parameter.

Seems simple enough, eh?
Let me know in the comments if there's any issues!


Deactivate the seeded Separate Remittance Advise Layout in Oracle Fusion Applications

Even if the seeded Separate Remittance Advise (SRA) Layout has already been deactivated from BI Publisher, , it may still appear on the LOV of the SRA Screen.

Take the sample below. the Custom SRA Layout is already selected as the default and the Seeded layout is already Inactive:


However, the seeded layout can still be selected when we go into Payments > Task List > Send Separate Remittance Advise:

To suppress this, go into Setup and Maintenance > Task List > Search and key in "Manage Formats" and search for "Disbursement Separate Remittance Advise Formats":


Open the seeded layout and end-date it:


This will effectively suppress the layout from being selected from the SRA screen:


Correctly display images in Separate Remittance Advise report in Oracle Fusion Applications

Currently, there is a requirement to modify the seeded Separate Remittance Advise (SRA) layout to add the Organization's specific branding such as logos, icons, etc.

To do this, just follow the same procedure in customizing seeded layouts in Oracle BI Publisher Enterprise and upload the custom layout. 

However, the SRA report has some limits on how it can be delivered. Depending on the setup of the Supplier site or the Payment Process Profile, we can either have it either "Printed" (save the PDF output and print or email it to Suppliers) or delivered automatically to the suppliers via Email (as an HTML).

However, one issue with delivering it via email is that when using layouts that contain pictures, the pictures explode because its not formatted correctly. Take the layout below as an example:


The sample layout above uses a Header in the RTF Template. Although this looks normal when generated manually (as a PDF), this layout's pictures will explode when delivered as an HTML Email:


Above is a screenshot of the report delivered via email, Zoomed at 20%. The text isn't even visible anymore due to the company logo eating up all the space. 

Follow the simple steps below resolves this issue:
  1. Open the RTF layout in Word. Click on the picture to be re-sized. From the ribbon, under the  Picture Tools / Format tab, click on "Compress Pictures":

  1. Change the photo's resolution to "Web/Screen" to that the resolution would be decreased to 96 dpi. Save and re-test:


  1. Now the report output delivered is readable from the Email message body.

Follow my other Social Media Accounts!
Facebook Page: https://www.facebook.com/theOracleProdigy/
Twitter: https://twitter.com/D_OracleProdigy

Customize the layouts of seeded Oracle Fusion Applications reports

Oftentimes, an organization will require Oracle Fusion's seeded reports to be modified to add specific logos, icons for Branding and Marketing purposes. The best way to do this is to use BI Publisher's "Customize" function.

Before you can actually modify the report, you have to first know the following:
  1. Identify under what group / pillar the report belongs to (Ex. Financials, HCM, Procurement)
  2. Identify the report's functionality (Ex. Invoice Report, Payroll, Purchase Order)
  3. Identify if the report is being called from the application screen via a function button, a menu, etc (more on this later).
  4. Familiarity with the expected report output and its data.
  5. Have the sufficient roles assigned such as BI Author and BI Administrator
For this example, we will modify the Purchase Order report and add a Custom logo.
To begin customizing a seeded Oracle Fusion Report, you may execute the following steps:
  • Login to Oracle Fusion Applications using your Username and Password
  • Click on the browser's address bar and change the URL to below to go to the BI Publisher Enterprise console

  • Once inside BI Publisher Enterprise console, go to "Catalog" to access the Reports Catalog
  • On the Folders pane, Expand "Shared Folders", then select the application that contains the Report to be modified (ex. "Procurement"), then open the folder of the report's functionality (ex. "Purchasing")

  • Once inside the folder, choose the correct report and click on "More", then choose "Customize"

  • This will effectively copy the said report and folder structure under the "Custom" folder.

  • Going back to the report, you should now see the reports dashboard. It is recommended that you download the current layouts and use it as a guide for your custom Layout. Click on "Edit" to download desired seeded layout and use Microsoft Word to edit the RTF.


  • Once you've finalized your custom layout, you may upload it by clicking on "View a List" (highlighted in Green). DO NOT use the "Add New Layout" button as this will prompt you to have a saved sample data in BI Publisher's metadata.
  • You will then see a new page that will show the each report's properties (i.e. available Outputs Formats, Default Format, Active/Inactive, etc). Click on the (+) icon to add a new Layout.

  • You again be shown a new page that will allow you to upload layouts. Click on the "Upload" icon to upload the customized RTF file. The other options are not recommended as they have limited formatting capabilities and may not be suitable for Production use. 

  • Once the upload has been completed, the custom layout will be visible in the reports dashboard. Don't forget to select it as the default layout if this will be the layout to be used by your organization.


Depending on the report, there might be additional configurations or setups required to run these reports from the application screens. Reports such as Purchase Orders, Customer Statements need to have some configurations changed. See the links in the said reports for more information on how to configure them.

Check out the step-by-step video demonstration below for more information:


For more information, you may check out the Oracle Documentation on BI Reports Customization

Follow The Oracle Prodigy on Facebook (https://www.facebook.com/theOracleProdigy/) and Twitter (https://twitter.com/D_OracleProdigy)

Changing the Purchase Order Layout in Oracle Fusion Applications

Often times there is a requirement to change the Purchase Order PDF report during implementation to add a company's logo or branding, or add or remove information from the layout itself.

Below are the steps for you to modify a Purchase Order Report:
  1. Upload a custom Purchase Order Template to BI Publisher. (see the link for the steps)
  2. Navigate to Setup and Maintenance
  3. Click on the Task Pane then click on Search


  1. Search for the Task "Configure Procurement Business Function"
  2. Select a Business Unit
  3. Click on the "Document Types" Tab and choose "Purchase Order"
  1. In the Document Type Details, select the desired Purchase Order layout.
  2. Click on Save and Close
  3. Test the new Purchase Order Layout by going to the Procurement menu > Purchase Orders, then click on the Task Pane and Select "Manage Orders"
  4. Select a Purchase Order and then "View PDF"


For more information, you may check out the Oracle Documentation on BI Reports Customization

Recent Posts

SQL Fundamentals

Introduction to SQL and Syntax What is SQL? SQL stands for Structured Query Language. is a standard programming language for accessing datab...

Top Posts