Showing posts with label invoice. Show all posts

Overview of Payable Transactions in Oracle Fusion Applications

This article will discuss an overview of Payable Transactions in Oracle Fusion Applications. Before you can create Payable transactions in Oracle Fusion Applications, make sure all configurations are complete. Check out a separate article "Overview of Payables Configurations in Oracle Fusion Applications" for more information on the configurations.


Once everything is configured, you may proceed to create payables transactions in multiple approaches. There are four approaches to create a Payables Invoice:

Manual
  1. Manual Invoice created from the Payables Work Area - allows you to create invoices by using an invoice work area within the application. There is a dedicated user interface where you can navigate and you can start recording your invoices by capturing header level information, line level information, and distribution level information.
  2. Integrated Imaging
  3. Manual Invoice created from Spreadsheets - Oracle provides functionality to upload invoices in bulk using Spreadsheets with the use of File-Based Data Import (FBDI) templates. This allows the user to be more efficient in getting their invoices in the application. Check out the video demonstration below on how to create invoices from an Excel Spreadsheet:


Self-Service
  1. Matched Invoices - This involves a process where you can match the invoices against purchase orders or maybe against receipts, depending on what type of matching level you are going to use.
  2. Unmatched Invoices - Invoices that are not matched to purchase orders can be routed to workflow approval rules that you configure
  3. Advanced Shipment Notices (ASNs) - A document which allows you to generate invoices automatically, which will be created when supplier create an ASN for drop shipments.
Automated
  1. Integrated Imaging - This will use Oracle Integrated Invoice Imaging solution to support integrated imaging of scanned invoices for paperless processing and routing. It then uses the import process to match to purchase order or receipts. If it's a PO based invoice, you can view invoice information including invoice status, installments, holds, payments, and applied prepayments against these invoices as well. You can also drill down to the original purchase order or receipt if required. And if errors are found during the process, manual intervention may be required to resolve the import errors.
  2. Self-Billed - In the application we have a feature called Evaluated Receipt Settlement, also known as Pay-On-Receipt. You can use the Pay On Receipt feature to help you in automatically generating an invoice the moment you create a receipt against a purchase order. You can use the predefined jobs, schedule them, and enable your supplier for Pay On Receipt functionality. When you do that, the moment you will create a receipt against a purchase order, based on the scheduled jobs system will automatically keep on creating an invoice against those receipts which you can access from the Payables application. Apart from that, we have also got something called Return to Supplier feature, or sometimes called as Return to Vendor (RTV). This basically helps you in automatically generating a debit memo the moment you create an RTV transaction in the Purchasing application. The moment you create an RTV transaction, that becomes the base to automatically generate a debit memo in the Payables application.
  3. Expense Reports - Expense reports are Invoices created from Employee Expenses that need to be reimbursed to them. It can be either done electronically through their registers bank accounts or in the form of a physically printed check. Whenever the expense reports are approved by both the manager as well as the Payables team, they become eligible for import into the Payables application. There is a job which you need to submit to export the expense reports from the Expense application into the Payables application, because from the Expense application you cannot directly process the payments. The type of invoice that is used for these expense reports is now known as Payment Requests. Whenever you will export the invoice from Expenses to the Payables application, you need to search with the invoice type as Payment Request. 
  4. Customer Refunds - Similar to Expense Reports, customer refunds can be triggered whenever there are any credit balance in Receivables that require a refund. Once approved, they will flow to Payments as Payment Requests.
  5. Inter-company invoices - An intercompany transaction that requires invoicing is imported to Payables for payment processing for internal suppliers
Electronic
  1. Business to Business (B2B) Web Service - Used to import invoices in an electronic format via a Web Service
Check out a separate article for more information on how to create Expense reports: Creating an Expense Report in Oracle Fusion Applications or check out the below step-by-step video demonstration:


For more full-detailed Tutorials and Tips, check out #TheOracleProdigy at https://lifeofanoracleprodigy.blogspot.com/
Follow The Oracle Prodigy on Facebook (https://www.facebook.com/theOracleProdigy/) and Twitter (https://twitter.com/D_OracleProdigy)

Overview of the Procure-To-Pay process flow in Oracle Fusion Applications

What is the Procure-to-Pay process flow?


The Procure-to-Pay process flow Involves two modules, the Procurement and the Payables Modules. In a quick summary, this process flow involves capturing the demand of a product/service, facilitating quotations from suppliers, converting quotations into purchase orders, receiving material, and finally releasing the payment for the vendor.


The process begins with demand, and the demand is recorded in the form of a requisition. The requisition is utilized as a base for requesting supplier quotations. Supplier quotations then get entered and compared within the application. Based on analysis and best product and price choice, the organization will award a purchase order to the chosen supplier. The supplier will then ship and send the material (or provide the service) to the organization, and finally the organization will book the invoice to pay the supplier. Do note that the sourcing of quotations is not a mandatory step in the process.

What is Procurement?

Procurement, or sometimes referred to as Purchasing, refers to a business practice of attempting to acquire goods and/or services to accomplish the goals of its enterprise. It is simply the process of identifying what the organization needs and buying it. The Procurement Modules' main end-users are called "Buyers".

Key Terminologies in Procurement

Purchase Requisition
  • Purchase Request is a precise document generated by an internal or external organization to notify the purchasing department of items it needs to order, their quantity, and the time frame that will be given in the future.
  • Executed by the End-Users of Each Department and sent to the Purchasing department.
Quotation
  • Request For Quotation (RFQ) is the communication between customer and supplier asking the availability of the item and its corresponding price.
  • Executed by Buyers to be sent to Vendors
Purchase Order
  • A written authorization from a buyer, for a supplier to deliver specified goods or services to the buyer, at the price, quality level, delivery date, and certain other terms specified in the agreement. A purchase order is legally binding after the supplier counter-signs it.
  • Executed by the Buyers and sent to the selling Vendor
What is Payables?

The Payables Application, sometimes referred to as the AP Module, is the module that is primarily involved with interfacing with Suppliers and paying Suppliers. Apart from the Procurement module, the AP module interfaces with multiple applications such as applications such as the Payments application for fund disbursement, Cash Management for bank statement reconciliation.

Key Terminologies in Payables

Suppliers
  • Organizations or Entities that provide goods or services. Can be both Internal or External.
Payment Disbursement
  • Provides funds for delivered goods or services to suppliers.
  • Can also provide funds for Customer Refunds or Employee expense reimbursements in the form of a Payment Request
  • Can be in the form of sending a physical check or electronic funds transfer (EFT)
Assets
  • Acquired Physical Goods that have a direct impact to an organization's net worth such as buildings, furniture, computers, etc.
  • Can be entered into the Payables module and will flow down to the Assets Module.
  • Value can Depreciate/Appreciate over a period time, and can be decommissioned as well.
For more full-detailed Tutorials and Tips, check out #TheOracleProdigy at https://lifeofanoracleprodigy.blogspot.com/
Follow The Oracle Prodigy on Facebook (https://www.facebook.com/theOracleProdigy/) and Twitter (https://twitter.com/D_OracleProdigy)

Manually Creating a Bank Statement and Reconciling against a Receivable Transaction

This video article shows you how to Manually create Bank Statement in Oracle Fusion Applications, including manually Reconciling it against a Receivable Transaction.

This video also includes a demonstration of creating a Manual Invoice and a Manual Receipt, including applying that Receipt to the Invoice.


For more information on Cash Management and Bank Statements, check out this separate article: Overview of Cash Management in Oracle Fusion Applications

For more full-detailed Tutorials and Tips, check out #TheOracleProdigy at https://lifeofanoracleprodigy.blogspot.com/
Follow The Oracle Prodigy on Facebook (https://www.facebook.com/theOracleProdigy/) and Twitter (https://twitter.com/D_OracleProdigy)

Overview of Processing Late Charges for Receivables in Oracle Fusion Applications

What is a late charge? 

It's a fee and/or penalty assessed against overdue customer transactions (Invoice or a debit memo).

What options do you have in the receivables applications to present late charges to your customers?

You have three options called late charge types. These are as follows:
  1. Adjustment. And so if you record late charges as adjustments, then Receivables combines all the interest charges relating to an overdue transaction, and creates a single Late Charge adjustment against the transaction. In other words, that adjustment is going to increase the balance of that transaction.So if you pick adjustments, and you are assessing fees as well as penalties, then Receivables will create two adjustments-- one for the fee, and one for the penalty.
  2. Debit memos. If you record late charges as debit memos, then Receivables will create one debit memo per overdue transaction. Additionally, if you also assess penalty charges, then Receivables includes a separate line for penalty charges on the debit memo.
  3. Interest invoice. if you record late charges as interest invoices, then Receivables will create a single interest invoice per customer site and currency. So think of this interest invoice as a way to consolidate charges so that the customer receives one single document. So they'll receive one single interest invoice that will detail charges for all the invoices that were overdue, and therefore are being assessed a charge. 
What's needed to implement the late charges feature?

Defining a late charge policy is required  to implement the late charges feature. A late charge policy is basically a configuration required for your late charge documents. Below are some configurations required to implement the late charges feature:
  1. Define Receivable Activities. Defining Receivables activities is needed for Interest charges, as well as Penalty charges. For Example when Receivables is creating an adjustment, it will need to know which GL accounts to use. The Receivables activity setup will provide the information how to generate accounting distributions. To know how to define a Receivables activity, check out a separate article: Overview of Managing Receivables Activities in Oracle Fusion Applications.
  2. Define Transaction Types. If the late charge document is going to be a debit memo or an interest invoice, you would need to define the transaction types for those debit memos or interest invoices.
  3. Turn on the Late Charges Option in Receivable System Options. Make sure that the Late Charges feature is enabled in Receivable System Options for the system to assess late charges on overdue transactions. This is an option defined per business unit. To know more about the configurations available in the Receivable System Options check out a separate article: Overview of Managing Receivable System Options in Oracle Fusion Applications.
  4. Customer Profile Classes. When you go the a customer profile class setup, there are two tabs. One of them is specific to the late charge feature. There's an option to enable late charge for any customers associated with the said profile class. Two Important fields here is the "Late Charge Calculation Method" and "Late Charge Type". For "Late Charge Calculation Method", this identifies if you are going to assess late charges on overdue invoices only, on late payments, or both. For "Late Charge Type", this identifies the document to be used for late charges.
Late Charge Calculation Method
When you set up a late charge profile for your customers, you must decide the method to use to calculate late charges.
You select the calculation method in the Late Charge Calculation Method field in the Credit Limits and Late Charges tab of the Customer Profile Class pages, or on the applicable customer or customer site profile.
The interest calculation methods are:
  • Average Daily Balance: Calculate late charges based on the average daily balance of overdue invoices. This method is for balance forward bills only.
  • Late Payments Only: Calculate late charges based on the number of days between the payment due date and the actual payment date. This method uses the paid amount as the overdue invoice amount when calculating the late charge.
  • Overdue Transactions Only: Calculate late charges for transactions based on the number of days a payment is late when you submit the Create Late Charges program.
  • Overdue Transactions and Late Payments: Calculate late charges on both overdue transactions and late payments. This option levies the largest late charge amount on a customer.
    For example, your enterprise calculates late charges on the 15th and 30th of each month. Your customer has an overdue invoice of $100 that falls due on November 16:
    • On November 30, you run the Create Late Charges program. The program calculates late charges for this overdue invoice.
    • On December 10, your customer pays the invoice.
    • On December 15, you run the Create Late Charges program again. The program assesses further charges for the additional 10 days that the payment was overdue.
There are three different interest calculation formulas that Oracle delivers out-of-the-box:
  1. Flat rate - Receivables will ignore the number of days that a payment is overdue.
  2. Simple
  3. Compound
  1. Interest Tiers and Charge Schedules. - The concept of Interest tiers are interest rates that's increasing as time goes on. So the longer that transaction is overdue, the higher the interest rate will be. The below table is an example. A charge schedule is shown with four interest tier periods, along with interest rates assigned to those interest periods.
Days Overdue Tiers
Interest Rate
1-30 Days
2%
31-45
3%
46-60
4%
Over 60 Days
5%

If the transaction is overdue between 1 and 30 days, you are charging 2%. If the transaction is overdue between 31 and 45 days, you are charging 3%, and so on or so forth.

To use Interest Tiers and Charge Schedules, enable the option "Use Multiple Interest rates" in the Customer Profile Class, inside the "Late Charges" tab.

To review the Interest Tiers and Charge Schedules, go to the Functional Setup Manager and select the "Manage Interest Tiers" and "Manage Charge Schedules" Task, respectively.

For more full-detailed Tutorials and Tips, check out #TheOracleProdigy at https://lifeofanoracleprodigy.blogspot.com/

Follow The Oracle Prodigy on Facebook (https://www.facebook.com/theOracleProdigy/) and Twitter (https://twitter.com/D_OracleProdigy)

Overview of Receivables Invoicing Rules in Oracle Fusion Applications

Invoicing Rules are used to determine when to recognize your receivable for invoices that span more than one accounting period. You can only assign one invoicing rule to an invoice. Receivables provides the following invoicing rules:

Bill In Advance: Use this rule to recognize your receivable immediately.
Bill In Arrears: Use this rule if you want to record the receivable at the end of the revenue recognition schedule.

To use Invoicing Rules create an Invoice with the field populated:


After creating your Invoice and assigning an Invoicing Rule, Run Recognize Revenue Program from the Scheduled Processes page. This will create Invoices dated in a future date depending on the Invoicing Rule you have specified.

Also, ensure that the Invoicing Rule setup in Import Information section of "Manage Transaction Sources" task is correctly configured.


For more full-detailed Tutorials and Tips, check out #TheOracleProdigy at https://lifeofanoracleprodigy.blogspot.com/
Follow my other Social Media sites:
Like my Page The Oracle Prodigy on Facebook (https://www.facebook.com/theOracleProdigy/)
Subcribe to my YouTube Channel (https://www.youtube.com/c/OracleNerd)

Creating a Receivables Invoice in Oracle Fusion Applications

This article demonstrates how to Create a Receivables Invoice in Oracle Fusion Applications.

Navigate to the Receivables application > Billing

On the Billing Work Area > Click on the Task Panel > Create Transaction

On the Create Transaction Page, Fill up the necessary details such as:

Invoicing Rule - See more information on Invoicing rule from another article: Overview of Receivables Invoicing Rules in Oracle Fusion Applications 

Below is a quick step-by-step demonstration on Creating a Receivables Invoice in Oracle Fusion Applications:


For more full-detailed Tutorials and Tips, check out #TheOracleProdigy at https://lifeofanoracleprodigy.blogspot.com/
Follow The Oracle Prodigy on Facebook (https://www.facebook.com/theOracleProdigy/) and Twitter (https://twitter.com/D_OracleProdigy)

Customize the Data Models of seeded Oracle Fusion Applications reports

This article further expands on another article I wrote: "Customize the layouts of seeded Oracle Fusion Applications reports". The previous article talks about modifying only the visual aspects of the report, but not the underlying data.

There might be some cases wherein an organization would like to use the Seeded Report functions of Oracle Fusion, but may be required to add more details (such as a Descriptive FlexField, or another column in the Table).

In my experience, I've been tasked to add the name of the Legal Entity of seeded reports from Receivables (such as Invoices, Statements and Credit Memos), Procurement (such as Purchase Orders and Requisitions), Collections (such as Dunning Letters) and Payments (such as a Separate Remittance Advice).

The best and recommended way to customize seeded reports is to use BI Publisher's "Customize" function. But before you can actually modify the report, you have to first know the following:
  1. Identify under what group / pillar the report belongs to (Ex. Financials, HCM, Procurement)
  2. Identify the report's functionality (Ex. Invoice Report, Payroll, Purchase Order)
  3. Identify if the report is being called from the application screen via a function button, a menu, etc (more on this later).
  4. Familiarity with the expected report output and its data.
  5. Have the sufficient roles assigned such as BI Author and BI Administrator
For this example, we will modify the seeded Receivables Invoice report's underlying SQL.

To begin customizing a seeded Oracle Fusion Report, you may execute the following steps:
  1. Login to Oracle Fusion Applications using your Username and Password
  2. Click on the browser's address bar and change the URL to below to go to the BI Publisher Enterprise console


  3. Once inside BI Publisher Enterprise console, go to "Catalog" to access the Reports Catalog

  4. On the Folders pane, Expand "Shared Folders", then select the application that contains the Report to be modified (ex. "Financials"), then open the folder of the report's functionality (ex. "Receivables")

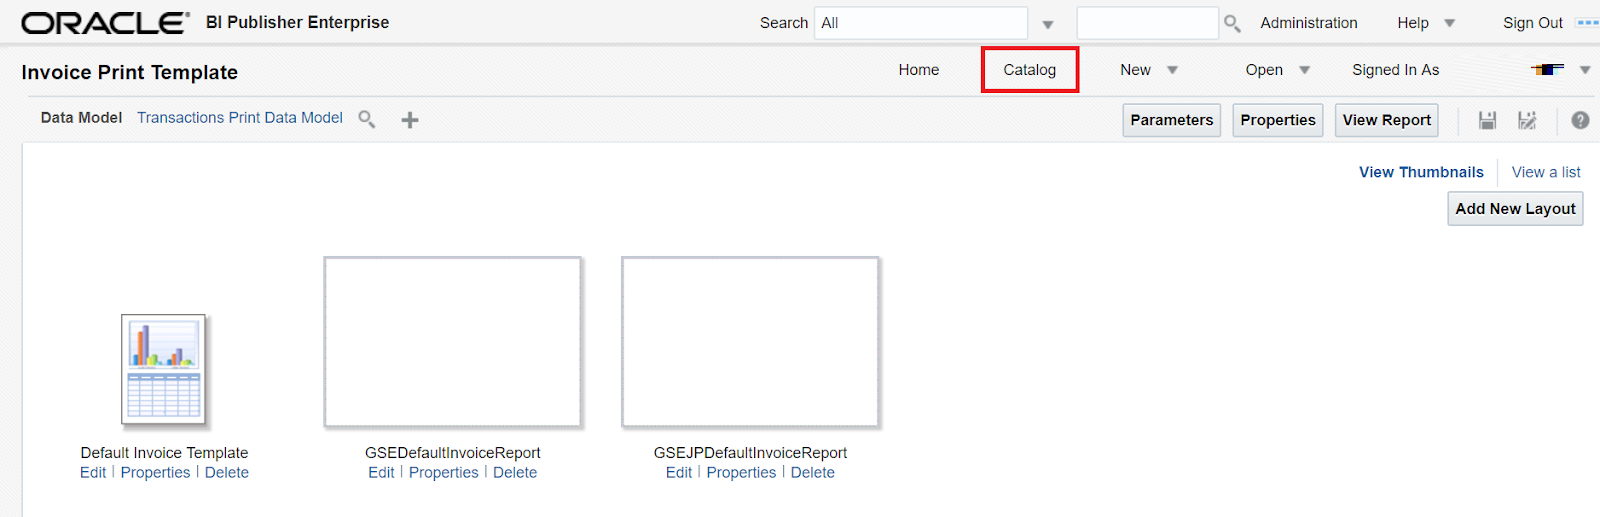
  5. Once inside the folder, choose the correct report and click on "More", then choose "Customize". Note that you may have to go deeper into the sub-folders to see the correct report. In this case, one has to navigate to the following folders: Receivables > Bill Presentment and look for the "Invoice Print Template" report:

  6. The Customize function will effectively copy the said report and folder structure under the "Custom" folder. However, note that this step only copies the report and its seeded layouts to the Custom folder, but still uses the seeded Data Model. Go back to the Reports Catalog by clicking on the "Catalog" link on the BI Publisher Enterprise's Global Area:


  7. On the Folders pane, Expand "Shared Folders" and further down to the "Custom" Folder. Again, select the application that contains the Report to be modified (ex. "Financials"), then open the folder of the report's functionality (ex. "Receivables"). You will now see the copy of the Report ("Invoice Print Template") that is ready to be customized.

  8. This Custom folder will also contain the customized data model. To proceed, click on the "+" Icon and add a new Folder called "Data Model". Please note that this folder name and structure is recommended by Oracle and using a different approach might result into data loss during upgrades or patches.

  9. Go back to the folder where the seeded report is placed (Shared Folders > Financials > Receivables > Bill Presentment) and go further down a sub-folder also named "Data Models". This will contain the seeded Data Models of each corresponding Report.

  10. Select the Data Model of the seeded report and click on "More" > "Copy". Then go into the Custom Data Model Folder (Shared Folders > Custom > Financials > Receivables > Bill Presentment > Data Model) and click on the "Paste" Icon.


  11. Go back on folder higher (Shared Folders > Custom > Financials > Receivables > Bill Presentment) and select the Report and click on "Edit":


  12. On the report page. Hover over the Data Model link and you will see that it points to the seeded Data Model (/Financials/Receivables/Bill Presentment/Data Models/Transactions Print Data Model). To point this to the custom Data Model, click on the search Icon and navigate to the custom Data Model.


  13. Once selected, hover once more on the Data Model link and you will see that it now points to the custom Data Model (/Custom/Financials/Receivables/Bill Presentment/Data Models/Transactions Print Data Model). Note that Oracle does not recommended to change the custom Data Model's name as it will impact how the seeded report is being run.

  14. Proceed to click on the Data Model link and you will be directed to the Data Model console. Here, you can modify, add or remove data sets, add parameters, Triggers, List of Values (LOVs) and Bursting Options.


For more information on modifying Data Models, you may check out the Oracle Documentation on BI Reports Customization. For more information on the usage of seeded tables in Oracle Fusion, check out the technical documentation on Oracle Tables and Views.

Follow The Oracle Prodigy on Facebook (https://www.facebook.com/theOracleProdigy/) and Twitter (https://twitter.com/D_OracleProdigy)

Use imported transaction number to search for Invoices in Oracle Fusion Receivables


Usually, when an invoice is imported into Oracle Fusion Receivables via AutoInvoice, the third-party application's miscellaneous details are stored in Descriptive Flexfields (DFFs). These details are often exclusive only to that application and isn't suitable to be mapped to seeded oracle fields, such as internal transaction numbers, descriptors, etc. 

In the example below, the details "Booking Number" and "Line Number" from a third-party application is stored in a DFF:


However, these DFFs are not available on the search screen and cannot be used to reference the newly-imported transactions:


To resolve this, we can use the "Reference" field to link the newly-imported transactions to their old transaction numbers. Below are the steps to set this up.

  1. Identify what DFF attribute holds the old transaction number (ex. INTERFACE_LINE_ATTRIBUTE1). Make sure this is properly defined and deployed before proceeding.
  2. Login to Oracle Fusion Applications and go to the "Setup and Maintenance" screen
  3. Search for the Task "Manage Transaction Sources" and query for the Transaction Source to be used.
  4. Under the "Source Defaults" section, inspect the LOV field "Reference Field Default Value" and choose the corresponding Header Attribute. For example, if your old transaction number is stored in INTERFACE_LINE_ATTRIBUTE1, then choose INTERFACE_HEADER_ATTRIBUTE1.


  1. Save your changes and close the task.
  2. Proceed to import a new sale transaction into Oracle Fusion Receivables using AutoInvoice. For example, the transaction number from the third-party application is "REFINV1" and is stored in INTERFACE_LINE_ATTRIBUTE1.
  3. Once AutoInvoice has successfully completed and imported the transaction, the reference value "REFINV1" will be stored in RA_CUSTOMER_TRX_ALL.CT_REFERENCE and RA_CUST_TRX_LINES_ALL.ATTRIBUTE1 DFF:

  1. It will be visible from the application in the "Cross Reference" field at the header Level and at also visible at the Line-level DFFs.
  2. You may now use this to search for the imported transactions:

Please note that this will only take effect to transactions that have been imported after the Transaction Source setup.

Recent Posts

SQL Fundamentals

Introduction to SQL and Syntax What is SQL? SQL stands for Structured Query Language. is a standard programming language for accessing datab...

Top Posts