Showing posts with label payables. Show all posts

Overview of Payable Transactions in Oracle Fusion Applications

This article will discuss an overview of Payable Transactions in Oracle Fusion Applications. Before you can create Payable transactions in Oracle Fusion Applications, make sure all configurations are complete. Check out a separate article "Overview of Payables Configurations in Oracle Fusion Applications" for more information on the configurations.


Once everything is configured, you may proceed to create payables transactions in multiple approaches. There are four approaches to create a Payables Invoice:

Manual
  1. Manual Invoice created from the Payables Work Area - allows you to create invoices by using an invoice work area within the application. There is a dedicated user interface where you can navigate and you can start recording your invoices by capturing header level information, line level information, and distribution level information.
  2. Integrated Imaging
  3. Manual Invoice created from Spreadsheets - Oracle provides functionality to upload invoices in bulk using Spreadsheets with the use of File-Based Data Import (FBDI) templates. This allows the user to be more efficient in getting their invoices in the application. Check out the video demonstration below on how to create invoices from an Excel Spreadsheet:


Self-Service
  1. Matched Invoices - This involves a process where you can match the invoices against purchase orders or maybe against receipts, depending on what type of matching level you are going to use.
  2. Unmatched Invoices - Invoices that are not matched to purchase orders can be routed to workflow approval rules that you configure
  3. Advanced Shipment Notices (ASNs) - A document which allows you to generate invoices automatically, which will be created when supplier create an ASN for drop shipments.
Automated
  1. Integrated Imaging - This will use Oracle Integrated Invoice Imaging solution to support integrated imaging of scanned invoices for paperless processing and routing. It then uses the import process to match to purchase order or receipts. If it's a PO based invoice, you can view invoice information including invoice status, installments, holds, payments, and applied prepayments against these invoices as well. You can also drill down to the original purchase order or receipt if required. And if errors are found during the process, manual intervention may be required to resolve the import errors.
  2. Self-Billed - In the application we have a feature called Evaluated Receipt Settlement, also known as Pay-On-Receipt. You can use the Pay On Receipt feature to help you in automatically generating an invoice the moment you create a receipt against a purchase order. You can use the predefined jobs, schedule them, and enable your supplier for Pay On Receipt functionality. When you do that, the moment you will create a receipt against a purchase order, based on the scheduled jobs system will automatically keep on creating an invoice against those receipts which you can access from the Payables application. Apart from that, we have also got something called Return to Supplier feature, or sometimes called as Return to Vendor (RTV). This basically helps you in automatically generating a debit memo the moment you create an RTV transaction in the Purchasing application. The moment you create an RTV transaction, that becomes the base to automatically generate a debit memo in the Payables application.
  3. Expense Reports - Expense reports are Invoices created from Employee Expenses that need to be reimbursed to them. It can be either done electronically through their registers bank accounts or in the form of a physically printed check. Whenever the expense reports are approved by both the manager as well as the Payables team, they become eligible for import into the Payables application. There is a job which you need to submit to export the expense reports from the Expense application into the Payables application, because from the Expense application you cannot directly process the payments. The type of invoice that is used for these expense reports is now known as Payment Requests. Whenever you will export the invoice from Expenses to the Payables application, you need to search with the invoice type as Payment Request. 
  4. Customer Refunds - Similar to Expense Reports, customer refunds can be triggered whenever there are any credit balance in Receivables that require a refund. Once approved, they will flow to Payments as Payment Requests.
  5. Inter-company invoices - An intercompany transaction that requires invoicing is imported to Payables for payment processing for internal suppliers
Electronic
  1. Business to Business (B2B) Web Service - Used to import invoices in an electronic format via a Web Service
Check out a separate article for more information on how to create Expense reports: Creating an Expense Report in Oracle Fusion Applications or check out the below step-by-step video demonstration:


For more full-detailed Tutorials and Tips, check out #TheOracleProdigy at https://lifeofanoracleprodigy.blogspot.com/
Follow The Oracle Prodigy on Facebook (https://www.facebook.com/theOracleProdigy/) and Twitter (https://twitter.com/D_OracleProdigy)

Overview of Payables Configurations in Oracle Fusion Applications

What are the required Configurations to use Payables in Oracle Fusion Applications?

These are some of the basic setups that we need to deal with first when it comes to Payables-to-Cash process. Some of the setups will be common, including enterprise structures, reference data sets. And some of the setups are specific to invoicing and payment process, and some of the setups are specific for reconciliation related requirements.

The required Configurations to use Payables are divided into four categories:
  1. Common Application Configurations
  2. Invoicing and Payments Configurations
  3. Cash Management and Banking
  4. Suppliers and Supplier Site Configurations
Common Application Configurations
  • Common Application Configurations are mostly configurations to be done in the General LedgerFirstly, you need to establish legal structures such as Enterprise details, Legal Entities, Business Units, Ledgers, etc. Secondly, you need to configure Reference Data Sets (RDS).
  • Enterprise Structures basically represents the entities through which you are managing your business. It includes a top entity called the Enterprise and under it you can have Legal Entities, ledgers, business units, inventory organizations, cost of books, etc. This includes Final reporting Structures, which is where the role of ledgers comes into the picture. For more information on Enterprise Structures, check out a separate article, Overview of Enterprise Structures in Oracle Fusion Applications
  • Reference Data Sets allows either the sharing of Master Data Objects (i.e. Payment Terms, Set of Books, etc.) across Business Units or makes it exclusive to a specific Business Unit or shared across multiple business units. It basically partitions the Master Data Objects on which Business Units get access to it. For more information on Reference Data Sets, check out a separate article: Overview of Reference Data Sets in Oracle Fusion Application.
Invoicing and Payments Configurations
  • To manage invoices and payments within Payables and Payments, you need to manage and maintain setups that are common to the Payables application.
  • For example, you will maintain common Payable and Procurement options. They will govern how the transactions are processed within the Payables and Payments application. Common Payment and Procurement Options are also used to default certain attributes directly on the invoices that you will process. Do note that there are certain Payment and Procurement Option attributes than can also be overridden at the supplier level.
  • Configurations such as allowing Invoice approvals and accounting for the payment transaction is driven through Invoice Options and Payment Options, respectively.
  • Setups required for Payment Processing such as design payment formats, payment systems, payment transmission configurations for electronically transmitting the payment files to your banks for disbursement purposes.
  • You may have to configure tax rules based on which the taxes should be calculated automatically.
  • You may have to set up Subledger Accounting Rules based on which the accounting entries at the Subledger level for these transactions will be generated. For more information on Subledger Accounting, check out a separate article: Overview of Subledger Accounting in Oracle Fusion Applications
Cash Management and Banking

Once these basic setups have been completed, you need to maintain your supplier and supplier site data. 

Supplier and Supplier Sites

Suppliers are used in different applications including Procurement, Payables, and Payments. You will use suppliers in the Procurement application for managing purchase orders as you cannot create a purchase order without a supplier. You need suppliers in the Payables application for processing supplier invoices. You need supplier in the Payments application for disbursing payments against the invoices that were recorded within the Payables application.

Supplier sites are basically used for establishing a relationship between a business unit and other attributes that will govern how the invoices related to those suppliers will be processed. This allows the system to know which business unit is authorized for recording transactions as far as a particular supplier site is concerned. You have have got an option to assign one site to multiple business units if necessary.

Supplier Sites also provide many defaults, controls and policies. Supplier Sites can default accounts combinations related to liability, advances automatically on the invoices. If it is not provided in the Site-Level, then system will retrieve those details straightaway from the common Payable and Procurement options.There is also a mechanism to specify a default withholding tax code, a default distribution set. Supplier Sites also controls whether to put holds on the invoices, default payment term, default terms date basis, etc.

Once all of these are setup and done, you can now proceed to create Payable Transactions in Oracle Fusion Applications.

For more full-detailed Tutorials and Tips, check out #TheOracleProdigy at https://lifeofanoracleprodigy.blogspot.com/
Follow The Oracle Prodigy on Facebook (https://www.facebook.com/theOracleProdigy/) and Twitter (https://twitter.com/D_OracleProdigy)

Overview of the Procure-To-Pay process flow in Oracle Fusion Applications

What is the Procure-to-Pay process flow?


The Procure-to-Pay process flow Involves two modules, the Procurement and the Payables Modules. In a quick summary, this process flow involves capturing the demand of a product/service, facilitating quotations from suppliers, converting quotations into purchase orders, receiving material, and finally releasing the payment for the vendor.


The process begins with demand, and the demand is recorded in the form of a requisition. The requisition is utilized as a base for requesting supplier quotations. Supplier quotations then get entered and compared within the application. Based on analysis and best product and price choice, the organization will award a purchase order to the chosen supplier. The supplier will then ship and send the material (or provide the service) to the organization, and finally the organization will book the invoice to pay the supplier. Do note that the sourcing of quotations is not a mandatory step in the process.

What is Procurement?

Procurement, or sometimes referred to as Purchasing, refers to a business practice of attempting to acquire goods and/or services to accomplish the goals of its enterprise. It is simply the process of identifying what the organization needs and buying it. The Procurement Modules' main end-users are called "Buyers".

Key Terminologies in Procurement

Purchase Requisition
  • Purchase Request is a precise document generated by an internal or external organization to notify the purchasing department of items it needs to order, their quantity, and the time frame that will be given in the future.
  • Executed by the End-Users of Each Department and sent to the Purchasing department.
Quotation
  • Request For Quotation (RFQ) is the communication between customer and supplier asking the availability of the item and its corresponding price.
  • Executed by Buyers to be sent to Vendors
Purchase Order
  • A written authorization from a buyer, for a supplier to deliver specified goods or services to the buyer, at the price, quality level, delivery date, and certain other terms specified in the agreement. A purchase order is legally binding after the supplier counter-signs it.
  • Executed by the Buyers and sent to the selling Vendor
What is Payables?

The Payables Application, sometimes referred to as the AP Module, is the module that is primarily involved with interfacing with Suppliers and paying Suppliers. Apart from the Procurement module, the AP module interfaces with multiple applications such as applications such as the Payments application for fund disbursement, Cash Management for bank statement reconciliation.

Key Terminologies in Payables

Suppliers
  • Organizations or Entities that provide goods or services. Can be both Internal or External.
Payment Disbursement
  • Provides funds for delivered goods or services to suppliers.
  • Can also provide funds for Customer Refunds or Employee expense reimbursements in the form of a Payment Request
  • Can be in the form of sending a physical check or electronic funds transfer (EFT)
Assets
  • Acquired Physical Goods that have a direct impact to an organization's net worth such as buildings, furniture, computers, etc.
  • Can be entered into the Payables module and will flow down to the Assets Module.
  • Value can Depreciate/Appreciate over a period time, and can be decommissioned as well.
For more full-detailed Tutorials and Tips, check out #TheOracleProdigy at https://lifeofanoracleprodigy.blogspot.com/
Follow The Oracle Prodigy on Facebook (https://www.facebook.com/theOracleProdigy/) and Twitter (https://twitter.com/D_OracleProdigy)

Difference of Payables in E-Business Suite and Oracle Fusion Applications

Someone asked recently: "Are there any functionality gaps between EBS AP and Oracle Payables Cloud?"

My response: "There are only a few differences, mainly with Fusion having the latest features compared to EBS."

Below is a quick table showing some key features missing from Payables E-Business Suite.


Information is updated as of April 4, 2019

Creating Banks, Bank Branches and Bank Accounts in Oracle Fusion Applications

This article gives a quick overview of the Bank Structure and demonstrates how to create custom Banks, Bank Branches and Bank Accounts in Oracle Fusion Applications. 

One of the main configurations for Cash Management is you have to define banks, branches, and the actual bank accounts. The Bank and the Branch information are stored in the Trading Community Model (TCM) tables where, whereas the account is stored in Cash Management tables.


To create custom Banks, Bank Branches and Bank Accounts in Oracle Fusion Applications, on the Springboard, click on the Navigator and go to the Functional Setup Manager (also known as "Setup and Maintenance" page):


Select the "Financials" offering, and select the "Cash Management and Banking" functional area and select the task "Manage Banks". Alternatively, you can click on the Task Panel and choose the "Search" function and enter "Manage Banks":


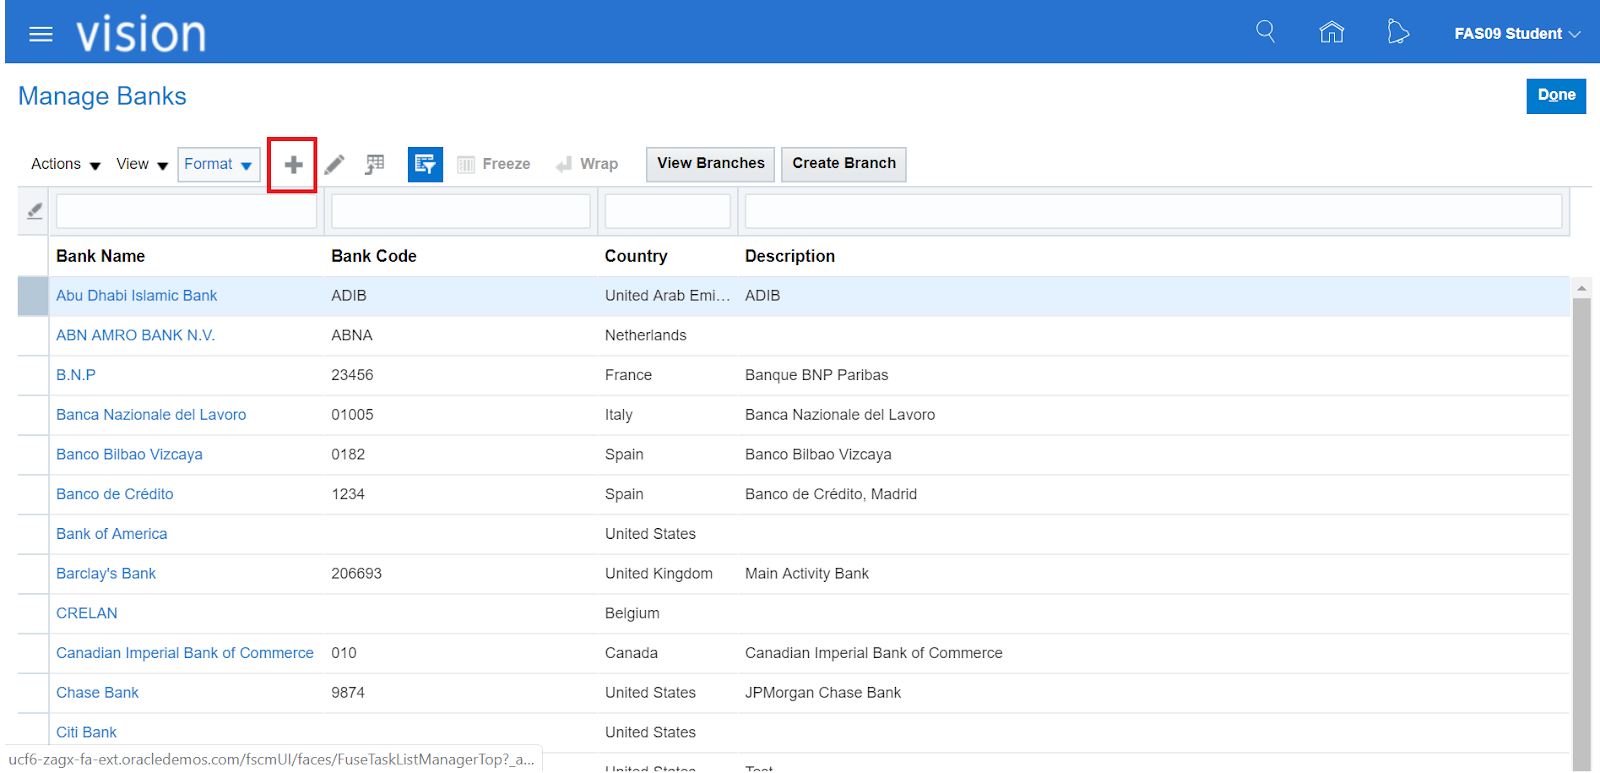
In the Manage Banks screen, click on the + Icon to add a new Bank and fill up the required fields:


In the "Create Banks" screen, fill up the required fields of the Bank such as the Country and Name. Other fields such as contacts and addresses are optional. Once done, click on the "Save and Close" button:


Back in the "Manage Banks" screen, select the newly created Bank and click on the "Create Branch" button to add a new Bank Branch:


In the "Create Bank Branch" screen, fill up the required field ("Branch Name"). Again, the other fields such as contacts and addresses are optional. Once done, proceed to Save and Close.


Back in the "Manage Banks" screen, select the newly-created Bank and click on the "View Branch" button to View the newly-created Bank Branch:


In the "Manage Bank Branches" screen, select the desired Bank Branch and click on the "Create Account" button:


In the "Create Bank Account" screen, specify which legal entities will have access to use this Bank Account and tick the corresponding check boxes if the Bank Account will be used for Payables, Receivables and Payroll functions. Also, take note of the tabs on this screen. These tabs will be very important for Cash Management. 
  • Under the General Tab, the GL Accounts section shows accounting information such as Accounts to be used for Cash, Cash Clearing and Reconciliation Differences. Under the Payment Documents section, this specifies what payment documents will be used by this bank account. These are going to be important for payables.
  • Under the Controls tab, there is a section dedicated to Reconciliation such as the Tolerance Rules, Auto Reconciliation Rule Set, Start Dates, etc. Also, under Bank Statement Processing, this is where Parsing Rule Sets and bank statement transaction creation rules are configured for the Bank Account. Further below, there are also some options for Payables for minimum and maximum payments, and then some forecasting options for Cash Management.
  • Under the security tab, That's an option where you could secure the bank account by directly assigning roles and/or users directly to the bank account.
  • Lastly, under the Business Unit Access Tab, you can specify which business units has access to the bank account. 


If the the "Business Unit Access" tab is not filled up, you will get the below error message:


Add the necessary Business Unit access and the correct Payment Document to be used by the Bank and Save:


Below is a quick Video demonstration of creating Banks, Bank Branches and Bank Accounts in Oracle Fusion Applications:


Follow my other Social Media Accounts!

Creating an Expense Report in Oracle Fusion Applications

This article will show you how to create Expense Reports in Oracle Fusion Applications. From the Navigator, click on the "Expenses" selection on the "About Me" section (or the "Me" section, depending on your Springboard layout):


If you haven't created an Expense report yet, you will be shown the Expenses Product Tour on the page, in which you can watch a quick video to learn more about the Expenses Module. To proceed to create an Expense Report, click on the "Create Expense Report" function:


On the "Create Expense Report" page, initially fill up the "Purpose" field and select the Payment Method and click on save for the application to generate its internal Expense Report Number:


As shown below, the Expense Report was assigned its internal number and is already in "Saved" status. To add the itemized expenses, click on the "+" icon:


On the Expense Item page, choose the appropriate expense type (i.e. Dinner, Hotel, etc.) and the correct amount and date. Put in the number of days the certain Expense was used as it will be divided from the total expense amount:


Depending on your organization's policies, your Expenses might need to be itemized and more detailed. Click on the "Itemize" button to add each line to the total expense. Tick the "Personal" checkbox if the expense was a personal expense and shouldn't be reimbursed. Once done, click on the "Save" drop down next to the "Close" button and proceed to close.


You can attach the necessary images of receipts on the "Create Expense Item" screen by clicking on the "+" icon or tick the "Receipt Missing" checkbox. This may be necessary for approval, depending on the Approving Manager or your organization's policies:


Make sure you tick the checkbox that signifies that you've read and accept the organization's Travel and Expense policies or else you won't be able to submit the expense report for approval. 


The report will undergo approval and once approved, will become a Payment Request in Payables to be processed. Depending on the Payment Method, the amount will be reimbursed to the employee via a Physical Check, Electronic (needs to have a Bank Account setup at the Employee-Level) or Wire. To know the approval stage of the Expense report, go to the Expense Report and click on the Status:


Below is a Video Demonstration of Creating an Expense Report in Oracle Fusion Applications:


Follow my other Social Media Accounts!
Facebook Page: https://www.facebook.com/theOracleProdigy/
Twitter: https://twitter.com/D_OracleProdigy

Overview of Oracle Financials

Below is a quick diagram of the Oracle Financials Cloud Modules and how they all interact with each other. Note that most of these modules are also found in Oracle E-Business Suite.


Below summarizes some of the important modules in Oracle Financials:

General Ledger (usually abbreviated to GL)
  • The Financial application that records all the finalized transactions of an organization
  • Deals with Ledgers, Periods, Currencies, Accounting Convention (sometimes called SubLedger Accounting Method) and finalized financial reporting

SubLedger Accounting (usually called SLA)
  • A subset application of the General Ledger that holds all the finalized transactions of the other modules (somewhat like an interface).
  • Transferring data from Subledgers to the General Ledger can be done on the Balances, Journal and Subledger Level (Lowest to Highest, respectively)
  • More information on a separate article: Overview of Subledger Accounting in Oracle Fusion Applications
Payables (sometimes called Accounts Payables or AP)
  • The Financial application that deals with Suppliers and Payments
  • Also linked to the Procurement Module via Purchase Orders and Requisitions
  • Invoices can be automatically created once a Supplier has delivered the ordered goods and the organization has confirmed it.
  • The Payment process can then be initiated and electronically transmitted to the Bank for Processing.
  • Run Create Accounting to Transfer to SubLedger Accounting (SLA)
Expenses
  • A subset application of Payables that deals with employee expense reimbursement such as Travel, Food, Accomodation, etc.
  • Expenses Can be entered via Spreadsheets, Mobile Application and usually goes through an approval process
  • Once approved, the expense will become a Payment Request in Payables for Reimbursement to be paid to the Employee
  • Follows the same process of "Create Accounting" through Payables
Assets (sometimes called Fixed Assets in EBS)
  • The Financial application that deals with Company Assets and how their value fluctuates over time.
  • Can be linked to Payables when an organization orders goods that are tagged as an Asset.
  • Assets can then be posted into the "Asset Book" and starts the Asset life cycle (Appreciation, Depreciation, Transfer, Adjustments, Retire, etc.).
  • Run Create Accounting to Transfer to SubLedger Accounting (SLA)
Receivables (sometimes called Accounts Receivables or AR)
  • The Financial application that creates and sends Invoices to Customers (can be created Manually or interfaced via AutoInvoice from Projects, third-party applications, etc.)
  • Receipts are then issued once customers have paid the Invoices
  • Run Create Accounting to Transfer to SubLedger Accounting (SLA)
Advanced Collections
  • A subset application of receivables that deals with customer payment collection.
  • Collectors can review delinquent, non-paying Customers and issue a reminder in the form of Dunning.
  • Customers can then issue a Promise to Pay letter or raise a Dispute on payments.
  • Every action a collector and customer is recorded in the application and can automatically raise flags/reminders when thresholds are not met.
Cash Management (usually abbreviated to CM)
  • Reconcile Bank Statements to and from the Bank and link up to transactions within the application such as receipts
  • Includes Miscellaneous Transactions such as Bank Interest and charges
  • Cash Forecast and Positions
  • Transactions such as External Transactions (Bank Charges or Interest Income) and Bank Account Transfers initiated from the Cash Management application goes into SubLedger Accounting
Tax (called E-Business Tax in EBS)
  • Module responsible for the Calculation for Tax for both AR and AP
  • Can be automatically linked to third-party tax providers such as Vertex
  • Defines the Tax Regimes, Rates and Tax Recovery Rates, depending on the geographical area

For more full-detailed Tutorials and Tips, check out #TheOracleProdigy at https://lifeofanoracleprodigy.blogspot.com/
Follow The Oracle Prodigy on Facebook (https://www.facebook.com/theOracleProdigy/) and Twitter (https://twitter.com/D_OracleProdigy)

Set Procurement Agents in Oracle Fusion Applications


Go to Setup and Maintenance > Choose the "Financials" offering and select "Manage Procurement Agents" under the Tasks.


Select the desired Business Unit the Agent will come under:


On the Manage Procurement Agents page, you may either search for an existing agent by filling up the required fields and clicking on the "Search" button, or you may click on the "+" sign to add a new agent:

In the "Create Procurement Agent" page fill up the Required fields and identify if that specific agent needs access to other Agents' Documents as well.

Click on "Save and Close" and you may verify if the Agent has been created from the "Manage Procurement Agent" page:


Overview of Reference Data Sets in Oracle Fusion Applications

Reference Data Sets (RDS) in Oracle Fusion Applications allows either the sharing of Master Data Objects (i.e. Payment Terms, Set of Books, etc.) across Business Units or makes it exclusive to a specific Business Unit. It basically partitions the Master Data Objects on which BUs get access to it.

There are two seeded RDS, "Common" and "Enterprise".
  1. Common: This RDS allows the access of Master Data Objects Across all Business Units (Global in Scope)
  2. Enterprise: This RDS only allows access of Master Data Objects to the specific Business Unit (Local in Scope).
Most Organizations create new Enterprise Reference Data Sets depending on their need. A common naming convention is to name the Reference Data Sets as the same as the Business Unit.

To Create a new Reference Data Set, navigate to "Setup and Maintenance" > Search for the Task named "Manage Reference Data Sets" and create the name of the Data Set there.


To Assign a Reference Data Set to a Business Unit, navigate to "Setup and Maintenance" > Search for the Task named "Manage Business Units" and edit the existing Business Unit you want to assign the Reference Data Set to.


In this case, our Business Unit in our sample named "Eagle" is assigned to the seeded "COMMON" data set, which grants the Eagle Business Unit all Reference Data that is assigned to the "COMMON" RDS.


For a Master Data Object to be assigned to a RDS, navigate to "Setup and Maintenance" > Search for the Task named "Manage Business Unit Set Assignment" and setup your needed Reference Data Object to the appropriate RDS:


In some complex cases, we can make a specific value in a Reference Data Object "shared" across Business Units. Take Payable Payment Terms as a sample below.

SET ASSIGNMENT

Business Unit
Reference Data Object
Reference Data Set Name
US1
AR Payment Term
US1SET
US2
AR Payment Term
US2SET
US3
AR Payment Term
COMMON

SETUP DATA


Reference Data Set Name
AR Payment Term
US1SET
NET30
US1SET
NET45
COMMON
NET30
COMMON
IMMEDIATE
US2SET
NET45
ORGSET
NET30

QUESTIONS

A User under a specific Business Unit is trying to create an AR Invoice. Using the SET ASSIGNMENT and SETUP DATA provided, What are the Payment Terms visible to the User?
  1. The User is under Business Unit "US1"
  2. The User is under Business Unit "US2"
  3. The User is under Business Unit "US3"
ANSWERS

The Payment Terms visible to the User would be:
  1. NET30, NET45 and IMMEDIATE
  2. NET30, NET45 and IMMEDIATE
  3. NET30 and IMMEDIATE
The reason both US1 and US2 show the same Payment terms is because NET30 and IMMEDIATE are under the "COMMON" configuration, and therefore are available to all Business Units.
If you want to make it exclusive the US1 or US2, the Setup for those Payment Terms should be removed for "COMMON".

In another Example, The diagram below shows that the specific Payment Term "NET 30" is shared between 3 Reference Data Sets (US1, US2 and Special Shared Set). This can be achieved by using the correct setup and making sure there are no common values. More information on this can be found from Understanding Enterprise Structures: Reference Data.


For more full-detailed Tutorials and Tips, check out The Oracle Prodigy at https://lifeofanoracleprodigy.blogspot.com/
Follow The Oracle Prodigy on Facebook (https://www.facebook.com/theOracleProdigy/) and Twitter (https://twitter.com/D_OracleProdigy)

Get the XML Extract of Payments or Separate Remittance Advise from Oracle Fusion Applications

When an organization is issuing Payments to Suppliers and sending Remittance Advise, 
there would be instances where issues would arise (Incorrect Amounts, Invalid Supplier Details, etc.) and there is a need to review the XML data fusion is sending out.
However, getting the XML Extract of Payments or Remittance Advises in Fusion can be quite difficult as compared to other Fusion Reports.
In comparison, getting XML data for AR Invoices/Credit Memos are particularly easy, as the option to download its XML is already included when running its ESS job ("Print Receivables Transactions").
On the other hand, Payments or Remittance Advises don't have this capability.
Luckily, there are two workarounds Oracle has identified and I have personally tested both.

Listed below are the workarounds, including their advantages and disadvantages:

  1. Use BI Publisher's ad-hoc querying capabilities. 
    • The advantage of this option is there is no need for the actual process to be re-run, particularly useful if the issue has occurred in Production.
    • The downside of this option is sufficient BI Administrator Privileges is needed to create the ad-hoc Data Model that will retrieve the XML.
  2. Modify the Report's Output Format to XML and re-run the process.
    • Unfortunately, I don't actually see an advantage with regards to this option.
    • Because actual process needs to be re-run, this option would be risky if done in the Production Environment, as the application might re-send the data to suppliers or the Bank, creating confusion.
For this post, we will focus on the Option # 1. The steps to do this are as follows:
  1. Login to Oracle Fusion Applications using a Username that has the sufficient Custom BI Role (inherited BI Admin or BI Author role)
  2. Go to BI Publisher by appending "xmlpserver" on the browser's URL: (i.e. https://xxxx.xx.xxx.oraclecloud.com/xmlpserver)
  3. Create a New Data Model 
  1. Create a New SQL Data Set:


  1. Use the Below Query with the appropriate Payment_File_Number 


select document 
from  iby_trxn_documents 
where  payment_instruction_id = &Payment_File_Number
and  doctype = 100
  1. Run this Data Set and Click on "Export".
  1. Open this output in either Notepad or Notepad++ and re-save it as an XML file.
The resulting XML file would be the actual XML data used by the Payment File and Remittance Advise.

Recent Posts

SQL Fundamentals

Introduction to SQL and Syntax What is SQL? SQL stands for Structured Query Language. is a standard programming language for accessing datab...

Top Posts