Infolets and Infotiles in Oracle Fusion Applications both are seeded objects that display key information about your organization. They both act like dashboards that alert the Business User on things you may need to prioritize. Below are some of their differences:
Infolets
Accessible from the Welcome Springboard (aka your Homepage) through the Navigational Dots (if using the Panel Homepage) or through the Analytics Section (.
Provides both Summary and Detailed information by extending using its extension arrows.
Users can create customized Infolets according to the data that they need.
Can be hidden, disabled and enabled based on preferences.
Infotiles
Only Accessible from a Work Area
Cannot be extended to show details.
Displays information specific to the said Work Area
Quick example: the Infotiles displayed in the Receivables Work Area shown above only pertain to AR Invoices, Batches, Receipts, etc.
This article will show you how to create a Customer in Oracle Fusion Applications.
First, navigate to Receivables > Billing from your Welcome Springboard:
On the Billing screen, click on the Task Panel, and click on the "Create Customer" function:
Fill up the required fields such as:
Customer Type - You have two options: Organization or Person. Choose Organization if this Customer is an Entity, and Person if this Customer is a direct individual.
Name - The Identifying name of the Customer
Registry ID - This is the Auto generated Customer ID as based on the Trading Community Architecture
Account Number - This is the Auto generated Customer Number that Oracle uses internally
Account Type - You have two options: External (for external customers) or Internal (usually used for Subsidiaries)
On the Address section, fill up the fields such as Site Name and the appropriate Address.
On the Address Purpose section, make sure to add the "Bill To" and "Ship To" purpose as these are the two most important purpose of a Customer Site.
Click on "Save and Close" to save your work.
To review and edit your inputs, you may search your newly-created customer from the "Manage Customers" screen:
Go to the Customer's Site and on the "Profile History" tab, click on the "Create Site Profile" button:
On the "Create Site Profile" screen, choose the appropriate Profile Class to auto-populate most of the fields on the Customer, and change other fields that are not applicable. Check another article to know more about Customer Profile Classes. Click on "Save and Close" to save your work.
Below is a quick video demonstration on Creating a Customer in Oracle Fusion Applications:
Customer profile Class is a master data setup object that holds attributes that are important to the interaction between the organization and customers in terms of their selling relationship. It holds details such as the Customer's creditworthiness, credit tolerance, credit limit, its default payment terms, statement configurations, and its assigned collector. A Customer Profile class is also used drive how the system will match receipts together with their invoices and defines how invoices are grouped together.
Is Customer Profile Class a Required Setup?
Yes, every customer in the system must be associated with a profile class before it can be created.
How does one create a Customer Profile Class?
Below is a Step-by-Step guide on creating a Customer Profile Class in Oracle Fusion Applications:
Navigate to Setup and Maintenance > Task Panel > Search:
Search for "Manage Receivables Customer Profile Classes":
In the "Manage Receivables Customer Profile Classes" screen, you can search for an existing Profile Class to review existing setups. Since we'll be creating a new Profile Class for this article, click on the "+" Icon to add a new Profile Class:
In the Create Receivables Customer Profile Class" screen, fill up the required fields such as:
Profile Class Name and Description - Identifier for the Customer Profile Class
Collector - Identifies the Collector responsible for Customers under this Profile Class
Tolerance - Defaulted to 0%
Allow Discount - Indicates if Customers under this Profile Class are allowed to have a discount
You may also fill up some of the important optional fields below:
Credit Analyst - Person responsible for Reviewing Customers under this Profile Class
Credit Classifications - Identifies the Risk Level of Customers under this Profile Class
Credit Review Cycle - Review Frequency for Customers under this Profile Class
Credit Limit - The Maximum Credit Amount allowed for Customers under this Profile Class
Order Amount Limit - The Maximum Amount allowed per Order for Customers under this Profile Class
Conversion Rate Type - Defaulted to Corporate
Payment Terms - Indicates the Number of Days Customers under this Profile Class should pay their due amount
Match Receipts by - Identifies how Receipts will be matched to Customers under this Profile Class
Send Statements, Credit Balances, Dunning Letters - Identifies if Statements, Credit Balances and Dunning Letters should be sent to Customers under this Profile Class
Preferred Contact Method - Identifies how Customers under this Profile Class should be contacted for Dunning and Credit Balances
Statement Preferred Delivery Method - Identifies how Customers under this Profile Class should be contacted for Statements
In the "Late Charges" Tab, Indicate if Customers under this Profile Class is allowed to have Late Charges. If checked, indicate important fields such as Calculation Method, Receipt Grace Days, Interest Days Period, etc.
Once Done, click on "Save and Close" to save your inputs.
You may review your newly-created Customer Profile Class by going back to the "Manage Receivable Customer Profile Classes" page and searching it using its Identifying name:
Below is a quick Video Demonstration of how to create a Customer Profile Class in Oracle Fusion Applications:
This article gives a quick overview of the Bank Structure and demonstrates how to create custom Banks, Bank Branches and Bank Accounts in Oracle Fusion Applications.
One of the main configurations for Cash Management is you have to define banks, branches, and the actual bank accounts. The Bank and the Branch information are stored in the Trading Community Model (TCM) tables where, whereas the account is stored in Cash Management tables.
To create custom Banks, Bank Branches and Bank Accounts in Oracle Fusion Applications, on the Springboard, click on the Navigator and go to the Functional Setup Manager (also known as "Setup and Maintenance" page):
Select the "Financials" offering, and select the "Cash Management and Banking" functional area and select the task "Manage Banks". Alternatively, you can click on the Task Panel and choose the "Search" function and enter "Manage Banks":
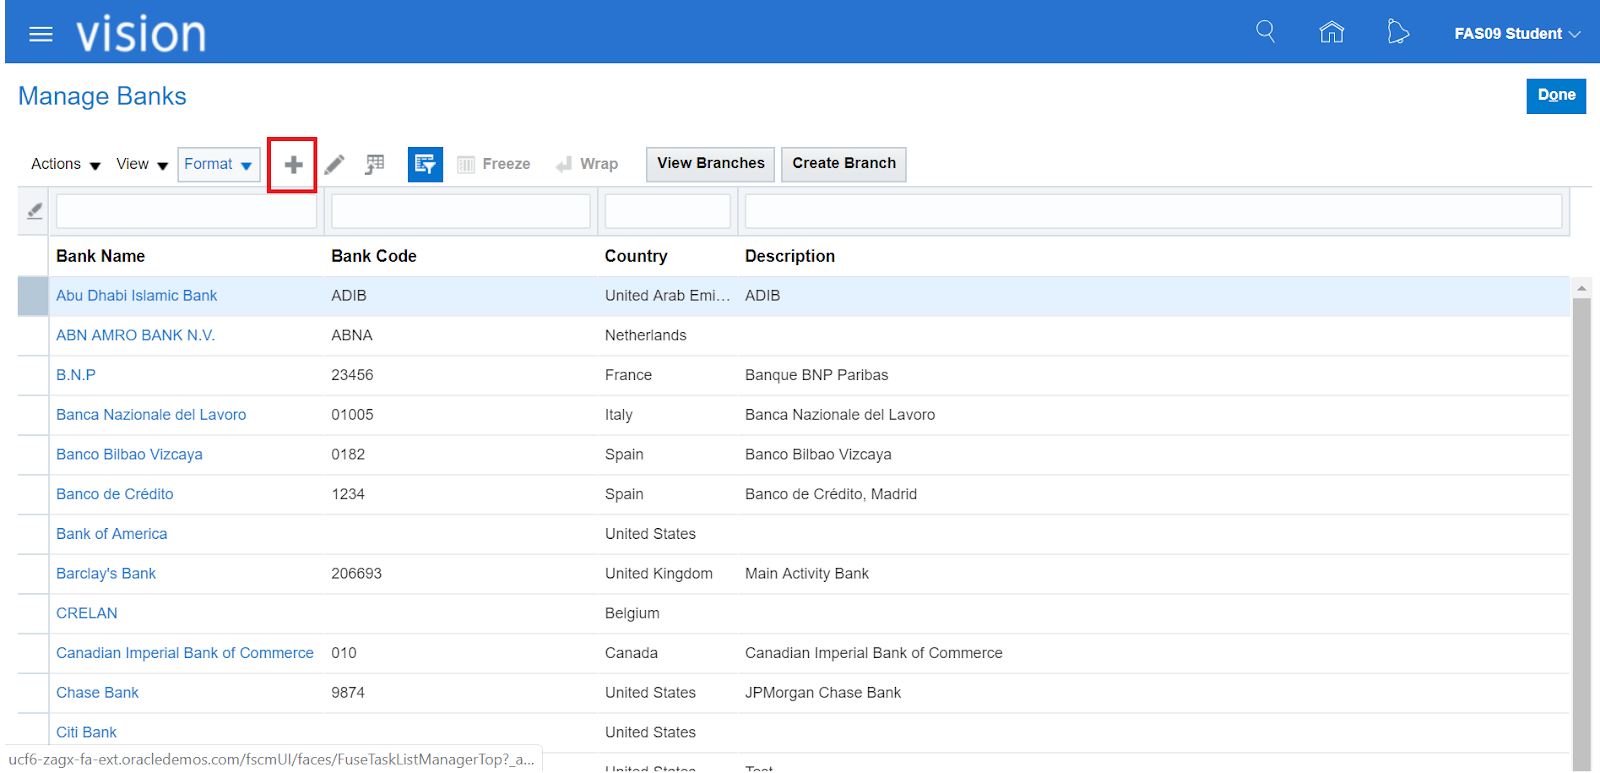
In the Manage Banks screen, click on the + Icon to add a new Bank and fill up the required fields:
In the "Create Banks" screen, fill up the required fields of the Bank such as the Country and Name. Other fields such as contacts and addresses are optional. Once done, click on the "Save and Close" button:
Back in the "Manage Banks" screen, select the newly created Bank and click on the "Create Branch" button to add a new Bank Branch:
In the "Create Bank Branch" screen, fill up the required field ("Branch Name"). Again, the other fields such as contacts and addresses are optional. Once done, proceed to Save and Close.
Back in the "Manage Banks" screen, select the newly-created Bank and click on the "View Branch" button to View the newly-created Bank Branch:
In the "Manage Bank Branches" screen, select the desired Bank Branch and click on the "Create Account" button:
In the "Create Bank Account" screen, specify which legal entities will have access to use this
Bank Account and tick the corresponding check boxes if the Bank Account will be used for Payables, Receivables and Payroll functions. Also, take note of the tabs on this screen. These tabs will be very important for Cash Management.
Under the General Tab, the GL Accounts section shows accounting
information such as Accounts to be used for Cash, Cash Clearing and Reconciliation
Differences. Under the Payment Documents section, this specifies what payment
documents will be used by this bank account. These are going to be important
for payables.
Under the Controls tab, there is a section dedicated to Reconciliation
such as the Tolerance Rules, Auto Reconciliation Rule Set, Start Dates, etc. Also,
under Bank Statement Processing, this is where Parsing Rule Sets and bank
statement transaction creation rules are configured for the Bank Account. Further
below, there are also some options for Payables for minimum and maximum
payments, and then some forecasting options for Cash Management.
Under the security tab, That's an option where you could
secure the bank account by directly assigning roles and/or users directly to
the bank account.
Lastly, under the Business Unit Access Tab, you can specify
which business units has access to the bank account.
If the the "Business Unit Access" tab is not filled up, you will get the below error message:
Add the necessary Business Unit access and the correct Payment Document to be used by the Bank and Save:
Below is a quick Video demonstration of creating Banks, Bank Branches and Bank Accounts in Oracle Fusion Applications:
This article will show you how to create Expense Reports in Oracle Fusion Applications. From the Navigator, click on the "Expenses" selection on the "About Me" section (or the "Me" section, depending on your Springboard layout):
If you haven't created an Expense report yet, you will be shown the Expenses Product Tour on the page, in which you can watch a quick video to learn more about the Expenses Module. To proceed to create an Expense Report, click on the "Create Expense Report" function:
On the "Create Expense Report" page, initially fill up the "Purpose" field and select the Payment Method and click on save for the application to generate its internal Expense Report Number:
As shown below, the Expense Report was assigned its internal number and is already in "Saved" status. To add the itemized expenses, click on the "+" icon:
On the Expense Item page, choose the appropriate expense type (i.e. Dinner, Hotel, etc.) and the correct amount and date. Put in the number of days the certain Expense was used as it will be divided from the total expense amount:
Depending on your organization's policies, your Expenses might need to be itemized and more detailed. Click on the "Itemize" button to add each line to the total expense. Tick the "Personal" checkbox if the expense was a personal expense and shouldn't be reimbursed. Once done, click on the "Save" drop down next to the "Close" button and proceed to close.
You can attach the necessary images of receipts on the "Create Expense Item" screen by clicking on the "+" icon or tick the "Receipt Missing" checkbox. This may be necessary for approval, depending on the Approving Manager or your organization's policies:
Make sure you tick the checkbox that signifies that you've read and accept the organization's Travel and Expense policies or else you won't be able to submit the expense report for approval.
The report will undergo approval and once approved, will become a Payment Request in Payables to be processed. Depending on the Payment Method, the amount will be reimbursed to the employee via a Physical Check, Electronic (needs to have a Bank Account setup at the Employee-Level) or Wire. To know the approval stage of the Expense report, go to the Expense Report and click on the Status:
Below is a Video Demonstration of Creating an Expense Report in Oracle Fusion Applications:
Every ledger must have the "4Cs":
- Chart of Accounts (CoA) - helps organize the data
- must be associated with A Calendar - the Calendar identifies the time frame
- the Currency provides a financial measurement
- Convention - Accounting Convention - the statutory requirements of how we conduct our accounting.
Whether or not we're talking about a primary ledger or a secondary ledger, they must have these elements.