Showing posts with label applications. Show all posts

Defining a Customer Profile Class in Oracle Fusion Applications

What is a Customer Profile Class?

Customer profile Class is a master data setup object that holds attributes that are important to the interaction between the organization and customers in terms of their selling relationship. It holds details such as the Customer's creditworthiness, credit tolerance, credit limit, its default payment terms, statement configurations, and its assigned collector.  A Customer Profile class is also used drive how the system will match receipts together with their invoices and defines how invoices are grouped together. 

Is Customer Profile Class a Required Setup?

Yes, every customer in the system must be associated with a profile class before it can be created.

How does one create a Customer Profile Class?

Below is a Step-by-Step guide on creating a Customer Profile Class in Oracle Fusion Applications:
  1. Navigate to Setup and Maintenance > Task Panel > Search:


  2. Search for "Manage Receivables Customer Profile Classes":

  3. In the "Manage Receivables Customer Profile Classes" screen, you can search for an existing Profile Class to review existing setups. Since we'll be creating a new Profile Class for this article, click on the "+" Icon to add a new Profile Class:


  4. In the Create Receivables Customer Profile Class" screen, fill up the required fields such as:
    • Profile Class Name and Description - Identifier for the Customer Profile Class
    • Collector - Identifies the Collector responsible for Customers under this Profile Class
    • Tolerance - Defaulted to 0%
    • Allow Discount - Indicates if Customers under this Profile Class are allowed to have a discount

    You may also fill up some of the important optional fields below:
    • Credit Analyst - Person responsible for Reviewing Customers under this Profile Class
    • Credit Classifications - Identifies the Risk Level of Customers under this Profile Class
    • Credit Review Cycle - Review Frequency for Customers under this Profile Class
    • Credit Limit - The Maximum Credit Amount allowed for Customers under this Profile Class
    • Order Amount Limit - The Maximum Amount allowed per Order for Customers under this Profile Class
    • Conversion Rate Type - Defaulted to Corporate
    • Payment Terms - Indicates the Number of Days Customers under this Profile Class should pay their due amount


    • Match Receipts by - Identifies how Receipts will be matched to Customers under this Profile Class
    • Send Statements, Credit Balances, Dunning Letters - Identifies if Statements, Credit Balances and Dunning Letters should be sent to Customers under this Profile Class
    • Preferred Contact Method - Identifies how Customers under this Profile Class should be contacted for Dunning and Credit Balances
    • Statement Preferred Delivery Method - Identifies how Customers under this Profile Class should be contacted for Statements


  5. In the "Late Charges" Tab, Indicate if Customers under this Profile Class is allowed to have Late Charges. If checked, indicate important fields such as Calculation Method, Receipt Grace Days, Interest Days Period, etc. 


  6. Still in the "Late Charges" Tab, in the Currency Settings, add a currency and the Minimum Amounts for Receipt, Statement, Dunning and Invoicing. To know more about Late Charges, check out a separate detailed article: Overview of Processing Late Charges for Receivables in Oracle Fusion Applications.


  7. Once Done, click on "Save and Close" to save your inputs.
  8. You may review your newly-created Customer Profile Class by going back to the "Manage Receivable Customer Profile Classes" page and searching it using its Identifying name:

Below is a quick Video Demonstration of how to create a Customer Profile Class in Oracle Fusion Applications:


Follow The Oracle Prodigy on Facebook (https://www.facebook.com/theOracleProdigy/) and Twitter (https://twitter.com/D_OracleProdigy)

Creating Banks, Bank Branches and Bank Accounts in Oracle Fusion Applications

This article gives a quick overview of the Bank Structure and demonstrates how to create custom Banks, Bank Branches and Bank Accounts in Oracle Fusion Applications. 

One of the main configurations for Cash Management is you have to define banks, branches, and the actual bank accounts. The Bank and the Branch information are stored in the Trading Community Model (TCM) tables where, whereas the account is stored in Cash Management tables.


To create custom Banks, Bank Branches and Bank Accounts in Oracle Fusion Applications, on the Springboard, click on the Navigator and go to the Functional Setup Manager (also known as "Setup and Maintenance" page):


Select the "Financials" offering, and select the "Cash Management and Banking" functional area and select the task "Manage Banks". Alternatively, you can click on the Task Panel and choose the "Search" function and enter "Manage Banks":


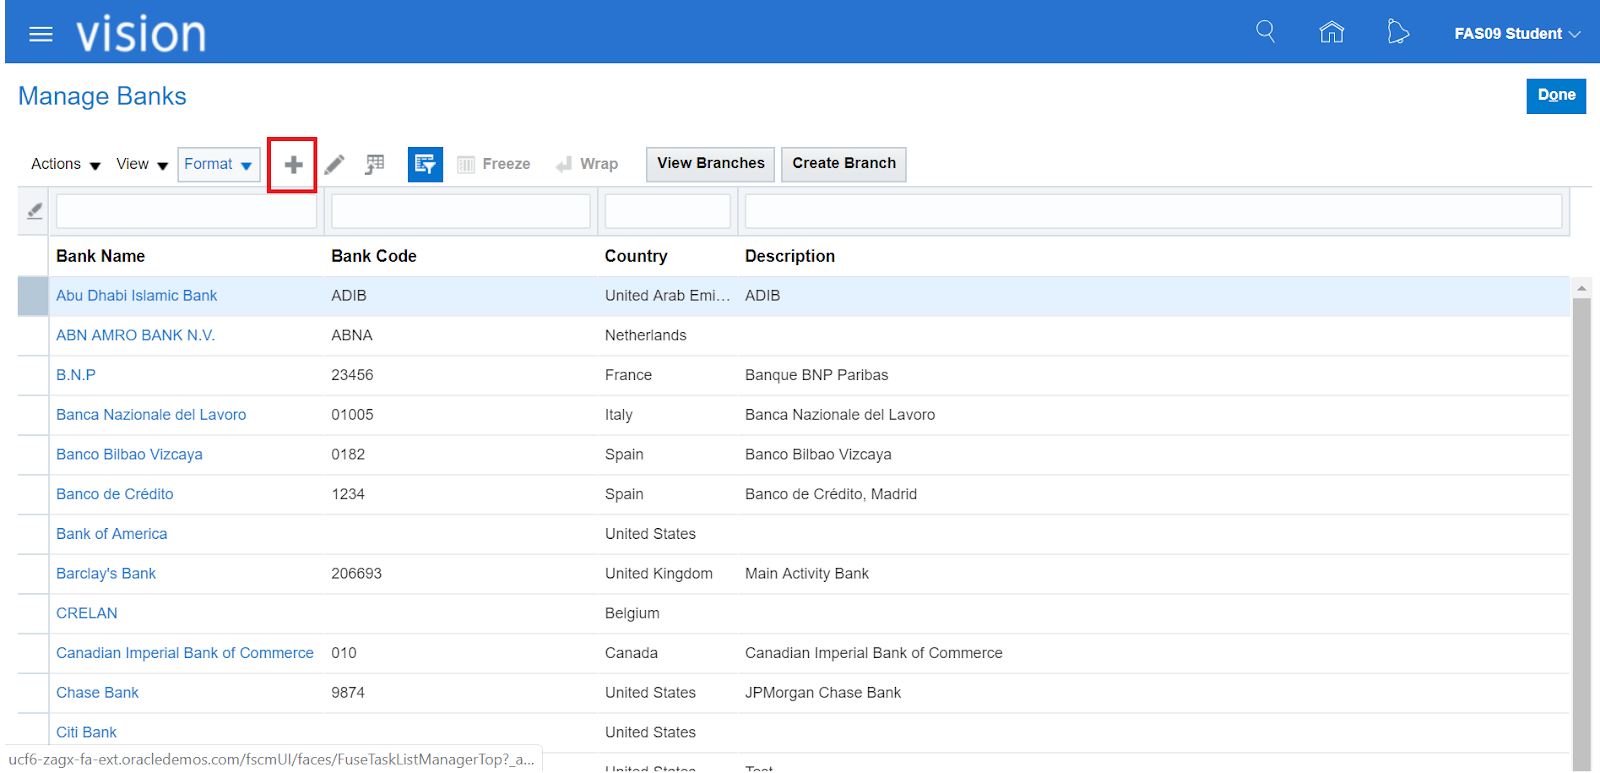
In the Manage Banks screen, click on the + Icon to add a new Bank and fill up the required fields:


In the "Create Banks" screen, fill up the required fields of the Bank such as the Country and Name. Other fields such as contacts and addresses are optional. Once done, click on the "Save and Close" button:


Back in the "Manage Banks" screen, select the newly created Bank and click on the "Create Branch" button to add a new Bank Branch:


In the "Create Bank Branch" screen, fill up the required field ("Branch Name"). Again, the other fields such as contacts and addresses are optional. Once done, proceed to Save and Close.


Back in the "Manage Banks" screen, select the newly-created Bank and click on the "View Branch" button to View the newly-created Bank Branch:


In the "Manage Bank Branches" screen, select the desired Bank Branch and click on the "Create Account" button:


In the "Create Bank Account" screen, specify which legal entities will have access to use this Bank Account and tick the corresponding check boxes if the Bank Account will be used for Payables, Receivables and Payroll functions. Also, take note of the tabs on this screen. These tabs will be very important for Cash Management. 
  • Under the General Tab, the GL Accounts section shows accounting information such as Accounts to be used for Cash, Cash Clearing and Reconciliation Differences. Under the Payment Documents section, this specifies what payment documents will be used by this bank account. These are going to be important for payables.
  • Under the Controls tab, there is a section dedicated to Reconciliation such as the Tolerance Rules, Auto Reconciliation Rule Set, Start Dates, etc. Also, under Bank Statement Processing, this is where Parsing Rule Sets and bank statement transaction creation rules are configured for the Bank Account. Further below, there are also some options for Payables for minimum and maximum payments, and then some forecasting options for Cash Management.
  • Under the security tab, That's an option where you could secure the bank account by directly assigning roles and/or users directly to the bank account.
  • Lastly, under the Business Unit Access Tab, you can specify which business units has access to the bank account. 


If the the "Business Unit Access" tab is not filled up, you will get the below error message:


Add the necessary Business Unit access and the correct Payment Document to be used by the Bank and Save:


Below is a quick Video demonstration of creating Banks, Bank Branches and Bank Accounts in Oracle Fusion Applications:


Follow my other Social Media Accounts!

Changing the Home Page Layout in Oracle Fusion Applications

Oracle Fusion Applications can provide three options for a home page layout: Newsfeed, Panel, and Banner. These are all set by the System Administrator.

News Feed Layout


Has the Analytics page section readily available.

Panel Layout


Banner Layout:


Has the Page Control dots to show the user's Infolets.

Changing the Home Page Layout

For you to change the Layouts or Appearance, the System Administrator would need to go into a "Sandbox" environment. Any changes applied to this Sandbox will only be visible to the user logged in and would need to be "Published" before all users in the system can see the changes. Do note that the Sandbox would only be available to the "System Administrator" Role. Below are the steps on how to change the Home Page Layout:


  1. Log in to a User that has a "System Administrator" Role.
  2. Go into a Sandbox by clicking on the Logged in User's name and click on "Manage Sandbox"
  3. You can either create a new Sandbox or activate an existing Sandbox.
  4. Click on the Navigator and select the "Appearance" menu
  5. Select the desired Layout and click "Apply". Wait for it to take effect.
  6. Click on the Home icon to navigate to the Welcome Springboard and see the applied home page layout.
  7. You may now publish the Sandbox and the desired layout will now be applied to the production environment.

Below is a video demonstration for further clarity:


Don't forget to leave a comment and subscribe to future tutorials! :)

Create a Supplier in Oracle Fusion Applications

To Create a Supplier, the User must first be granted the seeded role of "Supplier Manager". Navigate to the Security Console from the Navigator:


Click on the "User" tab and search for your desired user to grant the role to:


Click on "Edit" and proceed to click on the "Add Role" button:


Select "Supplier Manager" from the List of Values (LoV). If there is another role with a similar name, choose the Role with the Code of "ORA_" as the prefix. This signifies that it's the seeded Oracle role.


Once done, click on the "Add Role Membership" button and Save. You may need to logout and log back in after a few minutes for it to take effect to the desired user.

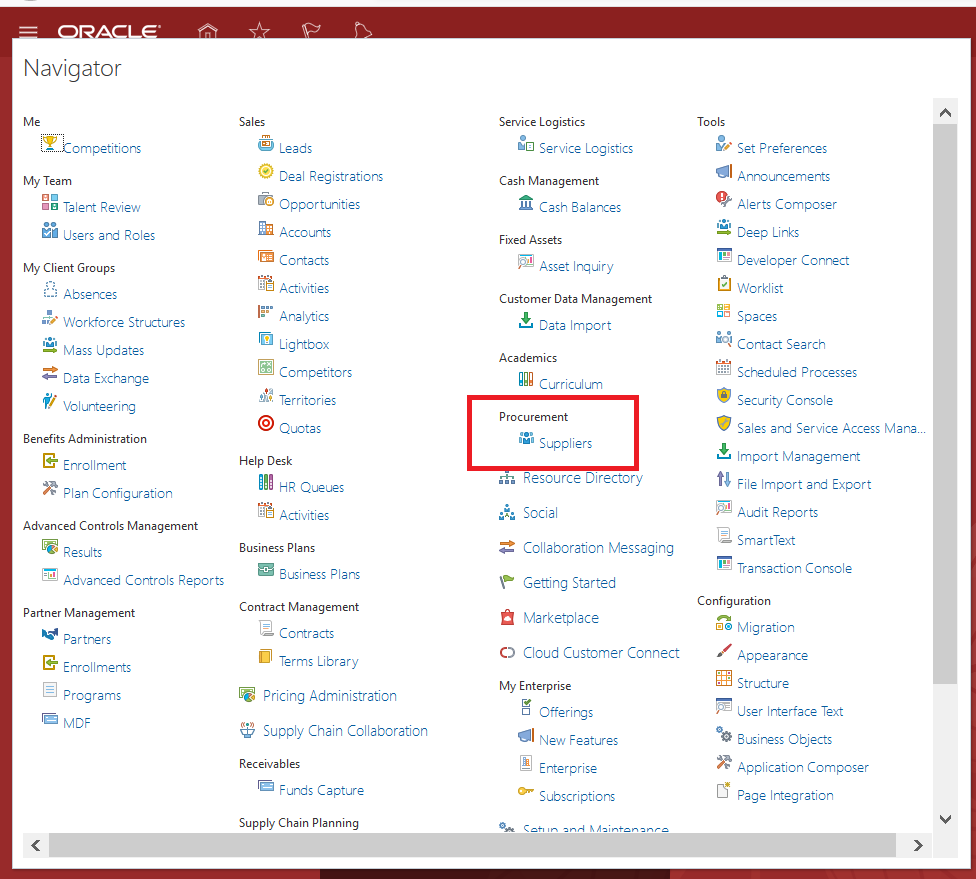
Click on the Navigator and select "Suppliers". Alternatively, you may click on the "Procurement" Menu on the Welcome Springboard and proceed to click on "Suppliers".


Click on the Task Pane and select "Create Supplier". Fill up the initial required details and click on "Create":


Once done, The initial details of the Supplier will be created. Please take note that you would still need to complete other important details before you can proceed to use the newly-created Supplier. You can view the details still pending for the Supplier by viewing the "Suppliers with Incomplete Setup" section in the Supplier screen:


A quick step-by-step Video demonstration can be found here:


Set Procurement Agents in Oracle Fusion Applications


Go to Setup and Maintenance > Choose the "Financials" offering and select "Manage Procurement Agents" under the Tasks.


Select the desired Business Unit the Agent will come under:


On the Manage Procurement Agents page, you may either search for an existing agent by filling up the required fields and clicking on the "Search" button, or you may click on the "+" sign to add a new agent:

In the "Create Procurement Agent" page fill up the Required fields and identify if that specific agent needs access to other Agents' Documents as well.

Click on "Save and Close" and you may verify if the Agent has been created from the "Manage Procurement Agent" page:


Create Journals though Spreadsheet in Oracle Fusion Applications

You can create Journal Entries in Oracle Fusion applications in two ways.
You can create it manually one-by-one or by Bulk through Excel Spreadsheets using the File-Based Data Import for Financials Cloud (commonly known as FBDI). For the manual process, you may refer to the tutorial found here: Create GL Journal Entry in Oracle Fusion Applications. For the bulk process, you first need to install FBDI on your Local PC and ensure you have the appropriate Microsoft Office version installed. For this article, we will use Microsoft Office o365 or 2016 and FBDI version 11.1.1.9.3 (build 5.0.2.18097).

Go to General Accounting > Journals 


Click on the Task Pane and choose Create Journal in Spreadsheet


Depending on the browser, you will be asked to either open the file in Microsoft Excel (for Mozilla) or it will download the file on your Local PC right away (for Chrome). Either way, proceed to open the file in Microsoft Excel:


Once the file has been opened in Excel, click on "Enable Editing" and proceed to confirm that you want to Connect:


You will be prompted to login using your Username and Password. Use the Username and Password that has the appropriate access to the Ledger you want to import transactions in.


Once login has been confirmed, the spreadsheet will now show the appropriate fields and you can proceed to input the Ledger Header and Line Details. The fields below in Red are the recommended fields you must populate:


For the Chart of Accounts (CoA), You may manually input the values or double-click on the field to select from the List of Values (LoV):


If you've completed entering the necessary information, proceed to click on "Submit" from the Ribbon. You will be prompted to select an option to either:
  1. Save the data to the GL_INTERFACE table without importing into the GL Base Tables (GL_JE_HEADERS, GL_JE_LINES, etc.)
  2. Save the data to the GL_INTERFACE table and subsequently import data into the GL Base Tables
  3. Save the data to the GL_INTERFACE table and subsequently import data into the GL Base Tables and process them for Posting


Once the process has completed successfully, the status will show as "Row inserted successfully" in the "Row Status" column in the Spreadsheet.
On the other hand, Error Lines will show as "Error" and you may update any incorrect data and resubmit to try again.


To verify the uploaded data, navigate to the Springboard > General Accounting > Journals then click on the Task Pane and select "Manage Journals".
You may use the Ledger name you've provided to quickly search for your Journal Batch:


Below is a quick video demonstration on the topic above:


Recent Posts

SQL Fundamentals

Introduction to SQL and Syntax What is SQL? SQL stands for Structured Query Language. is a standard programming language for accessing datab...

Top Posts