Reporting in Financial Reporting Compliance

In Financial Reporting Compliance provides a set of predefined reports organized into five categories.

Assessment Reports
  • Assessment Details Reports - displays information about assessment conducted against selected objects.
  • Control Assessment Report - lists controls and their related assessment activities in PDF format
  • Control Assessment Extract - lists controls and their related assessment activities in Excel Format
Control Reports
  • Control Details Report
Issue Reports
  • Issue Details Report - provides information about selected issues, including the object against which each issue is raised, issue status and state, users who created or updated and when they did so, and other values.
  • Issue Details Extract - provides similar information for export to an application such as Excel.
Risk Report
  • Risk Control Matrix Report - lists risks, controls and related information: perspectives and other values
  • Risk Control Matrix Extract - lists risks, controls and related information for export to Excel Format
Administration Reports
  • Change history Report
  • Pending Worklist Items Report
  • Related Objects report
  • Worklist Item Requiring Reassignment
Activating Email Alerts

Setup e-mail messaging in Financial Reporting Compliance users when tasks require their attention.
  1. select the Enable check box in the E-Mail Alerts region
  2. Select the test connection button to view a message that connectivity with your email server is established.
  3. Create an email alert schedule

Overview of Surveys in Risk Management Cloud

What is a Survey in Risk Management Cloud?

A Survey is a set of questions that may be associated with assessments or distributed independently of assessments.

You may link a survey to an assessment activity in an assessment plan. Survey questions concern the type of object (process, risk or control) and the activity specified in the plan. Answers to the questions help assessment participants form judgments about objects in assessments developed from the plan. Assessment participants are selected automatically on the basis of their job roles.

As you prepare a survey, you may start with any of the following components:
  1. Choice Sets. A choice is a possible answer to a question, and a choice set is an assortment of answers a person may select from. You can associate a given choice set with any number of questions.
  2. Questions. These may or may not require choice sets. Or you can select choices are you create questions and save them into choice sets.
  3. Template. As you create a template, you can select existing questions for it, or create questions. Moreover, you can use an existing template to distribute a new survey or create a new template for a survey.
Survey question formats

Survey questions may take the following formats. For any format other than open text, you can associate a question with a choice set.


Control Management in Risk Management Cloud

What is a Control?
A control defines measures to address risks. It describes actions taken automatically in other systems or manually. For example:
  • Ensure segregation of duties within payroll functions
  • Review changes to master data, including change owner.
Relating Controls to a Risk

As you create risks, you can relate them to controls.
  • The relationship indicates that a control mitigates the risk it is related to
  • you can relate any number of controls to a risk, or a control to any number of risks.
A control requires only two values:

  1. A Name, which should suggest what the control does to mitigate risk. You may choose to add a description that expands upon the name.
  2. A Method. Either Manual or Automatic:
As you create a control, you can create a test plan for it. Completed as part of a control assessment, it test whether the control is effective in alleviating the related risks.

Issue Management and Lifecycle in Risk Management Cloud

Manage the Issue Resolution Process

The resolution of an issue includes these steps:
  1. A User creates an Issue
  2. A User with proper privileges validates the issue, either determining that it requires investigation, closing it or putting it on hold
  3. If the issue is valid, a user with proper permissions determines whether a remediation plan is required for the issue to be resolved. If not, this user closes the issue.
  4. If so the user creates or selects a remediation plan. Other users respond to the worklists to complete remediation tasks. The remediation plan is marked as complete and the issue is closed.
The Issue object records defects or deficiencies detected for risks, controls or assessments. Typically, you discover issues when you assess risks or controls. Typically, one user identifies an issue, another verifies it and another resolves it.

Raising an Issue

A user may raise an issue from several places:
  • From an issue-management work area
  • from the issues tab in the management page for an individual risk or control, create an issue specific to that object or review its details
  • within an assessment of a risk or control
Resolving an Issue

Once an issue exists, the process of resolving it may include:

  1. Validating the issue
  2. Take appropriate actions to resolve the issue
  3. Closing an Issue
Validating the issue

When an issue is created, a user may receive a worklist notification to validate if. This user may:
  • Determine that it requires investigation.
  • Determine that it does not require investigation, and close it
  • Put it on Hold
To Receive a validation worklist, a user must be assigned a duty role called Issue Validator Composite. In effect, this user determines whether the issue is genuine, and so should be a user other than the one who creates the issue. However, the validation workflow is optional. If no user is assigned the Issue Validator Composite duty role, no validation worklist is issued.

Users with the Issue Validator Composite, or Issue Manager Composite duty role may oversee the validation and resolution of issues, and close them.

Closing an Issue

you can close an issue:
  1. when it is resolved; when points of concern have been addressed
  2. At any other time. You may, for example, determine during the validation step that the issue is invalid or cannot be resolved.
For more full-detailed Tutorials and Tips, check out #TheOracleProdigy at https://lifeofanoracleprodigy.blogspot.com/
Follow The Oracle Prodigy on Facebook (https://www.facebook.com/theOracleProdigy/) and Twitter (https://twitter.com/D_OracleProdigy)

Overview of Assessments in Oracle Risk Management Cloud

What is an assessment?

An assessment is the review of a risk or a control to ensure that it is defined correctly or that its definition remains appropriate over time.

An assessment may
  • focus on objects themselves, or on activities involving object, such as certification or audit
  • be batch or ad-hoc
  • concern a single risk or control, or encompass many.
  • Involve the participation of business stakeholders, internal and external auditors, or other users.
  • Incorporate test plans for controls
To determine what an assessment is meant to uncover, you assign one or more activity types to it. assessment activity types include:


The Assessment Page
  • An Introduction page presents an overview of the item being assessed. It includes guidance text, which is a broad statement of the assessment's purpose.
  • A "Review Prior Results" page displays records for any prior actions taken for this assessment.
  • An "Enter Test Results" page enables you to complete a test plan. It appears only if you are assessing a control for which a test plan has been created.
  • Use the response field to select an answer to an activity question. This determines whether the object passes or fails the assessment. You can also create a summary statement, create an issue, or attach a file to the assessment.
Batch Assessments follows the flow:


A batch assessment depends on several components
  1. A template designates a primary object of assessment, Risk and Control. The template also designates one or more activities to be completed in assessments.
  2. From the template, you develop a plan. It may contain filters that select instances of the primary object specified by the template. 
  3. From a plan, you initiate an assessment, selecting object instances made available by the plan.
A batch assessment offers an array of options:
  1. It not only involves multiple object instances, but also may designate multiple activities to be completed
  2. Its generation involves the use of supporting tools: templates and plans. You use these to select assessment activities to define a set of objects for assessments.
  3. You Initiate it and manage the components that support it within the Assessment work area
Initiating a Batch Assessment
  1. Provide the general information
  2. Review the selection criteria
  3. select risks or controls to be assessed
  4. review participants
The final page in the initiate assessment series identifies the assessors for each risk or control selected for assessment. These people are selected according to role assignments, and you cannot modify that selection in this page.

The purpose of this review is to identify risks or controls that have no assessors, so that you can return to the components page and remove them from the assessment

Adhoc Assessments

An adhoc assessment is simpler:
  1. It not only focuses on a single object, but also designates a single activity to be completed
  2. You initiate it from within the page to manage the risk or control you want to assess
Completing an Assessment

An assessment may include any number of risk or controls. You assess each of these individually. You May:
  • Select a Worklist notification for a risk or control included in the assessment
  • Select the "Complete Assessment" option in the tasks panel tab of any page in the Assessments work area. In a search page, search of an Assessment, select one of its risks or controls, and select "Complete Assessment".
  • Navigate to the Assessments tab of the Management page for the risk or control being assessed. Select the row for an Assessment and the "Complete Assessment" action.
For more full-detailed Tutorials and Tips, check out #TheOracleProdigy at https://lifeofanoracleprodigy.blogspot.com/
Follow The Oracle Prodigy on Facebook (https://www.facebook.com/theOracleProdigy/) and Twitter (https://twitter.com/D_OracleProdigy)

Manage Role Provisioning Rules in Oracle Fusion Applications

If you have numerous job roles and want to assign them automatically to users, you can use Job-Role Mappings to automate this process.

This is basically an If-Then Condition to assign roles automatically to users.


You can run a background program to automate this process.

For more full-detailed Tutorials and Tips, check out #TheOracleProdigy at https://lifeofanoracleprodigy.blogspot.com/
Follow The Oracle Prodigy on Facebook (https://www.facebook.com/theOracleProdigy/) and Twitter (https://twitter.com/D_OracleProdigy)

Overview of the Security Console in Oracle Fusion Applications

What is the Security Console?

Use the Security Console to
  1. Implement, customize and manage security
  2. Create and Edit Custom roles
  3. Create and Manage User Accounts

Access the Security Console through the Welcome Springboard > Navigator Menu > Tools

Functional Security Overview

Job and Duty Roles grant access to functionality:
  • A Duty Role grants access to privileges required to complete a specific task, or a set of related tasks.
  • A Job role combines duty roles required to grant access to a broad range of tasks.
  • You can assign job roles to users. In combination, the job roles assigned to a person encompass all that he or she is hired to do.
  • You cannot assign duty roles directly to users. A User is granted duty role indirectly as components of job roles.
  • You work with Risk Management roles in the Security Console.
Seeded Roles have the Prefix of "ORA" in their Codes. These cannot be modified but can only be duplicated. In the below screenshot we see two entries for Accounts Payables Manager, but one of them is a seeded Role and the other is a Customized Role:


Roles can also be viewed Graphically:


Editing a Role


  1. Function Security Policies
  2. Data Security Policies allow a role to work with a specific Business Unit or a Ledger
  3. Role Hierarchy 
  4. Segregation of Duties
  5. Users. Directly Assign the role to a specific User
Role Administration:


  1. Set Role Preferences such as Prefix for Copied Role Name and Code
  2. Copy Role Status for copied seeded Roles
  3. Bridge for Active Directory
Role-Assignment Strategies

More than one mapping of duty roles to job roles may correctly grant functional access to a user.

  1. You may create a single job role for a given user. For it, you would select all the duty roles the user needs.
  2. You may assign multiple job roles to a given user. Each would contain a subset of the duty roles the user requires.
The second approach is recommended because it gives greater flexibility. Each job role remains available for assignment to other users in varying combinations with other job roles.

One strategy is to use Role Provisioning Rules to automatically assign roles to users based on a criteria. More information can be found in another article: Manage Role Provisioning Rules in Oracle Fusion Applications.

For more full-detailed Tutorials and Tips, check out #TheOracleProdigy at https://lifeofanoracleprodigy.blogspot.com/
Follow The Oracle Prodigy on Facebook (https://www.facebook.com/theOracleProdigy/) and Twitter (https://twitter.com/D_OracleProdigy)

Overview of Perspectives in Risk Management

What is a Perspective?

Perspective is a set of related, hierarchically organized values. You can
  1. Create other perspective hierarchies
  2. Assign perspective values to processes, risks, models, controls, and incidents
  3. Assign perspective values to data security policies
  4. Use perspectives as a filter for searching and reporting
Perspectives are used for filtering/security and control rights. These are hierarchy of values that can either be based on your Organizational structure , Regulatory compliance, Geographic Location or Processes.

Before a perspective hierarchy is available for use, you must associate it to Module Objects. These Modules are
Below is a quick demonstration of Assigning perspectives to Module Objects:


You cannot add more modules, but you can modify them according to your business needs

After assigning a perspective to a module object, you would need to run a couple of jobs. Jobs are individual requests to synchronize data, evaluate models or advanced controls, export results, generate reports, or perform other background tasks. You run a job on the page to which the job applies, but you manage it in the Monitor Jobs page. You can:
  • See the current status of the job
  • Manage files created by the import or export jobs
  • Cancel some jobs
  • Purge the Job History

A perspective filter may use an "Includes Children" condition. If so, it grants access to objects tagged with a perspective value you select for the filter, or with any of its child values.

A single perspective filter  may select more than one perspective value. If so, those values have an OR relationship. The filter grants access to objects associated with any of the values.

A data security policy may include multiple perspective filters. If so, they have an AND relationship. The policy grants access only to objects associated with values selected by all the filters.

For more full-detailed Tutorials and Tips, check out #TheOracleProdigy at https://lifeofanoracleprodigy.blogspot.com/
Follow The Oracle Prodigy on Facebook (https://www.facebook.com/theOracleProdigy/) and Twitter (https://twitter.com/D_OracleProdigy)

Financial Reporting Compliance in Risk Management Cloud

What is Financial Reporting Compliance?

Financial Reporting Compliance is, in effect, a module of Risk Management. Its objects include Risk, Control (along with a test plan, test instruction and test step), and Process (along with action item).

Financial Reporting Compliance consolidates the documentation of your business practices to satisfy financial reporting regulations. This Enterprise-scope solution enables you to:
  1. Define and interrelate processes, risk, controls, assessments and issues.
  2. Automate periodic reviews, approvals, test and follow through.
  3. Secure what users see and do.
  4. Let stakeholders get the information they need to make the best decisions.
  5. Lower cost by implementing efficient, repeatable, and reliable day-to-day usage and administration.
The Financial Reporting Compliance module includes three object types: Process, Risk and Control
  1. Process is the parent of Risk. As you create or edit a process, you can relate it to risks that may affect it, or create related risks.
  2. Risk is the parent of Control, as you create or edit a risk, you can relate it to controls meant to address it. 
  3. Controls may work together to address a given risk, and if so, other configurations values may apply to them.
Risk-Control Matrix

Financial Reporting Compliance maintains a risk-control matrix:


Every business process is subject to risks, and a company enacts controls to minimize those risks.
A risk-control matrix is an organized record of all the material risks that may affect each process and all the controls created to address those risks.

Predefined Job Roles for Financial Reporting Compliance:
  1. Enterprise Risk and Control Manager 
  2. Compliance Manager 
Both of these are Superuser roles providing functional and setup access to anything a person can do in Financial Reporting Compliance.

Best Practice Financial Reporting Compliance


The Best Practice Solution is a prescriptive set of steps for deploying key elements of Financial Reporting Compliance with maximum Speed and efficiency, and with minimum cost and upkeep.

Best Practice Solution Steps

  1. Gather Configuration Data
    • Retrieve existing risk and control definitions from spreadsheets, email-records, file-sharing system, and any other Repositories.
    • Collect related data, such as documentation needed to support risks and controls.
    • Consider who is to work with risks and controls and the roles they are to fill.

  1. Prepare and Import Data
    • Use the data migration utility to import this data into Financial Reporting Compliance
  1. Configure Roles and Users
    • Use Oracle Identity Manager and Authorization Policy Manager to define risk management roles and assign them to users. You can create job roles from predefined duty roles.
Use risk-management and control-management work ares to create new risks and controls, or modify existing ones.
Optionally, use Risk Management workflow to route risks and controls to reviewers and approvers
Regularly assess risk and controls to ensure their continued viability.

For more full-detailed Tutorials and Tips, check out #TheOracleProdigy at https://lifeofanoracleprodigy.blogspot.com/
Follow The Oracle Prodigy on Facebook (https://www.facebook.com/theOracleProdigy/) and Twitter (https://twitter.com/D_OracleProdigy)

Security Strategies for Risk Management Cloud (draft)

Cloud Security Methodology can be summarized with a simple statement: "WHO can do WHAT on WHICH set of data?" where:
  1. WHO is the User
  2. WHAT actions the user can perform, reflected in job and duty roles
  3. WHICH set of data is reflected in data security policies
An example is below:

Security Processes


For more full-detailed Tutorials and Tips, check out #TheOracleProdigy at https://lifeofanoracleprodigy.blogspot.com/
Follow The Oracle Prodigy on Facebook (https://www.facebook.com/theOracleProdigy/) and Twitter (https://twitter.com/D_OracleProdigy)

Overview of Advanced Controls Management in Risk Management Cloud

What is Advanced Controls Management?

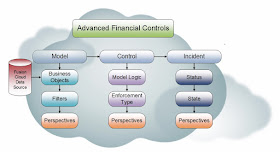
Advanced Controls Management is concerned with the testing of Financial Transactions and the segregation of duties. ACM is further broken down into two:

  1. Advanced Access Controls
  2. Advanced Financial Controls

Advanced Access Controls


Why is there a need for Advanced Access Controls?
  1. Stop Payment Fraud and Error
  2. Prevent Insider Data Breaches
  3. Remove Blind Spots and stay ahead of Emerging Risks
Advanced Access Control is used to monitor users who have access to do the following:


One example of the use and importance of Advanced Access control is the Analysis of Access Privileges.

Advanced Access control can be used to detect a User that has the capability to create a Supplier and Create an Invoice. This is a risk for Fraud and a violation of Segregation of Duties.

Another one is when a Buyer is a also an AP Supervisor. A buyer can create purchase orders and pay Invoices at the same time. This is also a risk for Fraud and a violation of Segregation of Duties.


Advanced Financial Controls


Why is there a need for Advanced Financial Controls?


  • Automate Detection of Fraud, Error and Policy Violation
  • Stop High Risk Transactions such as
    • Identical Expenses
    • Split Purchase Orders
    • Duplicate Invoices
    • Unusual Invoice Amounts
    • Unauthorized Spending
    • Blocked Suppliers
    • User Creates Supplier & Pays Invoices
Advanced Controls Management Best Practice


For more full-detailed Tutorials and Tips, check out #TheOracleProdigy at https://lifeofanoracleprodigy.blogspot.com/
Follow The Oracle Prodigy on Facebook (https://www.facebook.com/theOracleProdigy/) and Twitter (https://twitter.com/D_OracleProdigy)

Overview of Oracle Risk Management in Oracle ERP Cloud

Risk Management is a great tool for Auditors to address risks in the Organization. Risk, in this context, is an adverse material or financial impact to the organization. The Risk Management Module is composed of two divisions: Financial Reporting Compliance and Advanced Controls Management.


Financial Reporting Compliance is the part that Documents all the Business Processes, while Advanced Controls Management is used to test Financial Transactions (specifically Payables and Expense Reports), Segregation of Duties and User Security.

Advanced Controls Management is further broken down into two: Advanced Financial Controls and Advanced Access Controls.

Goals of Risk Management
  1. Update/Maintain Documentation for Business Processes and Adverse Impact
  2. Evaluate/Review Risks to Business Processes
  3. Resolve Issues
  4. Distribute/Print Results
To work with a risk is to:
  • Name the risk
  • Describe the risk
  • Relate the risk to the controls meant to minimize it
You may also attach documents to the risk to provide more detail about it and select perspective values for the risk to characterize it.

Risk Management Cycle
  1. Add risks and controls to the object library
  2. Review and approve risks and controls
  3. Create Assessment templates and plans and initiate assessments
  4. Assess Objects
  5. Create and Address Issues identified during assessments
  6. Re-assess Risks and Controls
  7. Review assessment result Reports
Predefined Job roles for Risk Management


Application
Job Role Name
Financial Reporting Compliance
Enterprise Risk and Control Manager
Financial Reporting Compliance
Compliance Manager
Advanced Financial Controls
Application Control Manager
Advanced Access Controls
Application Access Manager

Important Duty Roles in Risk Management
  1. Enterprise Risk & Control Manager
  2. Compliance Manager
The above-mentioned roles is recommended to be copied and customized because it is way too powerful to assign to business users. You would need to run specific background programs after the customization have been carried out.

How does Financial Reporting Compliance and Advanced Controls Management work together?

Financial Reporting Compliance and Advanced Controls Management both use Control as the way to identify the Risks in the Enterprise.

Scheduled Jobs in Risk Management

Three predefined processes run the first time you start Risk Management:
  1. User and Role Security Synchronization
  2. Worklist Security Synchronization
  3. Report Synchronization
Common Terminologies in Risk Management Cloud

Some common terminologies for Risk Management:
  1. Object is the generic term for any of the components one may include in a module. Objects are independent of other objects in other modules.
  2. A Module is a set of objects that relate to one another in a way that defines governance, risk and compliance environment.
  3. Process is the focus of governance, risk, and compliance efforts, representing business processes for which users identify risks and create controls to alleviate those risks.
  • Financial Reporting Compliance
    1. Process Object
    2. Risk Object - A risk defines circumstances that may adversely affect a business process.
    3. Control Object - A control defines measures to address a risk. 
    4. Test Plan - For each control, you can create test plans. Test plans document steps to be followed in determining whether the control is effective.
    5. Issue - An issue is a defect or deficiency detected for a risk or control, or an activity connected with one of these objects, such as an assessment.
    6. Remediation Plan
    7. Assessment - An Assessment is the review of a risk or control to ensure that it is defined correctly and remains effective over time.
    8. Survey is a set of questions that may be associated with assessments or distributed independently of assessments
  • Advanced Control Management
    1. Model
    2. Control
    3. Incident
For more full-detailed Tutorials and Tips, check out #TheOracleProdigy at https://lifeofanoracleprodigy.blogspot.com/
Follow The Oracle Prodigy on Facebook (https://www.facebook.com/theOracleProdigy/) and Twitter (https://twitter.com/D_OracleProdigy)

Idea: Ability to Generate Dunning Letters in Draft without Sending it as an Email Attachment

I recently submitted an Idea to Oracle's Cloud Customer Connect regarding the ability to Generate Dunning Letters in Draft without sending it as an Email Attachment. Below are the details:

In most cases, most Organizations would want to customize their Dunning Letters Templates to reflect their Organization branding and modify the words used. During the development process, developers would want to test out the look of the customized Dunning Letter Templates and thus, would need to run The "Send Dunning Letter" scheduled process in "Draft Mode". The Dunning Letter Program has two parameters that is responsible for running Dunning Letters in Draft:
  1. Draft Mode - indicates if the Dunning Letters are run in Final or Draft Mode (Required. Allowed values are Yes and No).
  1. Email Address - Indicates the specified email address would receive the generated Draft Dunning Letters (optional).
The problem with this program is that when Dunning Letters is run in "Draft Mode" without an email address, Dunning Letters would generated and sent out to actual Customer Site Contacts. This defeats the purpose of having a "Draft Mode".
The expectation of running the report in Draft Mode would be:
  1. If the email address parameter was supplied, the process would send all Dunning Letters to the specified email address.
  1. If the email address parameter was NOT supplied, the generated dunning letters can be downloaded them from the application.

The "Draft Mode" of Generate Dunning Letters is not the expected feature of a "Draft" Report. As documented in Doc ID 2257139.1 (What Does Draft Mode Accomplish For Report Send Dunning Letters), Dunning Letters would still be generated and sent out to Customer Site Contacts even if it was set to "Draft Mode" if the Email Address parameter was left blank. This takes away the real "Draft Mode" function of Dunning Letters, since "Draft Mode" implies that it's used to verify if the template generated is correct.

This Idea comes from a actual scenario that has happened recently during the development process. During the development of a customized Dunning report from the Test environment, Dunning Letters were sent out to over 400 Business contacts because the email address parameter was left blank.

Check out and vote for this Idea Here: Ability to Generate Dunning Letters in Draft without Sending it as an Email Attachment.

For more full-detailed Tutorials and Tips, check out #TheOracleProdigy at https://lifeofanoracleprodigy.blogspot.com/
Follow The Oracle Prodigy on Facebook (https://www.facebook.com/theOracleProdigy/) and Twitter (https://twitter.com/D_OracleProdigy)

Updating Customer Site Profile Classes using SOAP Web Services in Oracle Fusion Applications

First off, there are two ways to upload/update Customer Site Profiles in Oracle Fusion Applications:
  1. Using File-Based Data Import (FBDI)
  2. Using Web Services such as SOAP and REST. 
However, I would recommend using Web Services instead of FBDI because it's more straight-forward and simpler than FBDI. More details can be found in a separate article: When to Use FBDI or WebServices in Oracle Fusion Applications.

This article will talk about how to upload/update Customer Site Profile Classes in Oracle Fusion Applications using SOAP web services and in the future, I will also discuss how to do this using FBDI.

Before we begin, let's first discuss what a Customer Profile Class is. Customer profile Class is a master data setup object that holds attributes that are important to the interaction between the organization and customers in terms of their selling relationship. It holds details such as the Customer's creditworthiness, credit tolerance, credit limit, its default payment terms, statement configurations, and its assigned collector.  A Customer Profile class is also used drive how the system will match receipts together with their invoices and defines how invoices are grouped together. For more in-depth information, check out a separate article: Defining a Customer Profile Class in Oracle Fusion Applications.

Below are some prerequisites before you can actually upload/update Customer Site Profiles using SOAP Web Services:
  1. Download a copy of ReadyAPI, a software that will drive the updates to Customer Site Profiles
  2. Prepare an "Extraction Report" that will generate the spreadsheet with the required Customer Data.
Since the first prerequisite is pretty straight forward, we'll move on to discuss the second prerequisite: Preparing the "Extraction Report". The script will be run from Business Intelligence Publisher (BIP), a reporting tool that we'll utilize to generate the actual data that will be fed to the Web Service.

To create the extraction report, you would have to create the following in order:
  1. A custom Data Model that contains the SQL Script
  2. A custom Report with CSV as the Output
  3. A custom "dummy" Excel Template
Check out this article for an idea on how to create a custom Data Model (Customize the Data Models of seeded Oracle Fusion Applications reports). In the future, i'll create a step-by-step guide on how to create a custom data model, report and dummy excel template.

The SQL Script to be used in the Data Model is as follows:


 1
 2
 3
 4
 5
 6
 7
 8
 9
10
11
12
13
14
15
16
17
18
19
20
21
22
23
24
25
26
27
28
29
30
31
32
33
34
35
36
37
38
39
40
41
42
43
44
45
46
47
48
49
50
51
52
53
54
55
56
57
58
59
60
61
62
63
64
65
66
67
68
69
70
71
72
73
74
select  ACCT.ACCOUNT_NUMBER
 , hps.party_site_number
 , ACCT.CUST_ACCOUNT_ID
 --, 'DEFAULT' SET_CODE
 , STID.SET_CODE
 , custprof.CLEARING_DAYS
 , custprof.CREDIT_BALANCE_STATEMENTS
 , custprof.CREDIT_CHECKING
 , custprof.CREDIT_HOLD
 , custprof.PROFILE_CLASS_ID
 , decode(custprof.DISCOUNT_TERMS, 'N', NULL, custprof.DISCOUNT_GRACE_DAYS) DISCOUNT_GRACE_DAYS
 , custprof.DISCOUNT_TERMS
 , 'Y' DUNNING_LETTERS
 , custprof.EFFECTIVE_START_DATE
 , custprof.EFFECTIVE_END_DATE
 , custprof.LAST_CREDIT_REVIEW_DATE
 , custprof.NEXT_CREDIT_REVIEW_DATE
 , custprof.OVERRIDE_TERMS
 , HP.PARTY_ID
 , custprof.PERCENT_COLLECTABLE
 , custprof.SEND_STATEMENTS
 , custprof.TOLERANCE
 , coll.NAME CollectorName
 , custprof.EXCHANGE_RATE_TYPE
 , RTM.name  PaymentTerms
 , custprof.AUTOCASH_HIERARCHY_ID
 , null ApplicationExceptionRuleSet
 , aar.Name AutoMatchRuleSet
 , custprof.AUTOCASH_HIERARCHY_ID_FOR_ADR
 , cyc.NAME StatementCycle
 , grp.name GroupingRule
 , custprof.CREDIT_CLASSIFICATION
 , custprof.ACCOUNT_STATUS
 , custprof.RISK_CODE
 , custprof.CREDIT_RATING
 , custprof.CONS_BILL_LEVEL
 , custprof.CONS_INV_TYPE
 , custprof.LOCKBOX_MATCHING_OPTION
 , replace(custprof.PREF_CONTACT_METHOD, 'EMAIL', 'E-Mail') PREF_CONTACT_METHOD
 , replace(custprof.TXN_DELIVERY_METHOD, 'EMAIL', 'E-Mail') TXN_DELIVERY_METHOD
 , custprof.PRINTING_OPTION_CODE
 , custprof.MATCH_BY_AUTOUPDATE_FLAG
 , custprof.AUTO_REC_INCL_DISPUTED_FLAG
 , custprof.CONS_INV_FLAG
 , NULL CREDIT_REVIEW_CYCLE
 , custprof.CREDIT_ANALYST_ID
 , custprof.CREDIT_LIMIT
 , custprof.CREDIT_CURRENCY_CODE
 , replace(custprof.STMT_DELIVERY_METHOD, 'EMAIL', 'E-Mail') STMT_DELIVERY_METHOD
 , custprof.ORDER_AMOUNT_LIMIT
from  HZ_PARTIES      hp
JOIN  HZ_PARTY_SITES     hps   on HPS.PARTY_ID     = HP.PARTY_ID
JOIN  HZ_CUST_ACCOUNTS   ACCT  on ACCT.PARTY_ID     = HP.PARTY_ID
JOIN  HZ_CUST_ACCT_SITES_ALL  ACTS  ON (ACTS.CUST_ACCOUNT_ID    = ACCT.CUST_ACCOUNT_ID
           AND  HPS.party_site_id     = ACTS.party_site_id)
JOIN  HZ_CUSTOMER_PROFILES_F   custprof ON (hp.party_id             = custprof.party_id
           AND  ACCT.CUST_ACCOUNT_ID    = custprof.CUST_ACCOUNT_ID)
join  HZ_CUST_SITE_USES_ALL  usg   ON (usg.SITE_USE_ID          = custprof.SITE_USE_ID
           and usg.CUST_ACCT_SITE_ID    = ACTS.CUST_ACCT_SITE_ID)
JOIN  HZ_CUST_PROFILE_CLASSES  class  ON (custprof.PROFILE_CLASS_ID = class.PROFILE_CLASS_ID)
JOIN  FND_SETID_SETS    STId  ON (STID.SET_ID       = ACTS.SET_ID)
join  AR_COLLECTORS    coll  on (coll.collector_id     = custprof.COLLECTOR_ID)
join  AR_STATEMENT_CYCLES   cyc   on (cyc.statement_cycle_id   = custprof.STATEMENT_CYCLE_ID)
join  RA_GROUPING_RULES   grp   on (custprof.GROUPING_RULE_ID = grp.GROUPING_RULE_ID)
JOIN  RA_TERMS      RTM   ON  (custprof.STANDARD_TERMS = rtm.TERM_ID)
left JOIN AR_AUTOMATCH_RULES  aar   on (custprof.AUTOMATCH_RULE_ID = aar.AUTOMATCH_RULE_ID)
where custprof.status      = 'A'
and  class.status       = 'A'
AND  ACTS.STATUS       = 'A'
and  hp.party_type       = 'ORGANIZATION'
AND  hp.status           = 'A'
and  custprof.site_use_id is not null
and  sysdate between custprof.EFFECTIVE_START_DATE and custprof.EFFECTIVE_END_DATE
and  class.NAME = 'DEFAULT'

This is the script I used to capture all the required information for the WebService Payload that will  update the Customer Site Profile Classes. Feel free to change it according to your Organization's requirements.

Next, open up ReadyAPI and create a new SOAP project and provide the Web Services Description/Definition Language (WSDL) for your Instance. Next, load the Spreadsheet generated from the Report and assign it as a Data Source for the XML Payload below:


 1
 2
 3
 4
 5
 6
 7
 8
 9
10
11
12
13
14
15
16
17
18
19
20
21
22
23
24
25
26
27
28
29
30
31
32
33
34
35
36
37
38
39
40
41
42
43
44
45
46
47
48
49
50
51
52
53
54
55
56
57
58
<soapenv:Envelope xmlns:soapenv="http://schemas.xmlsoap.org/soap/envelope/" xmlns:typ="http://xmlns.oracle.com/apps/financials/receivables/customers/customerProfileService/types/" xmlns:cus="http://xmlns.oracle.com/apps/financials/receivables/customers/customerProfileService/" xmlns:cus1="http://xmlns.oracle.com/apps/financials/receivables/customerSetup/customerProfiles/model/flex/CustomerProfileDff/" xmlns:cus2="http://xmlns.oracle.com/apps/financials/receivables/customerSetup/customerProfiles/model/flex/CustomerProfileGdf/">
   <soapenv:Header/>
   <soapenv:Body>
      <typ:updateCustomerProfileAsync>
         <typ:customerProfile>
            <cus:AccountNumber>${DataSource#AccountNumber}</cus:AccountNumber>
            <cus:SiteNumber>${DataSource#SiteNumber}</cus:SiteNumber>
            <cus:CustomerAccountId>${DataSource#CustomerAccountId}</cus:CustomerAccountId>
            <cus:ProfileClassName>${DataSource#ProfileClassName}</cus:ProfileClassName>
            <cus:ClearingDays/>
            <cus:CreditBalanceStatements>${DataSource#CreditBalanceStatements}</cus:CreditBalanceStatements>
            <cus:CreditChecking>${DataSource#CreditChecking}</cus:CreditChecking>
            <cus:CreditHold>${DataSource#CreditHold}</cus:CreditHold>
            <cus:CustomerAccountProfileId>${DataSource#CustomerAccountProfileId}</cus:CustomerAccountProfileId>
            <cus:DiscountGraceDays/>
            <cus:DiscountTerms>${DataSource#DiscountTerms}</cus:DiscountTerms>
            <cus:DunningLetters>${DataSource#DunningLetters}</cus:DunningLetters>
            <cus:EffectiveEndDate>${DataSource#EffectiveEndDate}</cus:EffectiveEndDate>
            <cus:EffectiveStartDate>${DataSource#EffectiveStartDate}</cus:EffectiveStartDate>
            <cus:LastCreditReviewDate/>
            <cus:NextCreditReviewDate/>
            <cus:OverrideTerms>${DataSource#OverrideTerms}</cus:OverrideTerms>
            <cus:PartyId>${DataSource#PartyId}</cus:PartyId>
            <cus:PercentCollectable/>
            <cus:SendStatements>${DataSource#SendStatements}</cus:SendStatements>
            <cus:Tolerance>${DataSource#Tolerance}</cus:Tolerance>
            <cus:CollectorName>${DataSource#CollectorName}</cus:CollectorName>
            <cus:ConversionRateType/>
            <cus:PaymentTerms>${DataSource#PaymentTerms}</cus:PaymentTerms>
            <cus:AutoCashRuleSet/>
            <cus:ApplicationExceptionRuleSet/>
            <cus:AutoMatchRuleSet/>
            <cus:ReminderRuleSet/>
            <cus:StatementCycle>${DataSource#StatementCycle}</cus:StatementCycle>
            <cus:GroupingRule>${DataSource#GroupingRule}</cus:GroupingRule>
            <cus:CreditClassificationValue/>
            <cus:AccountStatusValue/>
            <cus:RiskCodeValue/>
            <cus:CreditRatingValue/>
            <cus:BillLevel/>
            <cus:BillType/>
            <cus:MatchReceiptsBy/>
            <cus:PreferredContactMethod>${DataSource#PreferredContactMethod}</cus:PreferredContactMethod>
            <cus:PreferredDeliveryMethod>${DataSource#PreferredDeliveryMethod}</cus:PreferredDeliveryMethod>
            <cus:GenerateBill/>
            <cus:MatchByAutoupdate/>
            <cus:AutoReceiptsIncludeDisputedItems>${DataSource#AutoReceiptsIncludeDisputedItems}</cus:AutoReceiptsIncludeDisputedItems>
            <cus:ConsolidatedInvoice>${DataSource#ConsolidatedInvoice}</cus:ConsolidatedInvoice>
            <cus:CreditReviewCycleName/>
            <cus:CreditAnalystName/>
            <cus:CreditLimit/>
            <cus:CreditCurrencyCode/>
            <cus:StatementDeliveryMethod>${DataSource#StatementDeliveryMethod}</cus:StatementDeliveryMethod>
            <cus:OrderAmountLimit/>
         </typ:customerProfile>
      </typ:updateCustomerProfileAsync>
   </soapenv:Body>
</soapenv:Envelope>

Provide the Username and Password of the Application User you intend to use to update the Classes. Test out a few customers first one-by-one before doing a full bulk load to ensure you get the correct output.

For more full-detailed Tutorials and Tips, check out #TheOracleProdigy at https://lifeofanoracleprodigy.blogspot.com/
Follow The Oracle Prodigy on Facebook (https://www.facebook.com/theOracleProdigy/) and Twitter (https://twitter.com/D_OracleProdigy)

When to Use FBDI or WebServices in Oracle Fusion Applications

I've been working through a really tough task recently and it involves updating Customer Data, more specifically to Contact Responsibility and Customer Class Profiles. I've had a lot of "mistakes"/shortcomings working on this task and I'd like to share this with you, so you can hopefully avoid it in the future.

This articles discusses when to Use FBDI or WebServices in Oracle Fusion Applications:

File-Based Data Import (FBDI)
  • FBDI is faster because it's executed from inside the Oracle Cloud Server and can do Bulk Updates/Inserts.
  • Troublesome to populate numerous Fields and Worksheets in the Spreadsheet.
  • CSVs can really ruin your number and date formatting.
  • Need to Extensive Effort to make sure Data Preparation is Accurate.
  • Use FBDI when updating data in BULK (thousands of rows)
  • DO NOT, use FBDI when updating data for Manually-Created Customers, because they do not have Original System References. This is an important field in the Customer FBDI template for some reason. This is the main point of my suffering for the past 2 months. :P
WebServices (SOAP or REST)

Specifically, I've only had experience with SOAP and i'm admittedly still not that good at it. But below are some tips that I can share based on what I've experienced so far and what I've researched on.

  • Strongly consider using Web Services for Integrations between Oracle Fusion Applications and other platforms since Oracle Fusion already has the pre-built ERP Integration Service that can be used to perform outbound or inbound ETL.
  • Consider using Web Services when you have small amounts of data to Update as WebServices aren't designed for Bulk Updates.
  • Web Services are a row-by-row update and are triggered from either your PC (using a Software such as SOAPUI or ReadyAPI) or from a separate Server from Oracle Cloud.
  • This means you would need constant network connection to process all the data, especially if you'll invoke the Web Services from your own machine.
  • Since Web Services are row-by-row, it's understandably slower than FBDI.
  • Would entail less data preparation compared to FBDI as you would only need to provide the mandatory tags, unlike in FBDI wherein you have to populate multiple worksheets.
In summary, I used to think FBDI was the way to go when doing Bulk Updates in Oracle ERP Cloud, but now, I think it's really troublesome and entails a lot of unnecessary work. I would strongly recommend that you first verify the data you'll be updating/inserting/deleting, before pursuing FBDI.

For more full-detailed Tutorials and Tips, check out #TheOracleProdigy at https://lifeofanoracleprodigy.blogspot.com/
Follow The Oracle Prodigy on Facebook (https://www.facebook.com/theOracleProdigy/) and Twitter (https://twitter.com/D_OracleProdigy)

"Could not find main class" error when previewing BI Publisher for Word

I recently encountered an issue regarding the BI Publisher Desktop MS Word Plugin. I had the issue  "Could not find main class" when previewing a Word Template like below:


I was able to resolve this issue by doing the steps below.
  1. Click on the BI Publisher Plugin Tab and click on Options:

  1. In the Option Window, select the "Preview" tab and check if the Java Home field is blank. This is most likely the cause of your issue.  
  1. Click on Browse and locate the appropriate Java directory from your Machine.

  1. Once you've selected the correct directory of your Java version, you may now load XML files and preview the template properly.


For more full-detailed Tutorials and Tips, check out #TheOracleProdigy at https://lifeofanoracleprodigy.blogspot.com/
Follow The Oracle Prodigy on Facebook (https://www.facebook.com/theOracleProdigy/) and Twitter (https://twitter.com/D_OracleProdigy)

Overview of Configuring Accounting Rules in Oracle Fusion Accounting Hub Cloud

In this topic, we shall be talking about Configuring Accounting Rules.

From the previous articles, we have understood how to get a data model by using the transaction object concept, and how to get the event model as part of the source system registration process. The next model that we need to think about is the accounting model. Here, we will talk about the concept of configuring the accounting rules. 

An accounting method contains different components, and under one accounting method, you will have journal entry rule sets. Each journal entry rule set will be carrying journal line rules, account rules, description rules, and supporting references. And each one of these individual components may utilize conditions, custom formulas, and mapping sets.


Each Subledger application will have a unique Journal Entry Rule Set that groups all the rules together for creating journals. Journal entry rule set like a grouping component which groups all the other definitions that you might have defined under a subledger application.

The Journal Line Rules defines the debit and credit side of the journal entry. The journal line rules are also assigned to the journal entry rule set. There are multiple active rules that are governed by the journal line rules, such as identifying which line is a debit line, which line is a credit line for a particular transaction type. 

And then we also have Account Rules which drives the GL account or segment for each debit and credit line of a journal. You may have multiple Journal Line Rules attached to the Journal Entry Rule Set and against each of those journal line rules, you will have to attach an accounting rule so that the system knows which account rule is applicable to enter the values for the respective segments. 

Then accounting methods may also use some optional components such as Description Rules and Supporting References.

Description rules can be defined to dynamically extract the description for a particular subledger journal entry. This rule enables you to combine source system values and constant values to use as a description for the Journal entry. 

For example, I want the loan officer name and Date of the Loan Origination in the description of the journal entry. I would need to define those as a source and concatenate them together with constant values and group them into a description rule. Using that description rule, whenever a journal entry is generated, the system will generate a dynamic description either at the header level or at the line level.

Another component that you can have is the Supporting Reference. These are basically used to store additional source information about transactions. They are also useful for reconciling the accounting with your source systems. They are also capable of storing the balances for a segment that might not be part of your chart of accounts.

For example, I want to identify the total loan that has been disbursed by a particular loan officer. So I can define loan officer as a supporting reference. Whenever a journal is posted, the system will keep on accumulating the amount by each of the loan officers. Then you can inquire on the balances using that supporting reference. When you click on the supporting reference name or when you search by the supporting reference, it will give you the consolidated amount, at the loan officer supporting reference level. Using supporting references, you can also drill down journal entries by each of the loan officers to see the amount that has been posted into their respective accounts.

Then we have another optional set-up called Mapping Sets. Mapping sets will have a direct relationship with account rules, and helps you map your source system journal entry rules to your Oracle chart of accounts. 

*** To be continued! ***


For more full-detailed Tutorials and Tips, check out #TheOracleProdigy at https://lifeofanoracleprodigy.blogspot.com/
Follow The Oracle Prodigy on Facebook (https://www.facebook.com/theOracleProdigy/) and Twitter (https://twitter.com/D_OracleProdigy)

Overview of Transaction Objects in Fusion Accounting Hub Cloud

This article provides an Overview of Transaction Objects in Fusion Accounting Hub Cloud.

Once you have populated the setup data in the spreadsheet template and successfully uploaded it into Oracle Fusion, the system will automatically generate a transaction object. A transaction object holds the transactional information that is used when creating a journal entry rule for accounting purposes. 

Automatically, the system will create one header level object and one line level transaction object. Those transaction objects have been utilized to generate the sources. Then the sources are also automatically generated based on the transaction objects and are assigned to the corresponding accounting event classes. These sources will always be used as a value when you design your accounting rules.

What is stored at the header transaction object level? Header transaction objects are used to store one row with header source values for each transaction that comes from the source system. This header object will always get populated with the transaction information that is coming from the source system. So for every transaction that comes from the source system, we need one header level record.

Each transaction is identified by its unique transaction number. And each transaction is also automatically assigned with an event as well. The transaction details whose values do not vary by transaction line or distribution should normally be stored in the header transaction objects only. So if you do not have line level details for bifurcating that value that you're capturing at the other level, so only header level information is enough to create the accounting entry.

What is stored at the line transaction object level? If you have a requirement where one header may have multiple lines, then apart from populating the data into the header level object, we need to populate the data into the line level objects also. So line transaction objects will store the details of transactions that vary based on transaction attributes. 

For example, a mortgage transaction for loan origination may have multiple amounts, each related to different components of the loan, such as a loan origination amount, closing cost amount, and escrow amount, and you want to charge them to separate accounts. So each of these amounts could be captured as separate lines, along with an indication of the amount type. One row per distribution is linked to the associated transaction by transaction number. So at the header level, you will have the transaction number. And same transaction number will be referenced at the line level also. Because against that header, we want to have three different lines.

Each row is also automatically assigned with a line number. Because for the line level transaction object, line number is a required field. Transaction details whose values will vary by transaction line or distribution are normally stored in the transaction object column, for example, the loan number for a loan payment.

If there is no breakdown for the amount, it's OK to capture that at the header level itself. Otherwise, then you must populate the values at the line level transaction object as well.

Sources

Each and every column that is part of your transaction object will be converted into a source. So you must assign an update value, certain look-up type assignments whenever appropriate sources can have lookup types or value sets assigned to them.

Assigning a value set or lookup type enables you to pre-define valid values for the sources that is used to create accounting rules. So basically, when the transaction object has been registered, you can look into the sources that system has generated against that transaction object. And against each of these columns that are part of the transaction object, you can associate them to a lookup code also so that whenever that will be used as a source while designing the accounting rules, you can pull the values from those lookup codes.

Accounting Attribute

Accounting attribute is a piece of journal entry. The mapping of the sources to accounting attribute specifies how the Create Accounting process will get its values for each of the piece within the journal entry. For example, the Entered Currency attribute is used to map the source values to the Entered Currency field for the subledger journal entry lines.

You have also got an option to add and update the source assignments to accounting attributes as per your requirement.

For more full-detailed Tutorials and Tips, check out #TheOracleProdigy at https://lifeofanoracleprodigy.blogspot.com/
Follow The Oracle Prodigy on Facebook (https://www.facebook.com/theOracleProdigy/) and Twitter (https://twitter.com/D_OracleProdigy)